DIY figures of a stork in a nest. How to make a stork with your own hands for the garden: a master class on making a garden figure
A beautiful well-kept garden is always pleasing to the eye. Help make it more comfortable garden sculptures, which can be made independently, for example or. One of the most popular is the stork. In this article we will look at what a stork can be made from.
How to make a stork with your own hands from plastic bottles?
To work, you need to cut a template from a sheet of plywood. This is the body of a bird and wings on the sides. Also prepare opaque plastic bottles in white and black, screws and red electrical tape.
- We fasten the templates together using self-tapping screws.
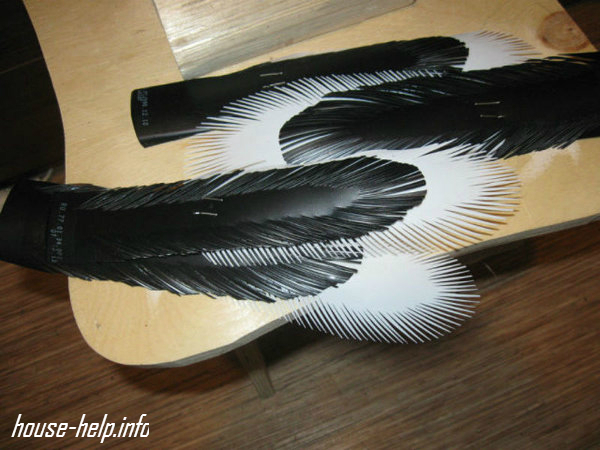
- For feathers we use plastic milk bottles. We cut them into strips of the same width and make a fringe along the edges.
- Next, use a glue gun to attach the feathers to the bird’s body.
- For the tail and lower body we use black shampoo bottles.
- We wrap the beak with red electrical tape.
- Legs can be made from wire. And buy toy eyes at a craft store.
- A do-it-yourself stork for the garden is ready!
 |
 |
 |
 |
 |
 |
We make a stork from polyurethane foam with our own hands

Now let's look at another option, how you can make a stork with your own hands. In this case, we use a five-liter container, foam tape and polyurethane foam.
- Using tape, we attach the body parts to a plastic container. The neck consists of wire covered with foam pieces.
- For the hips we also use pieces of foam.
- To make the beak, a large nail will do.
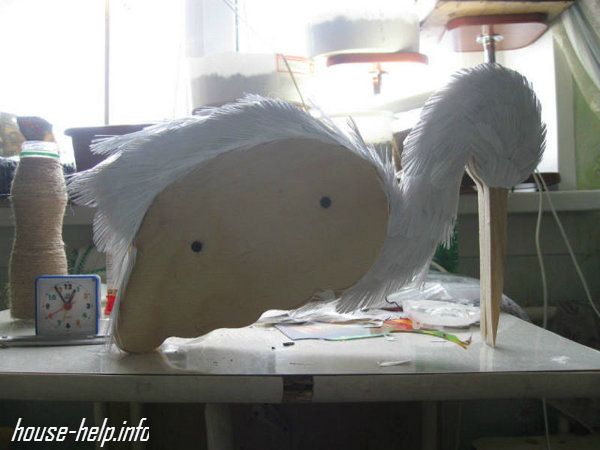
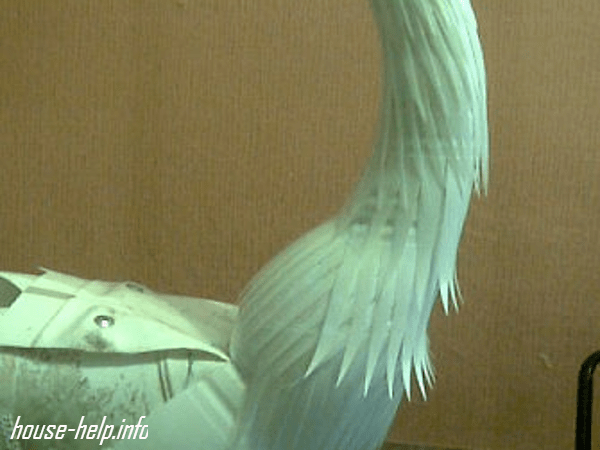
- This is what the workpiece looks like at this stage.
- The author of the lesson suggests making the legs from used electrodes. You can choose similar materials: it can be metal rods or thick wire with several turns.
- Before moving on to the next manufacturing stage, check the reliability of the support.
- Next, we simply apply mounting foam on top of the layout.
- Trim off the excess.
- We paint the finished sculpture with acrylic paints.
- We modify the nose from a piece of wood and attach it to a nail.
- To make the stork look like a real one, we insert real feathers into the tail and wings.
- This is such a wonderful stork.
 |
 |
 |
 |
 |
 |
 |
 |
 |
 |
 |
 |
Making a stork with your own hands from a canister

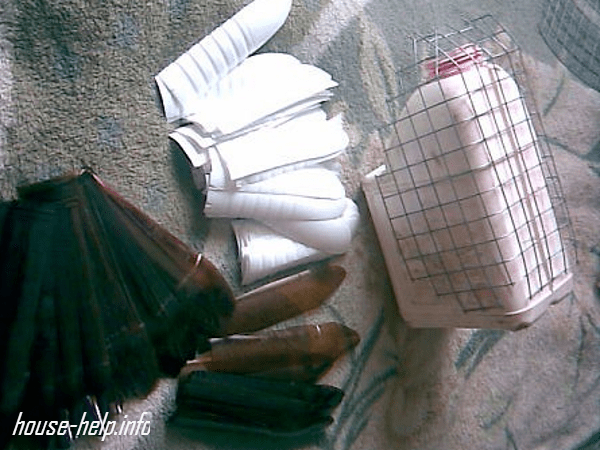
For work you will need the following materials:
- five-liter canister;
- durable thick wire and plastic tubes;
- net;
- Styrofoam;
- white and dark plastic bottles;
- corrugation.
Now let's look at all the manufacturing stages step by step.
- We cut out blanks from sheet foam.
- Next, use a knife to give them the outline of the head.
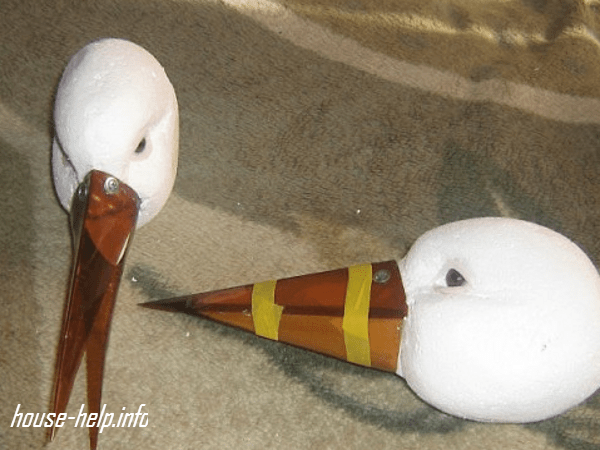
- We give the beak a flatter shape and cut out the eye sockets.
- Using sanding paper we make the surface smooth. We insert toy eyes into the eye sockets.
- We cut out a beak from a plastic bottle and attach it with Titan glue.
- We make the body for the stork with our own hands from a plastic canister.
- We cut off the handle.
- We cut a piece out of the mesh so that we can wrap it around the canister.
- We round the mesh a little so that it looks more like wings.
- We bend a thick rod and make legs.
- We cut feathers from white bottles.
- Now you can start assembling all the components together.
- We start work from the tail.
- To make a neck, we put a corrugated hose from a vacuum cleaner or a similar part onto the wire.
- We attach all the feathers with self-tapping screws.
- Since the stork has folded wings, it is enough to attach the feathers to the belly and a little on the sides.
- We cut the white bottles in half and make cuts in the form of a fringe. We attach them to the neck with tape.
- We start making the wings from the edge of the mesh.
- Cover the next row by one third.
- Starting from the third row, we use white plastic.
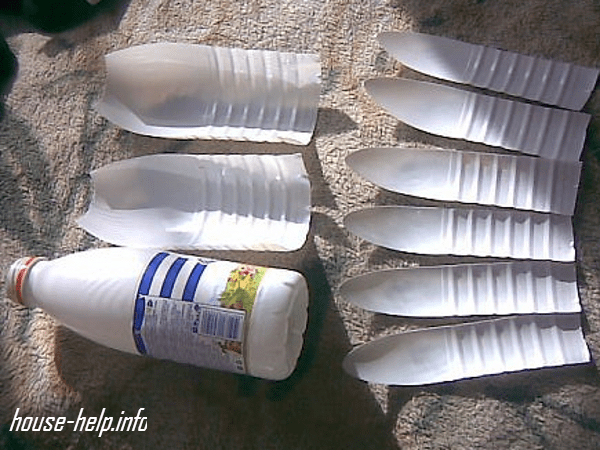
- To make the paws, we cut out blanks from half-liter bottles.
- Finally, paint the bird’s beak and legs red.
- A do-it-yourself stork for the garden is ready.
 |
 |
 |
 |
 |
 |
 |
A well-groomed and attractive garden will always please the eye. To make your garden more cozy, you can decorate it with various hand-made ones. Today we will talk about how to make a stork for the garden and what materials can be used for this.
Let's start with the simplest thing - PET bottles.
Option #1. Making a stork from plastic bottles
Before you start working, you need to take a small sheet of plywood and make templates from it. Templates need to be made in the form of the body and wings of a bird, as shown in the image. You will also need opaque plastic bottles (preferably white or black), red electrical tape and self-tapping screws. The procedure is as follows.

Step 1. First, you need to connect the previously made templates with each other using self-tapping screws. Plastic milk bottles will be used as feathers. The bottles should be cut into strips of equal width, and then a fringe should be made on the edges of each of them.
Step 2. Next, the finished feathers must be secured to the stork’s “body” using a glue gun. It is typical that black PET bottles will be used for the lower body and tail (usually shampoo containers are used for this).
Step 3. The beak should be wrapped with red insulating tape.
Step 4. To make the legs, ordinary wire is used. Eyes for the bird can be purchased at any craft store. That's it, the stork is ready with your own hands!


Option #2. Making a stork from polyurethane foam
Now let's talk about another option for making a stork for the garden with your own hands. Now you need to first prepare a 5-liter plastic container, polyurethane foam, polystyrene foam and tape. The algorithm of actions should be as follows.

Step 1. First, the body parts are attached to the bottle using a container. For the neck, ordinary wire is used, lined with pieces of foam. The thighs need to be made in a similar way (using foam and wire). An ordinary large-diameter nail is quite suitable as a key.
Step 2. The workpiece will look at the preliminary stage as shown in the image below.
Step 3. For the bird's legs (at least in this implementation) used electrodes are used. In the absence of electrodes, you can select a similar material - for example, thick wire twisted into several turns, or metal rods from thin reinforcement.
Step 4. So, all parts of the stork’s “body” have been assembled, but before proceeding to the next step, you need to carefully check the strength and reliability of the fasteners.
Step 5. After this, the entire layout must be covered with polyurethane foam.
Step 6. All excess is carefully trimmed off.
Step 7 Now the sculpture is almost ready. If the polyurethane foam has already completely dried, then the bird needs to be painted acrylic paint.
Step 9 Natural feathers are inserted into the wings and tail to make the stork look as realistic as possible. Look how wonderful garden stork you will succeed (if you do everything right, of course).


Option #3. Making a stork for the garden from a canister
Before you begin, make sure you have the following: Supplies:
· five liter canisters;
plastic bottles (black and white);
· plastic tubes;
· thick wire;
· foam plastic;
After this, you need to perform the following sequence of actions.
Step 1. Cut out the foam blanks and use a knife to shape the head. Cut out the eye sockets and make the beak flatter.
Step 2. Use sandpaper to make the surface as smooth as possible. Place toy eyes in the eye sockets (we’ve already talked about where you can get them).
Step 3. Cut a beak from a plastic bottle and secure it with glue.
Step 4. Make a bird's body from a plastic canister and cut off the handle.
Step 5. Cut a piece of mesh large enough to wrap around the canister. Round the mesh a little so that it looks more like wings.
Step 6. A thick metal rod must be bent and legs made from it.
Step 7 Feathers for the stork are cut from white bottles.
Step 8 After this, you can proceed directly to assembling all the elements. Work should start from the “tail”.
Step 9 For the “neck”, a corrugation (for example, from a vacuum cleaner) or something similar is put on the wire. The feathers are attached using self-tapping screws. Due to the fact that our bird’s wings are folded, feathers can only be attached to the belly and slightly on the sides.
Step 10 White bottles are cut in half, and a fringe is formed at the cut sites. The bottles are attached to the “neck” using tape.
Step 11“Wings” must be made from one edge of the prepared mesh. It is important that the second row covers the first by 1/3. On the third row, white plastic is used.
Step 12 For the “legs” of the stork, appropriate blanks are cut out of 0.5-liter bottles.


Step 13 All that remains is to paint the bird’s “beak” and “legs” red. That's it, your DIY garden stork is ready!

For a more detailed introduction to this manufacturing method, we recommend watching the thematic video material.
Video – DIY stork
Bright garden crafts from plastic bottles - simple and affordable way decorate your favorite area. Original sculpture of a stork from durable material will update the familiar landscape and create a joyful mood. A hand-made bird figure will make the garden unique and become a family symbol of goodness and happiness.
How to make a stork from plastic containers
To make such a craft, you need to stock up free time and get creative.
My patio is decorated with a stork figure, the basis of which is a plastic 5-liter bottle, covered with polyurethane foam and painted with acrylic facade dyes.
This wonderful stork comes out of a plastic bottle and polyurethane foam
What materials and tools will be needed
By creating your own bird design, you can assemble it entirely from plastic containers, fastening them with glue or staples. Or you can make the sculpture more expressive by adding plastic construction wood parts.
The frame of this bird is made of wood, covered with plumage made from plastic bottles.
Or make individual elements from foam plastic.
You can create such an exotic collection using ordinary plastic bottles and a piece of polystyrene foam.
For our impressive size craft you will need:
- A 5-liter plastic canister is the base of the body.
A 5 liter canister forms the base of the body
- Milk plastic bottles of 1 liter and 1.5 liters, from which white plumage is cut out. You can get by with transparent containers, but first paint them with white paint for exterior use.
- Dark plastic bottles of different capacities: 3 half-liter bottles will be needed for making legs and beak, one and a half liter bottles - for dark feathers.
Dark plastic containers will be needed for feathers, legs and beak
- Polystyrene foam 10 cm thick, from which a stork’s head with a beak is cut out.
A bird's head is made from a piece of foam plastic
- Sandpaper.
- Scissors.
- Corrugated tube for the neck.
A long bird's neck is made from a corrugated tube
- Metal mesh as a base for the wings.
- Furniture stapler.
- Metal rod 6–10 mm thick for paws.
- Thin wire for fixing the wings.
Using wire, the wings are firmly attached to the body model
- Self-tapping screws.
- Glue gun or universal glue.
Universal glue quickly glues plastic and other materials
- Acrylic facade paints, brushes.
Stages of making a stork
Having purchased tools and materials, first prepare all the parts of the bird, then assemble it.
Head
A head with a beak is cut out of polystyrene foam with a sharp knife.
A bird's head is cut out of a piece of foam plastic
Then the rough surface is sanded with sandpaper. You can coat the workpiece with white facade paint.
The workpiece is sanded with sandpaper to make the surface smooth
To strengthen the beak, use 2 triangular plates, which are made from a dark 0.5 liter bottle. Having cut off the neck and bottom, cut the resulting cylinder lengthwise and cut out triangles. The plates are bent in half and attached to the beak with self-tapping screws.
The beak is decorated with plastic, fastening it with self-tapping screws
Paws
They are made from the top of brown 0.5 liter bottles. Containers with the bottom cut off are cut lengthwise into 4 parts up to the necks, pointed at the ends and bent outward.
Paws with toes are cut out of dark bottles
Plumage
The most labor-intensive and time-consuming stage preparatory work- feather blanks. You will need a large number of them, different lengths, shapes and colors: for the design of the wings and tail - long, dark and white, for the body - light, smaller ones.
Light and dark feathers are used for crafts.
The neck and bottom of the bottle are cut off, the remaining middle part is cut lengthwise and strips are cut out of the resulting rectangle. One edge of the strip is made rounded. 6 large feathers are made from a liter bottle.
A white bottle with a volume of 1 liter is divided into 6 parts
To feather the neck, small feathers are cut out and the ends are decorated in the form of teeth or fringes. You can decorate the long neck with large plates of milk bottle halves, which are finely chopped along the edges.
Figure frame
The body is made from a canister with a cut off handle.
A canister with a cut off handle is the body of our bird
As the base of the wings, a fine-mesh metal mesh is used, which is secured to the canister with wire or staples. The mesh is cut at the edges in the shape of a wing and bent down.
A fine mesh mesh is attached to the canister - the basis of the wings
A wire is inserted into the neck of the canister and bent, forming the frame of a long neck. Attach the wire to the metal rod of the legs and put a corrugated tube or hose from a vacuum cleaner on it.
Strengthen the wire for the neck and put a hose on it
A hole is made in the lower part of the container and a bent rod is threaded through it - these will be the legs.
The legs are made from wire by bending it and threading it through the hole at the bottom of the canister.
Or they pierce the canister from the bottom and insert curved rods, onto the ends of which they put the legs upside down.
Assembly of parts
After preparing all the parts, the structure is assembled.
- The head is placed on a wire and additionally attached to the corrugated pipe with glue.
- The body is covered with plumage starting from the bottom. Light feathers are secured to the canister with staples.
They begin to screw feathers from the lower part of the body
- A tail is formed from feathers, arranging them in rows and securing them to the body using a stapler.
- Screw the feathers onto the edge of the mesh wing with wire. To make a stork's plumage with black edging along the edges of the white wings, the first two rows are made of dark-colored feathers.
The wings begin to be decorated with feathers from the edge, using dark-colored blanks
- Subsequent rows are formed from white feathers, overlapping them.
The third and subsequent rows on the wing are made of white feathers
- A row of feathers is screwed at the base of the neck with self-tapping screws.
It's not difficult to make a stork with spreading wings
In this case, the feathers are screwed onto the entire canister, and the mesh base of the wing is covered with feathers on both sides.
On spread wings, feathers are attached on both sides
Decorating a garden sculpture
Using decoration plastic craft can be made brighter, especially if only transparent bottles were used in its manufacture. Acrylic paints for exterior use are suitable for this. First, the plastic container is wiped with an alcohol-based solution and painted over with white or black paint before cutting out the feathers.
Acrylic facade paint moisture resistant and does not fade under the sun
The beak and paws are painted red or wrapped with red tape.
The beak and legs are painted red
Eyes are made from beads, decorative blanks for toys or small buttons that are placed on glue. You can simply paint them with black paint.
Acrylic paints become brighter after varnishing.
Master class on making a stork
There are many options for making a stork from plastic containers using elements made of wood, polyurethane foam, and polystyrene foam.
This original composition of a stork family in a nest is also made of plastic
Even a beginner can make such a garden sculpture, guided by video material from step by step instructions workflow.
Video: how to make a stork from plastic bottles
Storks made from plastic bottles - original decorative decoration personal plot and a subject of universal admiration. After all, they are made from ordinary garbage, transformed with skillful hands into works of art. Made of durable plastic, they are not afraid of rain and snow. Over the years, the figures will not swell, the paint will not fade or peel off.
It is very easy to make a stork from plastic bottles with your own hands; the master class will allow you to complete this product in a short time. In this case, it is necessary to strictly follow all the instructions in order to get a really good result. The product can be placed on a personal plot, which will make it possible to decorate the area.
A master class allows you to make a stork yourself, for which you need to use plastic bottles and other available materials. To make the craft look most realistic, you need to make blanks from plywood. Wings and a body are drawn on them. The prepared templates must be carefully cut out.
For work you will need the following materials:
- plastic bottles;
- insulating tape;
- self-tapping screws
It is better to take opaque (white) and dark bottles, and then arrange them, and only red electrical tape will do.
The previously prepared templates need to be combined. For this you will need self-tapping screws. To make feathers, they use white bottles, in which dairy products are usually sold. They need to be cut so that you get strips of the same width. You need to make a lot of shallow cuts along the edges to get the fringe.
The resulting wings are fixed on the body of the bird. To make the fastening as strong as possible, use glue gun. It must be applied carefully, without leaving traces of glue on the body.

To make the tail and the rest of the body, which will be located below, you need to use dark-colored plastic bottles. For example, beer is sold in such containers.
The beak can be obtained from a blank plastic bottle, since the stork has a red beak; the base is wrapped with red electrical tape. The stork also needs legs. To make them, you can use thick wire. For the eyes, take large beads, which are attached to the head with glue. This completes the DIY stork for the garden. It can be placed near a flower bed or on some kind of stand.
Manufacturing details of the second version
- To make a talisman bird for your garden with your own hands, you should prepare the following materials and tools:
- 2 empty plastic bottles; wooden beams
- : thick and wide (will serve as a base);
- thick aluminum wire (you can use a rod) to make the lower limbs;
- polystyrene foam (thickness 10 cm);
- corrugated hose;
- plastic canister (2 pcs., capacity 5 l);
- metal mesh (under the wings);

stapler
How to make a stork with your own hands? The procedure will take a little time, but the algorithm is simple. A stork will appear on the paths of the plot or in the garden after several hours of doing this.
First you need to start making the head and beak of the bird. These parts are cut out of foam plastic. On the surface you can either paint eyes with black paint or glue 2 black buttons (you can use beads).
The beak itself must be cut from a dark plastic bottle. It will consist of 2 parts and is glued to the head. To make the bird's body, you need to cut off the handle from the canister. Bend the metal mesh tightly around the contour of the canister. Remove excess material. You can perform the lower limbs by bending a rod, the ends of which should be secured in wooden block
You can attach the neck to the stork by attaching wire to the fittings. The next step: put the prepared hose on the wire. Since the feathers on the neck should be small, they are attached with tape. The feathers along the body are fixed on a metal mesh.
Since the bird in the garden will be located in vertical position, her wings will be folded. They must be secured with a stapler. The feathers should be positioned so that the details of each subsequent row overlap 1/3 of the previous row. This will give the craft a natural look and feel.
The master class ends with fastening the individual elements. To give the product maximum attractiveness, you can perform decorative tint on the beak, eyes, and legs. The craft can stand outside throughout the summer and is not afraid of bad weather.
Alternative product
An original do-it-yourself stork for the garden can be supplemented with a baby in the nest. Implementing this option will help make your home happy and bring prosperity and well-being to your home. To make a stork sitting in a nest, patterns from the Tilda bird are used as a basis. This is quite modern and fashionable today homemade toy from fabric matter. The patterns for it are simple.

Individual elements of the craft are cut out of dense and durable fabric. The parts are sewn together with thread. To give the body volume, it needs to be stuffed with any filler, so there is no need to sew the bird completely together right away. The filler can be burlap, sawdust, straw, feathers, unnecessary scraps, etc. After completing the filling stage, the hole is completely sewn up.
The beak is made separately. To create it you will need durable red cardboard. The finished part is attached to an already made head. You can sew clothes. To do this, you need to take measurements from the finished bird. At the final stage, the eyes are glued on, the baby is wrapped in a light cloth and placed next to the mother.
If you install a craft on the branches of trees in the garden, when it rains, you need to remove it from there so that appearance the product has not deteriorated. This bird is also placed on window sills; it will harmonize perfectly with indoor flowers.
Based on the fabric stork, the feathers are obtained from white plastic bottles in which milk or other dairy products are sold. They are fastened together. Eventually the wings come out.

Unusual option
The master class on making a stork, which is based on a large plastic bottle with a volume of 6 liters, is worthy of attention. To make the head, you need to use foam, which will need to be carefully cut out. Don't forget about the shape of the beak and eyes. Black pebbles can act as eyes and are fixed with glue.
The beak can be made from an ordinary plastic bottle. It also sticks to the head. A large plastic bottle will act as the body. You need to cut off the neck of it. Special metal mesh - wings. If the bird's wings are bent, it is necessary to make appropriate bends on the mesh.
The legs are made of wire, which is folded in several layers. Feathers will be from plastic bottles light shade. They are cut so that individual feathers look realistic. Fixation is done using wire to the wings themselves.
To make the neck look voluminous, the bottles need to be finely chopped to create a fringe. They are arranged in rows. Small bottles are placed on the paws, which are also cut at the base. If the fixation of parts seems weak, then the fastening process can be carried out using self-tapping screws.
Making a stork is not a very long and difficult undertaking. To bring your idea to life, you can use the recommendations provided. However, you can make certain adjustments to the idea that will allow you to create a unique and original product.
Have you ever imagined, dear readers, that it could be used as...a material for making art objects. Although it may not be art as such, in its literal sense, it is quite possible to make a decoration for the garden - a small sculpture. In fact, polyurethane foam is unusually plastic, hardens quickly and is easy to process - why not a material for creativity?
Today I will tell you how to make a stork sculpture from polyurethane foam to decorate your garden or summer cottage. You need very few materials, and they are very cheap. If you pay attention to how much garden sculptures cost in construction stores, then you will understand that the price of a pair of foam cylinders is not commensurate with their cost. Besides, our stork will turn out much better. So let's get started.
Stork frame
To begin with, we will select a suitable body for the stork - a frame on which the foam will be sprayed. A plastic water canister with a capacity of 5 liters will do just fine. We make the stork’s neck from wire, and to add volume, you can attach strips of foam plastic to the wire. The stork's legs can also be made from wire, and the nose and head can be cut out either from foam plastic or wood - whichever is more convenient and preferable.


Making a sculpture
After production simple frame Let's start spraying foam on our sculpture - we do it carefully, imagining the contours of the finished stork. To make it easier, print big bird. If the foam does not lie as you intended, no problem - after drying, the excess can be easily removed with a knife. By the way, if you wish, you can use real bird feathers for the tail - who knows, maybe you will make a peacock instead of a stork. After the foam has dried and finished with a knife, paint the sculpture with ordinary acrylic paint, fix it in place in the garden, and invite your friends to appreciate your creative genius. Good luck!


