How to stitch two photos into one. Online services and programs for combining photos into one
While working with existing images, the user may need to combine photos into one online. This could be creating a collage, photomontage, or other tasks that require gluing together several photos into a coherent visual composition. Specialized network services created specifically for combining several photos will provide valuable assistance in realizing your plans.
There are a sufficient number of services on the Internet that allow you to combine two photos online in just a couple of minutes. Some of these resources specialize in creating various types collages in which you can connect 5-7 various photos into one single image.
Others specialize exclusively in adding photos to each other and have a simple and user-friendly interface.
Working with tools for gluing images is built in a template manner. You go to such a service, upload two (or more) photos to it, decide on a number of settings, and start the adding process. After that, you view the result and save it on your PC.
In the case of resources that specialize in creating collages, you will need to first select a suitable collage template (or create one yourself), and then follow the steps described above.
The resulting result is usually not marked with watermarks, so you can safely use it for various tasks.
If you want to add any text to your photo, then the corresponding one on our website will be useful to you.
Let's take a closer look at services for merging photos online.
Croper.ru is a specialized photo editor
The resource croper.ru is a multifunctional online photo editor that allows you to perform various operations on photos (cropping, resizing, rotating, auto-processing, applying effects, etc.). Its functionality also includes gluing together user photos, which we use for our tasks.
To use the functionality of the photo editor, do the following:

Service imgonline.com.ua – simple combination of photos online
A feature of the Ukrainian service imgonline.com.ua is a predominantly text-based interface, with minimal inclusion of a graphic component. All operations are carried out by selecting the necessary text options, and at the very end the user has the opportunity to evaluate the result.

Mycollages.ru – easy creation of collages
The service is designed for quick and convenient creation collages from the user's existing photos. To facilitate the process, the resource has a number of standardized templates, but if desired, the user can create his own.

Quickpicturetools.com - English-language online resource for working with images
The quickpicturetools.com service can perform various simple operations when working with photos - cropping, adding text and frames to photos, creating a calendar based on photos, and more. There is also a function for combining and gluing images online, which we will use.
- Go to quickpicturetools.com ;
- Click on “Add” and upload the first photo to the resource;
- Click on “Add” again in the next cell and upload the second photo;
- Using the “Width” and “Height” options, set required dimensions first and second images, decide on other settings;
- To get the result, select "Generate Image" below;
- Save the result to your PC.

If you are interested in how to make a slideshow from photos with music, then this may be relevant to you.
Photojoiner.net – generation of collages in English online
The photojoiner.net service is similar in functionality to the mycollages.ru service I already mentioned. Despite the English-language interface, working with this site occurs in the same way.
- You go to the resource, select the number of collage cells, and click on “Apply”.
- Using the “Open” button, upload two photos to the resource and drag them into the corresponding cells of the collage.
- The “Save” button is used to save the result.

Conclusion
To stitch 2 photos online, you should use the services I listed above. Of the listed analogues, I would like to focus the reader’s attention on the resource croper.ru, which has a fairly diverse set of tools for working with images. In general, all of the services listed are free, have a simple and user-friendly interface, and can be recommended for quickly combining the photos you need online.
Creating collages and others design work They almost always require combining several photographs in one document. Sometimes there are options when the area that needs to be filled does not match the size of the inserted image. All these actions can be carried out in several ways. You will learn how to combine 2 photos into one from this article.
Paint raster editor included in all Windows versions, allows you to work with layers, is simple, has a user-friendly interface. To edit photos, after launching the editor, load the main photo into it using Explorer or the right mouse button. The main photo is the one that will be on the final image either on top or on the right.
To place the second photo, you need to prepare free space for it. For this purpose, nodal points located on the right and bottom borders are used. Move them with the mouse while holding down the left button. Moreover, the place needs to be determined with a reserve. Excess space can be removed after completing all operations in the same way.
To do this, on the main page of the editor, in the “Insert” drop-down list, select the “Insert from ...” command, select a file, the second photo is placed on top of the first in editing mode. Select the correct location of the photo by moving it with the left mouse button and install right size using nodal points, of which in this case there are eight. Four are at the corners of the image, and four are in the middle of the sides. After final adjustment of the dimensions of the combined image, the resulting document can be saved using the menu item, which opens by pressing the blue button, “Save as...”.
Combining two images in Photoshop
To connect two images, the operation of opening the second layer is optional. It is enough to create a place for the second photo by clicking on the lines “Image” - “Canvas Size”. Both images are opened, and on the second capture the part that is to be transferred is determined. This part is moved using the Move option. Photoshop will open the second layer for her on its own.
By pressing Cntrl+T together, we place three photos in their place. If necessary, blur the boundaries using the “Brush”, “Stamp”, “Blur”. For insertion, you can select a frame with multiple insertion windows. Save the resulting image under a new name so as not to spoil the original images.
Using the Picasa editor
You can combine two photos using the Picasa editor. After opening the program, the selected photo will be reduced in size at the bottom of the Picasa window. Then use the "Select Selected Items" button. Then as many images as needed are added. After pinning the photo, click “Create a collage.”
After this, a collage window will open, in which you can change the background, the order of the images, and the sizes of the pictures. After finishing the document, click “Create collage” again.
The capabilities of the above programs are quite enough to perform standard graphic tasks, which includes combining two photographs into one image.
1 voteHello, dear readers of my blog. Today we will talk about one very simple manipulation, thanks to which you can create quite beautiful objects. It's great when just one function is enough to do something complete, unique and useful. This is exactly the case.
Today I will tell you how to combine two pictures in Photoshop. You will receive not only step by step instructions, but in the future, thanks to this article, you will be able to process the edges of the image: highlight the borders with a contour, and also create smooth transitions. All this will add grace to your work and allow it to look good on the wall if you want to print a collage.
Such portraits can even be sold if you have some ambition, entrepreneurial spirit and a subscription to my blog. I often talk about simple ways x promote your business on the Internet, you just have to choose suitable advice and use them.

Well, now let's move on directly to working on photographs. How to combine them?
Merging photos together
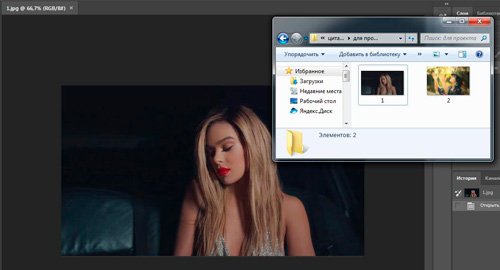
For work, I downloaded 2 photos from . You can have several pictures, it's not that important. Save them in a folder, open Photoshop and get ready for further action.

There are several ways to add an image to the program. For example, the item “File” - “Open” in the top menu. I love a different method that is perfect for creating a collage. I simply drag one image into the program’s working field from a folder, and then another.
In general, this method for this work is considered the “correct” one. In the article I told why. If you add a picture in the usual way, then several manipulations with the size can lead to the fact that the pixels in the photo are broken and the quality suffers. If you paste a picture from a folder, Photoshop treats it as a Smart Object and prevents pixel damage.
If you drag several pictures at once, they open in adjacent windows. If you first add one to the work field, and then a second or third, and so on, then they are superimposed on the original image.
It won't be difficult to reduce, enlarge or drag a new photo. All this is done using the mouse. The only thing I can reveal is a few useful secrets. If you hold Shift and then start manipulating the cursor, the proportions will be preserved. The picture will not be “stretched” horizontally or vertically.
Another useful keyboard shortcut is Ctrl+T. If you, say, have already worked on an image and pressed enter to apply formatting, and then again want to change the image size or its location, then these hot buttons will help you call the same function again.

Are you generally well versed in the term “”? If knowledge is not enough, I recommend reading the post on my blog, in which I talk in detail about this Photoshop feature. There will be no blank spots left in knowledge.
Now I will only recall the main points. Don't forget that clicking on one of the layers will activate it, you can work with the selected one, and the rest will remain untouched. However, if you want to do this now, many functions will be closed to you. What is the reason?
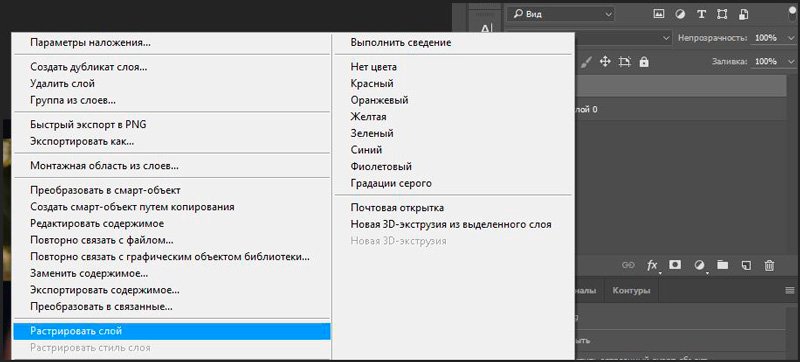
The top layer (under the number “2”) is not rasterized, and the second (“Background”) is closed from editing. Click the lock on the right to unlock the options below.
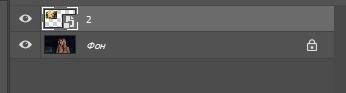
What I called “2” will have to be done differently. Right-click, and then select the “Rasterize Layer” function from the menu that appears.
That's it, now you have access to all the functions of Photoshop and can apply them on both photos.
Stroke
This blog already contains, in it you can learn how to work with complex contours. Now, I think we will need a simple design option for a frame for the image.
To do this, click on the Fx function in the right menu and select “Stroke” in the window that appears. Do not forget that it will be applied to the layer on which you clicked, and it subsequently became highlighted. In this case "2".

The settings are easy to understand. The size determines the width of the frame, you can choose the position (from the center, outside or inside the picture), make the shade more or less saturated - the “Opacity” parameter is responsible for this, and, in fact, the color itself, which, if desired, can be replaced with a gradient or pattern in the "Type" menu.
Play around with these settings yourself. Don’t forget to turn on “View”; to do this, check the appropriate box under the “New Style” buttons on the right.
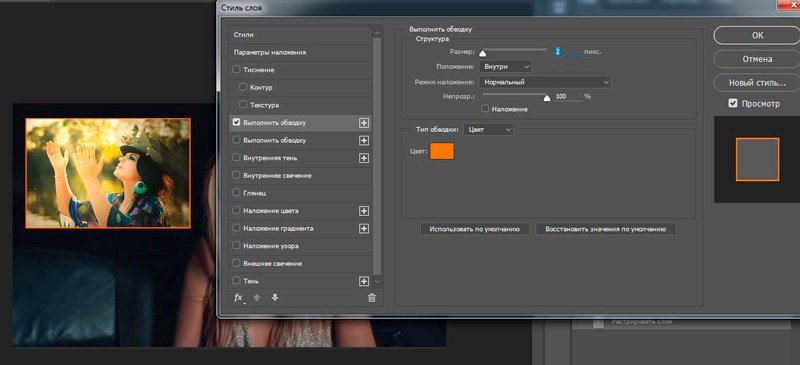
I will apply a stroke to both images next to each other.

Smooth transition
In order for one image to merge with another, you need to do things a little differently. Now I will show you a simple method for beginners.
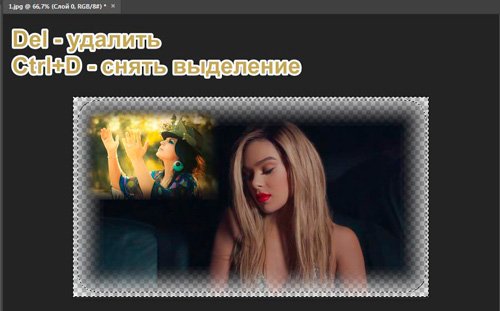
First, I'll select a rectangular selection, you can read in the previous post. Then I select the borders of the picture, which will be blurred, and then the “Select and Mask” option.
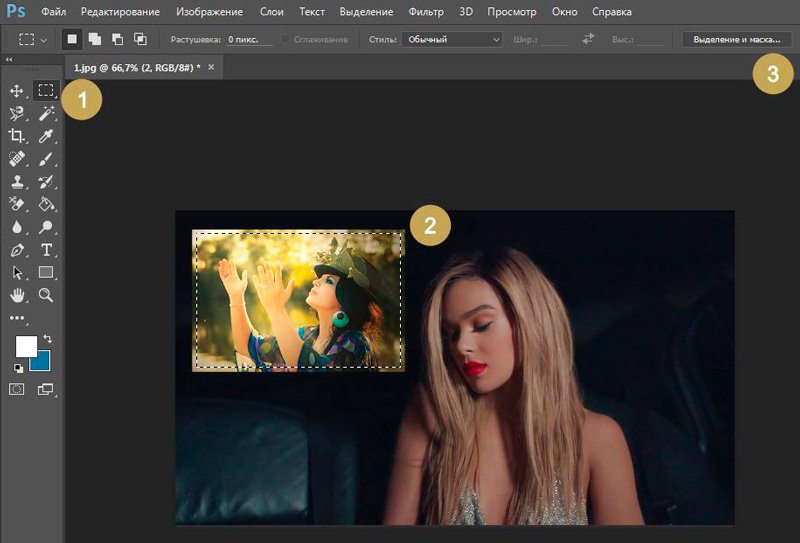
To better see the result, select the “On Layers” view.
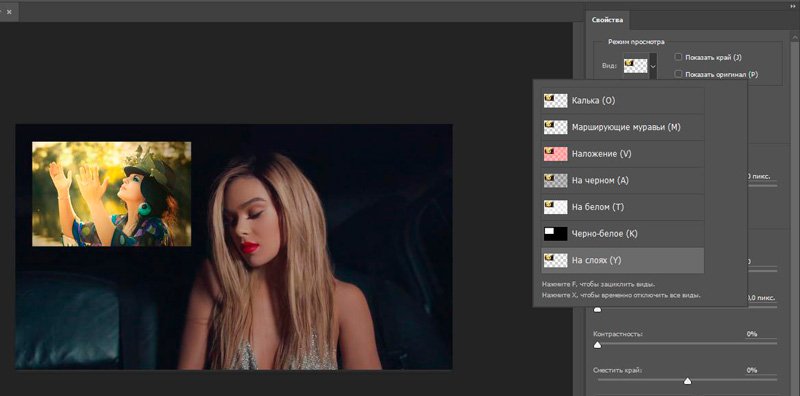
There are also a lot of settings here, but for now we will only need Feather and perhaps Shift Edge. Click the sliders and then click Invert.

Now for everything to work out at its best, select "Select" from the top menu and then "Inverse". You can simply use the hotkeys Shift+Ctrl+I.
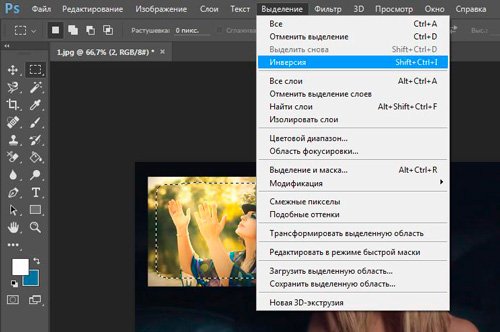
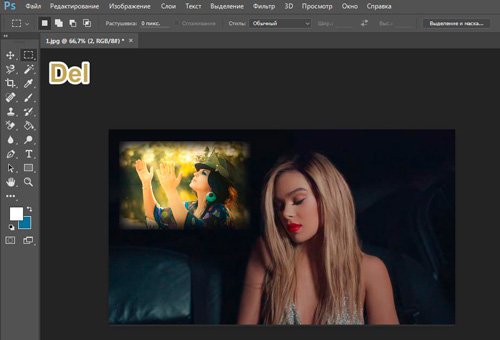
Done, press the Del button on your keyboard. If you had not applied the “Invert” parameter, now it would not be the edges of your picture that would be removed, but everything that is in the center.
You can do things a little differently than in the previous example. First, select the layer (now I'm working with the background), then outline the image using a rectangular selection, then apply an invert, and finally open the “Select and Mask” function.

Ready. This is what the photo looks like now. You forget to press Del. By the way, to get rid of excretory ants along the border of the picture, use the combination Ctrl+D.
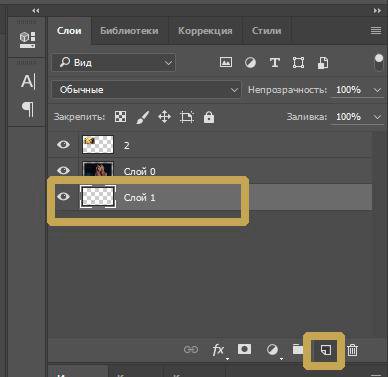
Our drawing turned out to be translucent. Read it if you want more details. I suggest you create a new layer as a substrate. Next to the Trash icon in the menu on the right, you will find a button to create a new layer. Then drag it under the background image.
Choose suitable color and the fill tool and apply it to the picture. By the way, I think that now you may need an article about that for the image. This post has many interesting simple ways and techniques to create by hand.

That's basically it.
Video instruction
If you still have questions, you can watch a video on how to combine two pictures side by side.
Well, this tutorial is suitable for you if you want to take a photo with a smooth transition. There are settings in this video that I didn't talk about in the text of this article, so don't ignore them.
Well, I just have to remind you that if you want to learn more about the tools that are in Photoshop, then the course will help you with this « Photoshop from scratch in video format » . A lot of detailed information for a novice user, especially if in the future you are thinking about making money from your skill.

Well, for those who want to achieve maximum results in their hobby - the course « Magic collage » . An incredibly useful thing, in which more attention is paid to the artistic component of the work: light, shadows, and so on, as well as maximum professional secrets processing the drawing.
That's all for me. Don't forget to subscribe to Start-Lak group VKontakte so as not to miss something useful. See you again and good luck.
IN modern world a person may always need to combine two photographs into one when creating a collage for a presentation or for some other purpose. However, not everyone is ready to spend their time learning complex professional and semi-professional programs like Adobe Photoshop or the like.
Not all personal computer users are so advanced in areas such as graphic editors. And what an experienced person can do in just a few minutes, can take quite a long amount of time for a user who is just understanding and mastering how to use a computer.
However, now it is not at all necessary to be a web designer, a professional, or to carefully study all the intricacies and nuances of working with complex programs. Nowadays, there are a great many much simpler analogues of Photoshop, and there are also entire online services for these purposes. Moreover, in this article we will also consider a method that allows you to combine two photographs into one using the simplest graphic editor Paint, which is present on every computer by default. After reading this article, you can easily understand how to combine two photos into one, and the process will not take you much time, and the final result will certainly make you happy.

First way
So, first, let's look at the first, simplest method of how you can combine two photos into one using a standard program Paint, which is already installed on your personal computer in case you use operating system Windows. However, keep in mind that although the program is easy to use, the downside of this method is the quality of the resulting image, especially if you start resizing the photo.
To combine two photos into one, do the following:
- Open the Paint program. As a rule, to do this, you need to go to the “Start” tab on the bottom panel of Windows and find the “Programs” item there, and then “Accessories”. This tab in most versions of Windows contains the image editing program Paint.
- After the program opens, in the upper left corner click on the “File” button, and then on the “Create” button new document».
- Using the arrows located along the edges of the currently empty image, stretch it to the size you need.
- Then select “Insert” from the menu, and then “Insert from” and then you will need to select the file with the photo you are interested in.
- After that. Once the photo is inserted, adjust its size by simply pulling the arrows. (It is precisely at this point that the disadvantage of using the standard Paint program lies - the fact is that when adjusting the size of a photo, its quality decreases and this is very noticeable. If you use a more professional program for the same purposes, such as Photoshop, for example , then the image quality will not suffer. Therefore, decide for yourself whether you are satisfied with the resulting photo or whether it is still worth exploring some other method of combining photos, which we will also consider later).
- In exactly the same way as in the previous paragraph, insert the next photo that interests you.
- After all photo manipulations are completed, click the "File" button in the upper left corner of Paint, and then select "Save As." It is best to save the final image in .png or .jpg format, choosing the maximum quality, since these are the most common formats.

Second way
The next method for combining multiple images into one is to use more complex program Photoshop. Although this system is considered professional program With rich set of features, in this article we will try to explain the work in it in the most in simple language. However, keep in mind that in this article we will not consider where you can download or buy the program. For this purpose, there is an official website of the software product and many other resources on the Internet.
Combining images


So, the procedure is as follows:
- Open two images using Photoshop. You can drag images into the field of the program itself or use the “Open with” item, which is called up with the right mouse button when you hover over the image, and then select installed program Photoshop.
- Once both photos are open, select the very first Rectangular Marquee Tool from the left panel of the program.
- Using the tool, select the image you plan to overlay.
- Next, you need to select the “Move” tool (this is the second tool from the top with an arrow icon).
- Drag the selected image onto the second photo.
- In order to change the size of the photo you just superimposed, select the “Edit” menu, and then “Custom Transformation”, and then you can increase or decrease the size of the image to the values that you need.
- Once everything is ready, all you have to do is save the result. This is done in approximately the same way as working in the Paint program. That is, you will need to click on the “File” button located in the far left corner of the program, and then select “Save as” or “Save as” (if you are using the English version of Photoshop) and then select the format for the image. It is best to use png or jpg formats.

Third way
If all the methods described above seem quite complicated to you, there is another extremely easy method for combining photos. This the method is in using online photo editing services. For example, such services include the website croper.ru or an extension for Google browser Chrome - Doubled. By the way, the latter allows you to combine two photos into one using a rather stylish overlay effect.
Using the services of such sites is as simple as possible. Just move it images you are interested in in the field of the site or browser extension and then follow the prompts that appear.
We hope this article was useful to you, and now you have learned how to easily implement combining photos, without resorting to the services of expensive web designers or complex professional utilities.
Video
Using this video as an example, it will be easier for you to understand how you can combine two photos.
Didn't get an answer to your question? Suggest a topic to the authors.
How to combine two photos or paste a cut out part of one image into another is a simple task for anyone who is a little familiar with Photoshop. But, firstly, not everyone knows how to work in Adobe Photoshop, and secondly, even experienced users do not always know how to superimpose one image onto another well. Let's look at several options for combining several pictures into one image.
In this example picture small size superimposed entirely, as they are, onto a larger image that serves as the background. Each small picture is located in a separate layer and partially overlaps the layers below.
How it's done? You need to open all the necessary photos in Photoshop. Depending on the version of Photoshop, you will see several windows with pictures in the program window, several tabs, or at the top of the window next to the menu there is such a button with an opening menu.

In the menu, select a button with an image of 2, 3, 4 horizontal or vertical windows and immediately see the number of pictures you selected.

The images are completely overlaid, so go to the window with the small photo that you will overlay first on the background. In the layers panel you see only one background layer with this picture. Using the mouse, drag this layer into another window onto the image with the background. Click on the image with the background, it becomes active, and in the layers panel you already see two layers - the background and above it a layer with a small picture. In the same way, drag other pictures onto the background layer and arrange them in the desired order.
What should I do if the image I'm inserting is too big or too small? You need to increase or decrease it. To do this, click on the layer with the inserted image, select Edit from the menu > Free Transform, or press CTRL+T and drag the handles or rotate the inserted image.

Inserting a fragment from another picture into an image
Much more often you need to cut out only part of one photo and superimpose this fragment on another photo. Such compositions from parts of different images are called photomontage or photo collage.
Open the image from which you will cut, select the required fragment with any suitable selection tool, copy Edit > Copy, then go to the main document and paste the copied part of the image Edit > Paste. The inserted fragment is located in a separate layer and its dimensions can be changed as you need.


The main difficulty in this case is to qualitatively select the desired part from the picture. To avoid problems with selection, images from clipart collections are often used - pictures on a transparent background, or isolates - objects on a white or black background. Homogeneous background is easy to highlight with a magic wand and delete.
Don't forget that the photo montage should look realistic, so follow
Smooth transition from one image to another
In some cases, you need to make one image smoothly transition into another, or some part of the picture becomes transparent, and the background is visible through it.
To overlay one image on top of another in Photoshop, open both original photos and drag a layer from one open image to another document. The top layer is made translucent (in the Layers panel, the Opacity parameter is reduced to 50-60%) so that the bottom layer can be seen through it, and the image is moved on each layer so that the parts of your future creation fit well together.
If you need to do it quickly and High Quality not required, you can use a soft eraser - the Eraser tool to quickly erase part of the layer. The Brush tool sets the size, shape, density, and hardness of the elastic band, so in the brush settings, the Hardness parameter must be set to 0, and in the brush parameters panel, Opacity (Opacity) must be set to 20-30%.

Use an eraser to erase parts of the top image in the right places and, when finished, return the Opacity parameter to 100% for this layer. The layer will become opaque, but those places where the rubber band has been applied will be completely or partially transparent.
If needed good quality, it is better to apply a layer mask. Unlike an eraser, a mask does not change the main image, but only hides some parts of it. The mask can be disabled or removed without any damage to the main photo.
To add a mask, go to the layer with the top image and at the bottom of the Layers panel, click the Add Leyer Mask button.

In Photoshop's Toolbar, set the colors to black and white (foreground and background). Select the gradient tool, in the gradient settings set the transition from black to white. Click on the mask to make it active and create a gradient transition in the area where your images overlap. The edge of the top image will become transparent. Toward the middle, the transparency will decrease.
To add realism to the image, select a soft brush, make sure the mask is active and add black and white areas to the mask. Remember that in a mask you should paint black where you want to hide part of the layer, and white where you want to open some area.

Finally, two simple ways to smoothly transition an image into the background.
1 way. Place the image on top of the background and add a mask to this layer. In this example, the mask is created using a gradient radial fill. It is important that the mask completely hides the edges of the picture, then the transition from the image to the background will not be visible.


Method 2. Select the desired area in the image, execute the menu command Select > Modify > Feather. In the window that opens, you need to set the width of the feathering area in the Feather field. This value depends on the size of the image and is selected for each photo separately - experiment!

After that, copy the selected shaded area and paste it onto a suitable background. The edges of the inserted fragment will be translucent, with greater transparency near the edge.


