What thickness of tiles to use for country paths. Tiles for paths in the country: a universal solution
FORUMHOUSE users know well that life outside the city means not only a pleasant time in a hammock in the garden, but also constant housework. Everyone arranges their “ten acres” to their own taste. And if the creation of landscape design is a matter of personal preference, then garden paths are simply vital in any personal plot and at any dacha. Indeed, in addition to purely decorative purposes, it is the paths that allow us to move freely around the site, regardless of the time of year.
Therefore, increased demands are placed on materials for paving garden paths, such as wear resistance, safety, environmental friendliness and presentable appearance. Paving slabs meet all these requirements. Expert advice and step by step instructions from users of our forum in this article will help you lay tiles for the path in your country house yourself!
How to make a path from tiles. Planning.

Any construction should begin with careful planning of all work. Styling will be no exception paving slabs. First of all, you should pay attention to the following points:
The total number of paths and their location on the site. Tiles for paths in the garden.
The key rule can be formulated as follows: “The central path in the garden should lead from the entrance to the site to the house.” If there is a garage, workshop or gazebo on the site, then paths should be laid to them. This way, you can ensure the zoning of the site, ensuring unobstructed access to each building.
Width of sidewalk paths

The path leading to the house should be such a width that two adults walking towards each other can easily pass each other. On average, this value ranges from 1 to 1.5 meters.
Paths that are not used very often and lead to flower beds or beds can be made 0.5 to 0.8 meters wide.
You should also clearly define the functional purpose of the tracks.

Denis Bogdanov Landscape improvement specialist, forum nickname Denis Vlad-ch
– For myself, I clearly divide paths into decorative ones, leading to the gazebo, and functional ones, which are subject to heavy loads and lead to the house or garage.

Paths that experience heavy loads require more careful preparation foundations than those paths that are used from time to time.
Denis Vlad-ch
You also need to consider how you will care for your garden path in winter and autumn.
Unlike unfilled paths, paving slabs are easier to maintain. When removing snow and fallen leaves, you won't be throwing rubble aside.


The second most important characteristic of a garden sidewalk, after functionality, is how pleasant it is to walk along it. And in order to understand this, you can use the secret of landscape designers.


Vladimir Petriv Director of Petriv Landscape Designe
I always advise you to first walk along pre-marked paths and make sure that everything is comfortable and that it is convenient for all household members to move along them. I can say that after such a “walk” you almost always have to make adjustments to the original plan for marking the path.
In addition to defining the functionality garden path, you need to select the thickness of the tile. And here it is better to adhere to the following rules.
How to do sidewalk path: step by step instructions
In addition to determining the functionality of the garden path, it is necessary to select the thickness of the paving slabs. And here it is better to adhere to the following rules.

Konstantin MerzlyakovExpert from the Factory GOTIKA, Moscow:
For garden paths and local area where passenger vehicles do not enter, the paving slabs of the path can be no thicker than 40-50 mm. And for a path providing passage for passenger cars and parking, the thickness of the tiles must be at least 60 mm.


Vladimir Petriv:
Initial preparation for laying garden paths usually involves excavation, and this must be linked to the geoplasticity of your site. With large differences in heights, slopes, etc., it will be necessary to move and remove large masses of land - a very costly undertaking that requires the use of construction equipment

Geoplastics is the artificial formation of the relief and architecture of a site.
How to lay a tile garden path. Recommendations from experts.
Paving slabs are an environmentally friendly and durable coating for garden paths. And its durability and beauty, first of all, will depend on the quality of paving slabs and compliance with laying technology. You can also make tiles for paths with your own hands.


Konstantin Merzlyakov
Modern paving slabs are made of concrete. The shape of the tiles can be absolutely any, which allows you to successfully fit garden paths into landscape design any area.
The service life of concrete vibropressed tiles is on average 15 years, provided proper preparation grounds.
And, like any coating, paving slabs require maintenance during operation (cleaning, use of water-repellent coatings, etc.).
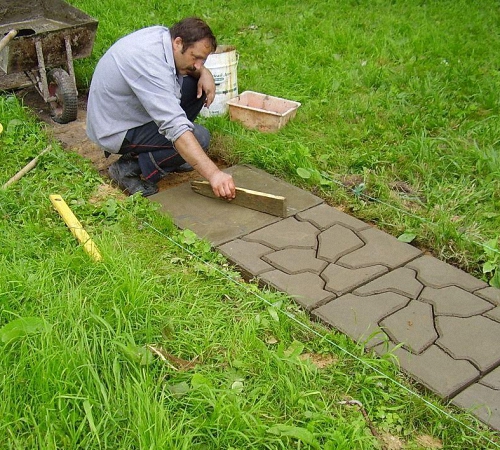
The first stage of preparatory work for laying paving slabs is breaking out the contour of the area to be laid and setting up control “beacons”. The angles of the territory, connection to existing areas, and slopes are taken into account. After the work on laying out the contour has been carried out, they begin to prepare the base, which includes the following types of work: planning, installation of a load-bearing layer, installation of curbs and installation of a leveling sand layer under the tiles.
DIY sidewalk paths

We make a path from paving slabs in the following step-by-step sequence:
- The earthen boxes under the side stone are torn off;
- A side stone is installed around the perimeter of the site. Curb stone is necessary for strong fixation of paving slabs;
- The underlying layer is poured;
- The base is being laid;
- The tile covering is being laid;
- The tile joints are filled.
It is also necessary to remember that when laying tiles, the following standards should be followed.

Alexander LoginovTechnical Director of the company TD BRAER
Work on the installation of paving must be carried out in accordance with SNiP 3.06.03-85 “Highways” and SNiP III-10-75 “Landscaping”.

And the independent installation process can be divided into a number of successive stages.
- Planning and designing a garden path. It is necessary to determine the type of soil on the site. Then develop the layout of the garden paths, choose the design and pattern of the tile layout;
- Cost calculation necessary materials;
- Carrying out work on laying garden paths.
 Garden paths made of tiles.
Let's take a closer look at each of the points.

Alexander Loginov:
The choice of method for laying tiles depends on the condition of the dacha soil and the subsequent operating conditions of the site: the blind area of the building, a pedestrian area, an area for driving and parking cars, etc.
It should be remembered that the result of your work, first of all, will depend on the thoroughness of the preliminary marking and preparation of the base for laying the tiles.
Planning includes the following:

- draw the layout of the area to be paved;
- measure the area in order to put the dimensions on the plan;
- Based on the above points, calculate the required amount of tiles for laying, as well as the amount of materials for preparing the base of a tile path with a border.
After developing the plan, they begin marking future paths.

Alexander Loginov
First of all, determine the direction of water flow. Please note that water must flow along the blind area of the building or along the path into drainage wells or onto lawns. The slope can be made longitudinal, transverse, longitudinal-transverse, but not less than 0.5%, that is, 5 mm per meter.
The direction of the slope should be such that water flows from the paving into drainage systems or onto the lawn, but not towards the building!
After the location for laying the tiles has been determined, the boundaries of the path are marked. To do this, pegs are driven along the boundaries of the site, along which a cord or fishing line is pulled. After this, you can begin excavating the soil, following these recommendations:
- The excavation is carried out so that after laying the front surface of the tiles reaches the specified level of your site;
- The area formed after excavation is leveled and compacted;
- If the soil is soft, it needs to be moistened (sprayed with water from a hose) and compacted.

Vladimir Petriv
Drainage and water disposal into a storm drain or storage well must be thought out and installed at the preparatory stage of work on laying garden paths.
Tiling a garden path

Konstantin Merzlyakov
When laying paving slabs along complex curved surface and with a large difference in heights, when planning, it is necessary to allocate a larger percentage to the consumption of tiles (trimming, adjusting, etc.).
Preparing the base of the sidewalk path
Most important stage laying paving slabs - preparing the base. The right foundation will not allow the path or site to “sag”, ensuring their longevity. It should be taken into account that, despite the tight seams between the tiles, the base is still saturated with water. Therefore, a permeable drainage bearing layer (gravel, crushed stone) is needed at the base. Then some of the water from the surface will be drained through the paving stones and the load-bearing layer into the soil.
 How to make paths from tiles.
It is also important to understand what layers the correct version of the base pie for laying tiles consists of.

Alexander Mishin Expert of the Wienerberger Brick company
The pie consists of several layers: the natural soil base, the subbase, the underlying layer, the “bed” and, in fact, the “sidewalk”.
The “bed” is a layer of sand or small gravel. The sub-base is a bulk layer of soil, and the underlying layer consists of gravel or crushed stone.


Alexander Mishin
The thickness of the “bed” for any type of soil base is on average 3-5 cm. The thickness of the remaining layers should be formed based on indicators of the soil base such as humidity, density and composition.

Alexander Loginov
For the main supporting layer, frost-resistant material with a uniform grain composition (crushed stone, gravel) is used. This material must be laid evenly in height and with the required slopes.
To build an ordinary pedestrian dacha path, you will need to make a load-bearing layer 10-20 cm thick. When constructing areas for travel and parking of passenger cars, a layer of 20-30 cm is used. For heavy loads, the load-bearing layer is increased and laid in 2-3 layers, each layer is compacted vibrating plate or vibrating roller.

As mentioned above, the method of preparing the base largely depends on the expected load on the garden path. It is also necessary to take into account the bearing capacity of the soil.
 Our forum user Oleg Novitsky advises how to build a sidewalk path from tiles in difficult soil: if there is so-called heavy or clay soil under the base, or you have a marshy summer cottage, then the thickness of the crushed stone base must be made at least 10 cm.
Then geotextiles are laid.
Geotextiles allow water to pass through well and do not allow materials to mix (mixing materials leads to the formation of voids and gaps in the coatings).
Alexander Mishin
The use of geotextiles is appropriate when the natural soil base is located in a swampy area and has high humidity. A layer of geotextile is placed above the natural soil base.

The next layer of our “pie” is screening on a geotextile base.

Oleg Novitsky
We fill the area with screenings (or sand). The screening layer must be at least 10 cm. This layer must be compacted very carefully. At this stage, it is necessary to precisely level the entire foundation for laying using a rule or other tool.
Screening has a not very good property - caking. This means that over time the base becomes almost monolithic, and then, due to its low strength, it cracks, and cracks and cavities form in the coating. To avoid such a nuisance, use a vibrating tool for compaction and tamping and do not carry out work in rainy weather. The best screening for such work is dry.
We then proceed to create the foundation level using the following algorithm:
- The boundaries and center lines of the site are marked with a rope;
- Loose sand can be leveled just below the edges of the curb;
- We compact the resulting pillow with a vibrating plate.


Oleg Novitsky
An electric or gasoline vibrating rammer with a rubber sole is well suited for compacting the sand layer. With its help, you can not only prepare a high-quality gravel-sand cushion, but also avoid further subsidence and collapse of the soil under the laid tiles.

Alexander Loginov
It must be remembered that all layers of the base are poured, leveled and compacted, taking into account a 0.5% slope!

Completes preparatory stage filling with river sand or cement-sand mixture. To do this, a layer of clay-free river sand 1-2 cm thick is poured onto the base without compaction; the layer should be loose.
CPS (cement-sand mixture) is taken in a ratio of 1:8-1:10, because cement is needed to bind the sand so that it can be washed away by water.

Alexander Mishin
The use of a cement-sand mixture as a “bed” is justified only in cases where intensive vehicle traffic is expected on the surface of the tile. The garage and pedestrian zone of a private house do not belong here, because the movement and load here are not so intense.
Laying paving slabs
In order for the garden path to be durable and for the tiles to lie flat on it, the gardener must also divide its installation into several successive stages. 
Laying begins:
- from the bottom point;
- from optically important boundaries;
- from conspicuous elements: porch, front entrance to the house;
- manual laying of tiles is done diagonally in the direction “away from you”, so as not to disturb the prepared top layer.
Before laying the first row of tiles, in order to maintain the exact location of the seams, it is necessary to pull the cord over the entire length and width of the object. After this, holding the cord, proceed with installation.
It is recommended to check the location and straightness of the seams every three rows of laid paving slabs. Laying is done using a rubber hammer (mallet) with light blows on the tile. Every 3-5 square meters of laid but not yet compacted paving slabs, its surface is controlled using a two-meter rule or a building level.


Alexander Loginov
As a frame for paths on suburban area curb stones should be used. These guards must be made before laying the outer part of the path to prevent lateral displacement and settlement of the tiles.
Along the edges of the marked area of the path, dig a trench along a stretched cord large size and depth (so that the curb enters this trench to the required level). The base of the trench must be compacted, backfilled, and the curb installed on concrete.
The border can be visible or hidden - it depends on the desire. If the border is hidden, then it must be placed so that the top of the tile exceeds the top of the border by the height of the chamfer.

Oleg Novitsky
To reduce the number of tiles to cut, start the longest row at the curb, laying entire tiles directly towards it. The resulting voids should be exactly half the tile. By cutting from one whole you will get two halves you need, and I think waste can be completely avoided. This technique can be used for figured symmetrical tiles.
The main enemy of any paving slab is freezing water. Therefore, you cannot lay tiles on monolithic, waterproof substrates, concrete screed. On outdoors It is prohibited to lay tiles on the mortar.
Sealing and vibrating ramming
After laying out the tiles, the coating is compacted with a vibrating plate. After the first vibration compaction of the coating, dry, sifted, clean sand is poured onto the surface so that the sand is easily and densely poured into the cracks between the tiles. The scattered sand is spread evenly with a brush over the entire area and hammered into the seams, “tying” the entire coating into a single whole.

And in order to build a durable coating, when working you must adhere to the following recommendations:
- Do not lay tiles in rainy weather without a special canopy.
- Do not fill the joints with a mixture of sand and cement.
- If the area has “complex”, heaving soil, it must be taken into account that its displacement can deform the tile. Then a more complex installation is performed - with step-by-step preparation concrete pad as a base, which guarantees durability.
Thus, when self-installation Garden paths need to take into account every little detail and carefully plan all stages of work. After all, the path to your home begins with a garden path made!
A path in a country house performs many functions, including connecting the entrance to the house, the house to the garden, etc. Therefore, when arranging it, it is necessary to pay due attention to the choice of materials and the installation process. The optimal material for laying on a garden path is tiles. Let's look at how to lay tiles in a dacha below.
Options and materials for constructing a path at the dacha
There are many options for arranging a path on summer cottage. The choice of one or the other depends directly on the desires of the owners, the general exterior of the building, and the type of soil on which the path is being built.

Usage natural stone makes the exterior noble and truly beautiful. Although the cost of this finishing material very high. By using natural stone make curved paths. The arrangement of the stone elements is chaotic, so with their help it’s great to build a beautiful curve.
When designing a country path in a country style, it is possible to construct it from wood. By applying special impregnations and varnishes, it is possible to improve the natural texture of wood. This path looks extraordinary.
If the dacha is built of brick stone, then brick is also suitable for constructing a path. Its combination with pebbles will improve the appearance of the path. In addition, the use of ordinary brick is impractical; it is better to use a brick adapted to tiles, since it has high level moisture and frost resistance.
Paving stones or paving slabs have the longest service life. With the help of multi-colored paving stones and a specific installation pattern, they make various designs or ornaments that will suit the individual style every garden.
More budget and inexpensive option is the construction of a gravel path. Its installation is appropriate in the wild or in the design of a naturalistic cottage.
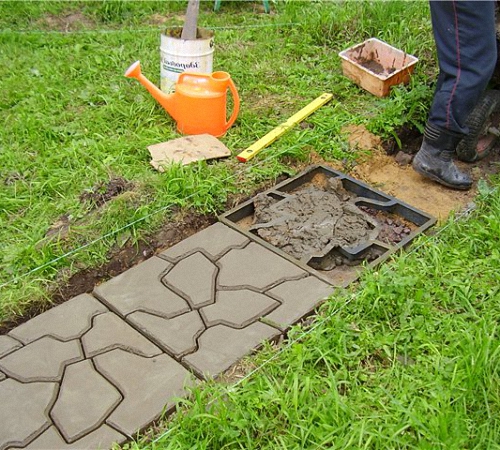
In addition, for the construction of a path that will be unique and chic, ordinary concrete is used, which is poured into special silicone molds. A combination of several materials will also serve in a good way experiment at the dacha.
Tiles in the country: features of selection and application
The country path is constantly exposed to the influence of the environment, so the material for its finishing must be of high quality in order to serve its owner for many years.
The path at the dacha is under the influence of people who move along it, garden carts and tools, water is spilled on it, dirt or dust is brought from the garden plot, in addition, there is constant exposure to rain and snow with ice, which periodically need to be cleaned. Therefore, the requirements for the construction of a country path are very high.
Tiles in the country house photo:

The best material for finishing a garden path is the material in the form of paving slabs. Let’s take a look at the features of its choice below:
1. Pay attention to the material from which the tiles are made. Since the main components of the solution greatly affect its durability. In addition, the technology of its production plays an important role. The seller must have this information. Otherwise, look for another place to buy it. In addition, we recommend inspecting the certification of products and documents confirming their quality.
2. The size and thickness of the tile also plays a role in the process of its operation. If the garden path is intended for pedestrian traffic, the recommended thickness is three centimeters. When installing platforms for transport, choose tiles with a thickness of five centimeters. You should not choose tiles that are too large, since it has been practically proven that the smaller the tile, the more resistant it is to mechanical damage and cracking.
3. Appearance paving slabs will also help determine its quality. If the tile has bright color and smooth surface, this does not mean that it is of high quality. It is the smooth texture that indicates a large amount of water in the solution, and the brightness indicates the use of cheap synthetic dyes, improving looseness and reducing the strength of the material. In addition, it should be noted that a tile surface that is too smooth leads to injuries when slipping, especially in winter time or in the rain. Therefore, before purchasing a tile, you should clearly determine its texture, color and pattern. To check the strength of a tile, you should hit one tile against another; if there is a ringing sound, the tile is strong, otherwise it is loose.

4. It is possible to purchase one tile that you like for a thorough inspection. If there are various kinds of stains on the back side, it is better to refuse the purchase. Since in the production of such tiles sand with a large amount of clay was used, which significantly deteriorates the quality of the tile. Clay is never combined with cement mortars, as it worsens its quality and leads to looseness. Next, you should split the tile into two parts to examine the uniformity of the texture on its inner part. If there are no paint stains, clay or sandy areas and pores, feel free to buy tiles to build a path.
The path is an important part of the dacha, so it is better to think about its location at the stage of constructing the building itself. To make calculations easier, it is better to make an approximate drawing using special online programs. After identifying important points, connect them using straight or curved paths.
It is advisable to place on the diagram all the objects present on the territory. These include garden plot, vegetable garden, greenhouse, bathhouse or gazebo. Paths provide communication between these objects.
For the material used to construct the walkway, choose a finish that matches the environment. You should not make all the tracks of the same type. It is possible to combine solid paths with step-by-step paths, curved paths with straight ones.
When designing a site, you should indicate the location of the future location of plants and bushes. When staying in climatic zone with heavy rainfall, take care of the arrangement drainage system, which involves the construction of drains on the sides of the path. With their help, water will be removed and stagnation will not appear. During the construction of a country path, it should be remembered that water that freezes on its surface reduces the service life of the coating on the path several times. Do not allow powerful trees to be planted near the path, as they root system, will eventually destroy their integrity.

Laying tiles at the dacha: process technology, initial stage
After purchasing high-quality tiles for your dacha, you should carry out a series of work to install it. If you do not take this procedure seriously, then even the most good tiles Over time, it will require replacement due to non-compliance with its installation technology.
Before laying paving slabs in your dacha, you need to study the instructions from the tile manufacturer for its installation.
The initial stage of the work is the design and marking of the territory for the construction of the path. All calculations from a previously prepared project should be transferred to the surface of the earth. To mark, you will need to measure the width and length of the path, gradually installing pegs in the marking areas. A tension thread is pulled onto the pegs, the slope, if any, and turns are marked.

You should decide on the type of tile to buy in advance, but buy it only after the markings are ready. Since it is with its help that it will be possible to calculate the required number of tiles for laying. It is preferable to take a few tiles in stock to replace the material if it accidentally crumbles.
The next stage is based on excavation work to remove the soil layer before laying the tiles. The thickness of this layer is influenced by factors such as the size of the tiles, the drainage pad and the amount of concrete required to strengthen the base. In addition, it is necessary to take into account that over time the soil will shrink and the installation height of the tiles will decrease. The correctness of these calculations depends on the type of soil located on the summer cottage, the size of the path and the foundation under it.
The most accurate calculation is made by a specialist located directly at the installation site of the tiles. The interval between the values of removing the soil layer is from 8 to 40 cm. The first number determines the thickness of the tile, for example, 5 cm, the second - the sand cushion - 4 cm, if necessary, in arranging paving with increased load-bearing capacity, it makes a recess of another 8 cm.

We should not forget about the arrangement of a rain slope constructed at the work site. Its value is one centimeter per 1 m². In addition, there is a need to make lateral indentations of 8 cm on both sides. They are necessary for the installation of curb stones.
The third stage of laying tiles is the installation of borders. The main requirements for them are evenness and uniformity. In addition, they must be set at a certain slope. The stone is installed using a liquid mortar. Try to strictly adhere to the markings.
The installation procedure continues - pouring the base cushion. Crushed stone is used as the bottom layer, with a fraction of two to four centimeters. After laying it, tamping and leveling of the first layer follows.
When creating a surface with increased load-bearing capacity and strength, the pillow has a slightly different appearance. Sand is poured onto the crushed stone, then non-woven geotextile is laid, which improves the quality of the cushion and prevents the sand from shrinking. Then another sand layer, 10 cm thick, is laid on the surface. A vibrating plate or roller is used to compact it. Then another layer of sand is poured, 4 cm thick; it does not require compaction. They begin laying tiles directly on this sand.
The final process is the actual laying of the tiles. To do this, a rope is pulled along which the installation of the first row is aligned. Start laying solid stones, leaving gaps of a few millimeters between them. When laying each brick stone, it is necessary to hit it with a rubber hammer for better compaction in the sand cushion.
The next row is laid not with whole stones, but with half stones. This will create a beautiful decorative design. In order to achieve even seams between paving slabs, it is recommended to purchase special crosses that are installed in the gaps between each of the tiles.
After laying the tiles, fill the joints between them with sand or a sand-cement mixture. This way they will be reliably sealed. It is necessary to wet the seams several times with water and wait until they dry completely.
- when carrying out work, use only special tools, because there is a risk of damage to the tiles;
- be sure to buy tiles with a small margin to compensate for damaged material;
- if necessary in standard bearing capacity, the tiles are laid on a surface with a dry mixture or a sand cushion; if it is necessary to install it on a car platform, the tiles should be laid on the base using concrete mortar.

Tile path in the country - an extraordinary solution
Simple and budget option is to independently make a path in the country from old tiles.
To create it you will need:
- old ceramic tiles or new tiles the cheapest cost;
- cement;
- sand;
- gravel;
- mixing tank;
- peg;
- cord;
- shovels;
- roulette;
- level.
To make such a track yourself, you first need to make markings along its width and length. According to the previously made markings, it is necessary to dig a trench; its depth is 15 cm. The trench should be inclined by one and a half centimeters. Attach on the sides of the future path wooden formwork. Compact the bottom of the trench and level it with a roller. Please note that the slope must be maintained.

Fill the bottom of the trench with sand in a layer of 5-8 cm, then crushed stone in a layer of 6 cm. Prepare the concrete solution, watch its consistency. It should be mushy. The surface of the path should be several centimeters higher than the surface of the ground. Level it out concrete surface, get rid of excess air. Smash ceramic tiles on the fragments, if desired, and install it based on your own preferences and imagination. Wait for the concrete solution to dry completely, this will take about 6 days, and use the path for its intended purpose.
Please note that this version of the path does not involve too much load on its surface, and serves more as a decorative element.
Paving slabs at the dacha video:
If you think that laying paving slabs is a job that only professionals can do, then this review will prove you wrong. Take 10 minutes to read the article and you will know all the nuances of the technology and will be able to make tracks no worse than the specialists. There is no need for special skills or complex equipment; the main thing is to do everything carefully and follow the correct sequence of work.

Step-by-step description of the workflow
Now let's figure out how to make paths from paving slabs in the country.
The work process can be divided into several stages:
- Planning and layout of the territory;
- Acquisition of necessary materials and tools;
- Preparation of the base;
- Laying tiles;
- Leveling the surface and sealing seams.
Now let's move on to a detailed consideration of each stage.

Stage 1 - planning paths and marking the area
This is the preparatory part, which will greatly help us in the future.
As part of this stage, the following work is performed:
- You should have a site plan at hand, or rather, you should transfer it to a blank sheet of paper. Just draw, on the correct scale, the configuration of the area where the work will be carried out. On the sketch, indicate all objects that can create interference and that need to be avoided;
- Garden paths are located so that it is convenient for you to move and that they go around all natural obstacles. If you have already lived on the site for a year or two, then the location of the paths is easy to determine: wherever you often walk, there will be trodden paths. You only need to reflect them on the project to see the approximate amount of work;

- The layout of garden paths should include their width. Immediately determine the size of the sites. As for the width, where people often walk, it should be a meter and a half, and where movement is infrequent, you can limit yourself to 75-80 centimeters. If you drive along the path with a car, then take into account its dimensions and add a margin of half a meter on each side;

- You also need to decide what tiles will be used and how they will be installed. Competently combining and choosing interesting scheme styling, you can do beautiful paths. There are a lot of options, below are just a few examples that are popular and used quite often;

- Once you have decided on the location of the paths and their configuration, you can begin to lay out the area. First of all, you need to drive pegs into the places where the paths begin, and then place them along the entire length at a distance of 2-3 meters from each other. If you have a lot of bends, then the pegs are located closer to accurately mark the configuration of the future structure;

- The cord is stretched at a height of 10-20 cm above ground level. You can use any twine or fishing line, the main thing is to set the contours of the path so that later you can clearly see where the work needs to be done;

- If you need to make semi-circular corners, you can use the simple method shown in the diagram below. A peg is driven in the middle, a cord of the required length is tied to it with the same peg or a simple stick, and a curve is drawn. Everything is simple and at the same time precise.

Since you will be digging a trench along the marking line, the pegs need to be driven to a depth of 35-40 cm. Then, when preparing the bed under the path, they will not fall and will stand as expected.
Stage 2 – purchasing the necessary materials and tools

| Material | Recommendations for selection |
| Paving slabs | It should be remembered that paving slabs for paths in the country are selected depending on the load on the surface. If cars will drive on the surface at least occasionally, then the thickness of the elements should be 70-80 mm, and if people will walk along the paths, then 50-60 mm will be enough. Street tiles do not have a huge number of colors, but if you wish, you can find unusual options |
| Curb stone | Before choosing borders, you should decide on the tiles. Then you will know the color of the paths and will be able to choose the optimal frame for them. I do not recommend installing without borders, as the process will be much more difficult |
| Crushed stone or gravel | If you use crushed stone, then take the options of small or medium fraction. As for gravel, the standard composition is suitable; all large stones must be removed from it before use. I recommend using the first option as it creates a stronger foundation |
| Construction sand | There are no special requirements here. The main thing is that the composition does not contain plant roots and pieces of clay. |
| Geotextiles | With the help of this material we will strengthen the base and improve moisture removal. This will prevent the paths from subsiding and being washed away during heavy rainfall. |
| Cement | The composition of the M400 or M500 brand should be used. With its help we will make a mixture for the base and filling the joints after installation |

Now let's look at the tools that you will need to lay paving slabs:
- Roulette, level and rule;
- Rubber or wooden mallet;

- Trowel;
- Hose with diffuser or garden waterer;
- Rake and broom;
- Profile or rail for leveling the surface;
- Tamping, you can do it manually, but it’s much easier to rent equipment, it’s inexpensive.

Stage 3 - preparing the base
A very important part of the workflow, which consists of the following actions:
- Removing soil to the required depth;
- Installation of curb;
- Construction of a cushion under the tiles.
Let's analyze each stage in detail and start with digging a trench for the path:
- The turf is broken through the rope with a shovel; you need to hold the bayonet vertically and make an even line to a depth of at least 20 cm. That is, first of all, the top layer is cut through and a reference point is set;

- Next, you need to remove the soil; the depth of the trench should be approximately 30 centimeters below the level of the future path. It is important to carefully remove excess soil; the easiest way to start is with two strips along the cord. This way you will remove the earth on the sides, and it will be easier to carry out work in the middle;

- The soil is removed over the entire area where the tiles will be laid. During the work process, periodically check the level to remove the soil approximately equally.

Now let's figure out how to install a border:

- Since the height of the sides is greater than the tiles at the edges, you need to make trenches 15 cm below the already dug surface. The width of the trench should be approximately the width of a shovel, this is quite enough to install the sides;
- First, approximately 20 cm of crushed stone is poured, it is leveled and compacted, and 5 cm of sand is poured on top. After this, you can pour water on the surface and compact it, controlling the plane with a level. It is important to make a level base on which the border will be located;
- A small layer is applied to the sand cushion cement mortar(4 parts sand to 1 part cement). After this, a curb stone is placed along the cord. It will stand stable on the solution; you just need to adjust its position;

- When you place several elements, additionally check the plane with a level. This will help to align the structure evenly and clearly;

- Laying continues like this until the very end. To be safe, you can apply a small amount of solution on the side. The structure must stand for about a day before the next stage of work can begin.

Now let's figure out how to make a base for tiles:

- To begin with, a layer of crushed stone or gravel 15 cm thick is poured. After this, the material is evenly distributed over the surface and compacted. You can work with both special equipment and manual device from a piece of log with a handle. It is important to compact the crushed stone well over the entire area where it is laid;

- A layer of geotextile material is laid on top of the crushed stone. It will create a barrier for sand to penetrate the crushed stone and improve surface drainage. Laying is very easy: the canvas is spread across the width of the path. At the joints, for reliability, make overlaps of 10-15 cm;

- A layer of river or construction sand 5 cm thick is poured over the insulating layer. It must be carefully leveled and moistened with a hose or sprinkler. After this, the final leveling and compaction of the sand cushion is carried out. It is important to make a smooth and solid base;

- Lastly, a layer of dry cement-sand mixture is poured, which is prepared from 4 parts sand and 1 part cement. The composition is evenly distributed over the surface; the easiest way is to level it with a homemade lath. It is done simply: a board is cut to the width of the curb, and cuts are made in it so that it lowers to the desired level. Then you simply smooth the surface, ensuring the uniformity of the cement-sand mixture.

If you have unstable or heaving soil, then it is better to place geotextiles not only under sand, but also under crushed stone. Two layers of material will strengthen the surface and prevent subsidence of crushed stone into soft soil.

Stage 4 – laying tiles
If you have done the preparation correctly, installation will be quick and easy.
The work consists of the following actions:
- Work starts from the extreme point. You should lay the tiles in front of you so as not to step on the previously prepared base. First, the first row is laid out; you must press the elements tightly against each other and make sure that they are located in one line;

- The row is aligned along the line, after which the plane is checked. If necessary, individual elements are tapped to level the surface. If any tile has sagged, then it must be lifted, then with a trowel, put a little cement-sand mixture and level it;

- If you have straight tiles, the easiest way is to lay them row by row, using a strip as a guide. Everything is simple here: the two outer tiles are laid, the landmark rests on them and is pressed on the other side so that it does not move. Then along the line you can lay out a row very quickly, and at the same time it will be perfectly even;

- If the tiles are laid diagonally, then the easiest way to guide is to stretch a cord along one of the joints. It simply presses the tile against the edge and helps you see if you are laying the row evenly. To better understand this option, a diagram is shown below;

- If cutting tiles is required, this process is carried out after laying all intact elements. The work is done using a special gas cutter or grinder with a disc for concrete. The element is marked and then carefully cut along the line; the work is not difficult, but noisy and dusty.

Stage 5 – leveling the surface and sealing the seams
When the installation work is completed, you can begin the finishing part of the process.
Everything is quite simple here:
- To begin with, the surface is checked with a long, level rod or rule. If there are protruding areas, they should be leveled using a rubber hammer. Differences should be minimal, so do not continue work until you check the path in all directions;

- Then it gets ready sand-cement mixture, which is poured in a small layer onto the surface. The easiest way to hammer the compound into the joints is with a hard-bristled brush. Simply treat the surface so that the sand gets into all the cracks, after which the excess is carefully swept away;

- Next, the surface is well wetted with a hose or sprinkler. It may turn out that in some cases the mixture will shrink, then you need to apply it again and moisten the tile again. Drying takes 2-3 days, during which time the mixture sets and a very durable surface is obtained.

Conclusion
After reading the review, you can easily lay paving slabs with your own hands. The process is simple and does not require much experience or special skills.


