Lightweight DIY notebooks made from paper. How to make a notebook from paper with adhesive connection: a large notebook with your own hands without stitching
Although store shelves are filled with notebooks and notebooks for any purpose, finding a truly unique item is not easy. It’s faster and more affordable to make your own notebook. It won't take much time, and as a result you will receive a one-of-a-kind accessory for recording the format you need. This article presents step-by-step master class making notebooks with tips and video tutorials.
Tools for making a notebook with your own hands
To make a notebook or diary, first prepare paper for writing. Simple notebook sheets (checked, lined) or landscape paper will do. To cut a large number of sheets evenly for a small notebook, use a stationery knife. You will need the following tools and supplies:
- scissors;
- ruler;
- awl;
- thick needle and strong threads;
- stapler;
- glue, double-sided thin tape or adhesive tape;
- materials for the cover (base cardboard, colored cardboard, fabric);
- decorations (sets for scrapbooking).
How to make a workbook with your own hands?
Make a notebook with big amount sheets (up to 10-12) can be done in 2 ways:
Stapling.
- Carefully fold the required number of sheets in half.
- Open the pages in the middle and staple along the fold line.
Usually 2 paper clips are enough, but if the page length exceeds half an A4 sheet, place paper clips at a distance of 5-10 cm between them. The greater the thickness and amount of paper, the larger the paper clips should be.
Stitching.
- Carefully fold the sheets in half.
- Mark with a pencil several pairs of future holes for stitching (the distance between the punctures is 1-3 cm).
- Punch holes with an awl at the marked points (make sure that the hole does not exceed the diameter of the stitching needle - 1-2 mm).
- For thin paper, prepare a needle with a single thread, for thick paper - with a double thread. There is no need to make a knot at the end of the thread.
- Sew the pages through the holes along the fold simple seam“needle forward”, starting the first stitch from the outside (leave the end of the thread hanging 5-10 cm). The ends of the thread after stitching should be on the outside of the notebook.
- After everything is stitched, pull both ends of the thread and tie it with a strong knot.
If you need a thick notebook with many pages, the usual binding technique is suitable, which is done in two ways:
- Make blank booklets (each of 3-5 sheets folded in half; the thicker the paper, the fewer sheets). All books are individually stitched with threads using the above method. Then the blanks are sewn together or glued together.
- Method of simultaneous stitching of blank books and fastening them together with one continuous thread:
- Sew the first piece from bottom to top.
- Without cutting the thread or tying a knot, move on to the second workpiece, only you will sew it from top to bottom, catching the outer stitches of the first booklet with the needle as you go along the seam.
- Having reached the bottom, proceed to the third workpiece, stitching it like the first (from bottom to top), while simultaneously grabbing the stitches of the second book. Once finished, move on to the next workpiece.
- When sewing, pull the thread tighter so that the pages do not dangle and the books fit snugly together.
- Having sewn the last piece, fasten the ends of the thread together with a knot.
If you take colored sheets rather than white ones, you will get an original Notebook with multi-colored sections. You can also experiment with the texture and thickness of the paper. At the end of the work, check that the edges of the resulting book are even. It is most convenient to cut a curved edge using a utility knife along a ruler.
How to make a cover for a notebook?
Bound pages will have an unfinished appearance if not bound. For a thin notebook or a finished spiral bound paper block, cut two matching sheets of colored cardstock. The cardboard is glued to the first and last pages of the book with glue or double-sided adhesive tape, then decorated.
To cover a thick notebook with a wide spine you need:
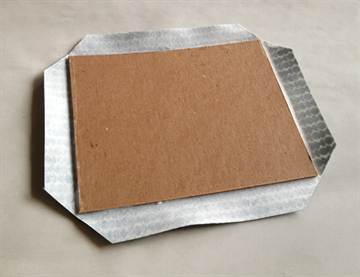
- Make 3 base blanks: the front and back of the cover (cut from thick cardboard to the size of the notebook), a piece of cardboard for the spine of the appropriate size.
- Glue with strong glue or double-sided tape all 3 blanks onto one large piece of colored cardboard (fabric or other material that will be the cover). Fold the edges and corners of the cover material inward and glue it to the base cardboard.
- Glue the first and last pages of the notebook you made to inside covers. As a result, the base cardboard must be completely hidden (on the outside - by the cover material, on the inside - by the outer pages of the notebook).
- We put the finished notebook with the cover under the press overnight, then decorate it. The design of the cover depends only on your imagination. Use available materials: colored paper of different textures, lace, fabrics, threads, beads, rhinestones, etc.
Video tutorials on creating a notebook at home
After watching the selection of videos presented, you will learn how to make any notebook with your own hands. This activity is inexpensive and accessible even to children, because does not require complex actions. And the exclusive cover, made by yourself, will turn a purchased notebook into original item and will be a wonderful gift for any holiday.
How to make a beautiful notebook with a cover
From A4 sheets
Notebook for Monster High dolls
When choosing a gift, people always puzzle over originality and practicality. After all, no one wants a donated item to gather dust somewhere in the back drawer of a closet. Most often, people choose a notebook as a gift. This one is simple necessary thing not only for work, but also for Everyday life. He may turn out to be very stylish accessory and give a special highlight to the image. Of course, it’s very easy to buy a notebook in a store; there’s just a huge selection of options. You can buy the cheapest one, or you can buy an original work by a famous master. But most the right decision- This is to create a notepad yourself. This option will allow you to choose the thickness of the product, size, and packaging. You will really like this gift and will say without words about your attitude towards the person. Our article will tell you how to make a notepad for special occasion with your own hands.
Making a bright paper notebook with your own hands
For beginning craftsmen, the easiest way is to make a notebook out of paper. There are thousands of options. You can do the simplest ones, but you can try to create a beautiful and original work. This article will talk about how to make a notebook from simple but high-quality paper. This is very exciting activity which will bring a lot interesting moments and ideas.
To make such an original item, you need to purchase or prepare thick cardboard, which is cut to a size of twelve by fifteen centimeters - 2 pieces. You also need to buy a beautiful fabric for the top of the cover, thick, maybe watercolor paper, cut to a size of eleven and a half by nineteen centimeters - 30 leaves. Cut the next thick paper to a size of eleven by fourteen centimeters - 2 sheets. You will also need newspaper, glue, a glue brush, a knife, scissors, an awl, a stationery knife, a ruler, a square, threads, a needle, and a weight.

From the very beginning, you need to cut the fabric; it should be two centimeters larger than the cardboard.

Use a square to cut 45 degree corners.
The gap between the corner of the cardboard and the corner of the fabric should be three centimeters.

When working on newspaper, you need to coat the cardboard itself with glue; there is no need to set it up a lot. Now glue the cardboard to our fabric.
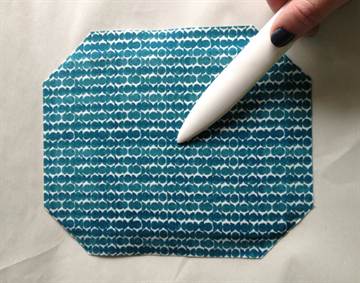
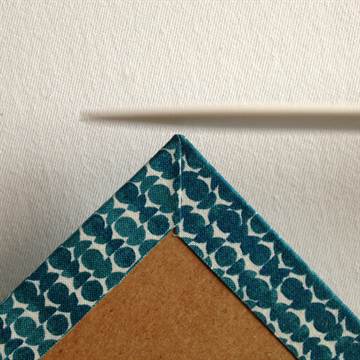
Glue the corners of the fabric on the back side as well, working well with the corners.

Use paper to remove excess glue, blotting it gently. Now use a knife to round the corners.
Now White list The paper needs to be coated with glue and the back of the cover covered. To create a second cover, you need to do all these steps again.

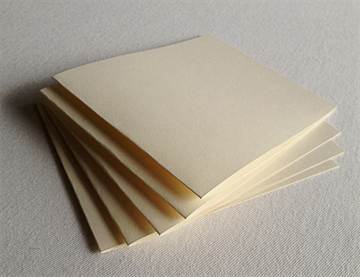
Now bend the white sheets. There should be five such sheets, and by bending them in half, we get ten pages.
In order to sew all the leaves, you first need to create a template. On a simple piece of paper, mark the center of the fold and the middle.
Draw marks for the holes as shown in the picture below:

We apply the template to the original sheet and make holes using an awl. Let's do all the pages like this.

Let's move on to assembling our notebook
Now we fold the bottom of the notebook and the leaves on top. They will serve as a guide. We punch holes. Pay attention to the fabric pattern. We do the same with the next cover.

Sew the details. We place the cover and leaves so that they peek out a little from behind the table.

We open the middle and now put some weight, for us it’s a sock with cereal. We take a thread the length of our hand and begin to stitch the notebook.

Direct the needle first into the hole of the leaf and then into the cover. This creates a loop. Now pull the leaves to the edge of the cover.
Make similar loops with the remaining holes.

This is how we sew on all the leaves.

We fasten the top cover, sew and pull tightly so that the notebook holds.
It turned out to be a very original and beautiful gift.
Using an unnecessary notebook for work
It's even easier to create a notebook from a simple notebook. Everyone can guess how to make a notebook out of a notebook. This does not require special materials or tools. An ordinary general notebook needs to be disassembled by removing the paper clips. Make rectangular blanks of the same size from the sheets. It’s easier to cut more than one leaf at a time. You can decorate your notebook by inserting colored inserts between regular sheets.
Mark and cut out the cover from a used notebook required dimensions. Place all the leaves near the edge of the notebook and punch them with a stapler. If you don’t have such an assistant, then sew all the leaves with a needle and thread, puncturing holes in advance.
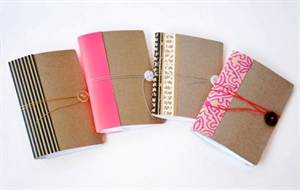
The notebook cover can be decorated with any in a convenient way. You can use fabric applique, self-adhesive colored paper, ribbons, beads, and small beautiful details. For originality and exclusivity of the work, the masters use photographs; black and white ones look especially beautiful. Let your imagination know no bounds, and the gift will turn out very beautiful!
Video on the topic of the article
We offer needlewomen an interesting selection of videos on this topic.
Not long ago I came across the word “Moleskine”. The definition was unfamiliar to me. And imagine my surprise that this is a trademark of a company that makes the most banal notebooks.
I've been finishing all my notebooks since school. I glued pockets with separate leaves for quick lists, created multi-bookmarks, and tinted the edges of the sheets. Later I got electronic notepads, but that's a different story.
In the vastness of the RuNet I met detailed lesson for making an unusual notebook. Making your own notepad is not difficult. The master class contains a detailed photo report with comments from the author. I present the article “as is”.
A technique similar to classic book binding is described. First we need regular office paper. You can combine colors, sew in dividers, etc. I used 80 g/m2 A4 paper in vanilla beige color and 90 g/m2 designer colored tracing paper.
We select sheets of paper in a notebook. If the paper density is about 80 g/m2, then it is optimal to select 5 sheets. If the paper is thicker, then it is better to make notebooks of 2-3 sheets.
Fold the notebook in half:
And so on several times until the desired thickness of the future block is achieved. I have 13 notebooks here, i.e. The notebook will contain 130 sheets of A5 format.
We place the future block at the spine with two pieces of binding cardboard (this is done so that there are no dents left on the paper from the staples, and it is pressed evenly) and secure the spine with office clips, as shown below:
The block usually sits under pressure for about 3 hours, but I often leave it overnight.
While the paper is being pressed, you can look out the window and drink a cup of coffee :)
When our notebooks are compacted, we open the clips and straighten the spine by tapping them on the table. We secure the perfectly even spine again with clips, like this:
Next we have to cut 6 holes at equal distances on the spine. I use a pre-prepared sheet of paper with markings; for an A5 notebook format, you can download one from this link and print it out. If the format is non-standard, I think you can easily mark the block with a pencil and ruler :)
We cut these holes on the spine (as one option, you can draw marks on the spine itself, and then use an awl to pierce holes in each of the notebooks, but in my opinion this takes longer):
I used a small file with three edges, bought at Auchan :)
When our holes are ready, we can easily and masterfully sew the block. We will need two fabric ribbons. I use cotton. The tapes should be of such width as to fit between two sawn holes:
I feel comfortable sewing by placing the block on the edge of the table facing me. There may be variations here, but the main thing is to try not to wrinkle or stain the paper in the process. Often, at first, not everyone succeeds. For sewing I use leather needles and Iris thread for crochet. We place one of the notebooks in front of us, as indicated in the photo.
We sew the first notebook with a “forward needle” seam, using a single thread, leaving the tail outside. We do not pierce the fabric ribbons, but simply bend them around with thread:
We place the second notebook on top of the first one, without confusing the right and left edges of the notebooks, i.e. don't turn them over. We insert our needle into the hole in the second notebook:
And we stitch it in the same way as the first one, catching the thread on the thread of the previous notebook in the place where we go around the ribbons:
When we have reached the edge, we tie the working thread and our left tail into two or three knots, having first pulled them up well:
Place the third notebook on top and do the same:
In the places where our ribbons are located, we hook the working thread to only one previous one:
Sew on the third notebook:
And now we must tie a knot, connecting the third notebook with the previous ones. To do this, we thread a needle through a thread between the 1st and 2nd notebooks:
We remove the needle, leaving a loop:
And we thread the needle through the resulting loop like this:
We press the notebooks together to make our knot tight:
It is essentially a simple sewing knot and is often tied when finishing sewing. Now we boldly lay all subsequent notebooks on top, sewing them to the block and tying knots along the edges
If you run out of thread, it is convenient to tie it on at the moment when we are above the ribbon. In this case, the knot is guaranteed to remain on the spine and will not be visible on the finished product.
When all the notebooks are sewn together, we tie not one, but two or three sewing knots on the side.
Place the block again between the cardboards, Special attention giving an even spine. Notebooks should lie next to each other:
And we fasten our improvised press from above and below:
Now you need to glue the spine. I use Silicone Sealant from Moment. It holds notebooks together quite firmly, while remaining elastic even after drying, as a result of which the notebook opens and leafs easily. Also, after using it, there is no need to additionally glue the gaps between notebooks.
Apply sealant to the spine:
And spread it along it with a sponge, paying attention to filling every crack.
When all the cracks are filled, you can remove the excess and level the layer.
We fasten the clips along the spine again, trying to get as close to it as possible with their “pressing” part.
Usually the block takes an hour to dry, but if possible, it is better to leave it under pressure longer. I also often leave it overnight.
In the meantime, we can prepare future endpapers. For them we will need two sheets of thick paper (in our case A4 format), preferably from 180 g/m2, you can use scrapbooking paper. We make creases in the middle:
And fold them in half, with the “beautiful” side inward:
As it dries, we take our block out from under the press:
I put on a couple of pieces of kraft paper before I put on the endpaper. It will tailor the relief of the ribbons under the endpaper and add strength to the product.
I glue it using a UHU glue stick like this:
And I glue the ribbons on top of the craft:
Next we glue on the endpapers. I like to make durable and good quality notebooks, so I use Moment Crystal glue. To apply the glue strip evenly, protect with a sheet of paper that part of the block that the glue should not get on:
We remove the sheet and glue the endpaper. We glue a piece of craft paper with ribbons onto the endpaper at the top:
Now we have to align the edges of the resulting block. There are 4 ways:
1. Buy a simple guillotine cutter. It justifies itself if you plan to make notebooks often and in large quantities.
2. Try cutting it manually using a construction knife. The knife can be bought in Auchan, Leroy Merlin and so on. Choose an expensive, heavy knife and good replacement blades. Break blades as often as possible. At first glance, this method seems impossible, but in my master classes many people manage to cut the block quite decently the first time. And with certain training, it often turns out not far from ideal.
Place a metal ruler at the edge and press it firmly against the block with your left hand. You should not cut less than 5 mm, it is very difficult. Right hand cut with a knife, holding your hand strictly perpendicular to the work surface. We pass the knife over and over again without pressing hard. It’s better to have more “passes”, but almost no pressure. As a result, the cut can be processed with fine sandpaper.
Photo from my MK:
3. You can take the block to a printing house near your home or work. Often they will not refuse to cut a block, and it costs around 5-15 rubles. per block. If there is only one block, they often cut it for free :)
4. Leave as is:) The shaggy edge emphasizes that the product is handmade.
I'm using the cutter:
As a result, we get a finished block.
I already wrote once how to make a notepad out of a block, but some things there are outdated, despite the fact that general principle remained. I promised to update the information a long time ago - and here it is :)
We will need two binding cardboards slightly larger than the block size and 300 g/m2 cardboard for the spine.
We cut the cardboard so that when placed on the block there is 5 mm left over on 3 sides, and the spine has 5-7 mm less:
On cardboard for the spine (mine is 10 cm x cover height) we make several creases 7 at a distance of 2-3 mm from each other. This is done so that the spine is beautifully rounded during use. The distance from the first to the last creasing should be 3-4 mm greater than the height of the block spine.
This is approximately how the cardboard spine should sit on the block:
Now we glue the spine with the cover cardboard. I use Moment Crystal glue. Do not forget to retreat those 5-8 mm from the outer creases on the spine, which we laid when cutting the cardboard.
I want a softer notebook, so I glued an extra layer of fleece on top :)


In this instruction I will show you how to make a notebook with your own hands with a perfect binding. I wanted a small paperback notebook and used my bindery press, I used an old classic car manual as a unique cover and a glued binding method to secure the spine of the notebook with PVA glue.
For this project you will need:
- A5 paper (UK) (USA)
- PVA glue (UK) (USA)
- Spray adhesive (UK) (USA)
- Black cardboard A4 (UK) (USA)
- Black acrylic paint (UK) (USA)
- Clips (UK)
Step 1: Paper Block


I started with standard printer transfer paper. I didn't want the notebook to be too big and decided that A5 would be perfect for me. I've never wanted to carry one in my pocket (otherwise I would have preferred an A6 or similar size), but I would like it to fit in the backpack I always carry with me.
My first thought was, why not make A5 paper myself using a regular paper guillotine? I tried. And he failed. Not a single sheet cut perfectly, I just couldn't do it. If you have the best quality guillotine, then everything is possible and will work out!
So, I found and ordered A5 paper online. For some reason, I really wanted to make the paper myself, but for this project, I didn't want to complicate things. I took out about 50 sheets of paper. The thickness of this volume of paper seemed good to me and not too thick. If the notebook was going to live on a desk or something, I would have made it much thicker, but since I wanted to carry it around with me, it was overkill. I tamped the sheets down on all sides to make sure the block of paper was perfectly level. And used clips to temporarily secure the leaves together.
Step 2: Clamp and Glue


The next step was to place the block of paper in my binding press (the clips were still on the block). Once the block was in the press, I tightened all the screws to keep the book secure and removed the clips.
I took some PVA glue and, using a stiff bristle brush, applied a thin layer of glue to the spine. future book. I did everything very carefully, and you will see that everything is smooth and the entire spine is covered with a layer of glue. I let the glue dry for 20 minutes and coated the spine with a new coat, as far as I remember, I did a total of 4 coats. Between layers of glue, I ran my fingers along the edge of the spine to make sure the glue wasn't running off the edge of the paper.
Step 3: Cover


I had old instructions to one of the classic cars my dad had (he didn't have many, don't worry!). I flipped through it until I found a page with interesting illustrations that I liked. I think this is the radiator circuit diagram? Either way, she looks cool.
I wanted to use black cardstock to apply the gold plating next, so I took A4 cardboard and sprayed some spray adhesive onto it. The first time I made the cover (and as many of the instructions said), I applied a lot of PVA. But it turned out that no matter how thin a layer of PVA was applied, it would still make the cover wrinkled or not stick at all. In the end I decided to use spray adhesive, it works much better and doesn't warp the cover paper at all!
Step 4: Gilding


I wanted this notebook to stand out a little, so I watched a few videos about “gilding” the edges of the book. The traditional color is gold, but I wanted to do something more modern, so I chose black. I used some black acrylic paint and applied it with a brush in very thin layers. Typically, when creating a book, you try to avoid damaging the paper. If you overdo it with glue or paint, you'll end up damaging the paper!
I made sure to place the block of paper back into the press to secure all the pages together and stop any ink bleeding into the pages. I went around all three sides and applied paint to each one.
Once the paint has dried, it's time for final assembly. I placed a block of paper inside the cover and folded the cover over the binding. You can measure the width and thickness of your book and transfer it to the cover, then you will get a better fold. But in the end, I decided that I would take the easy route and fold the cover directly onto a block of paper.
Using spray adhesive I covered inner part cover and glued the paper inside to it.
Step 5: Finished Look


All is ready! I think it's great that you can give the notebook any look you want. I'm excited about learning new types of book binding. This no-sew method looks very easy for beginners and what I like about it is that you can easily rip out the sheets you need. This soft cover notebook is designed for jotting down ideas so that if the idea suddenly disappears, you can simply remove the page!
If you make your own notebook, be sure to come back here and share a photo of your notebook!
A notepad is a very useful gift! But it’s so difficult to choose it depending on your preferences, so it’s easier to make it yourself. In this article you will find detailed master class, thanks to which you will learn how to sew a notebook from paper and leather.
How to make a notebook with your own hands - materials
The main material for the pages of the notebook will be office paper. Choose it not too thin, otherwise the sheets will not be able to hold their shape. Also, do not buy thick paper, it will be difficult to leaf through.
The notebook can have any cover, but give preference to this one practical material like skin. The rest of the decor is only at your request.
Additionally, prepare the following materials:
- genuine leather measuring 23 cm by 30 cm;
- 2 sheets of cardboard (15 cm by 21 cm);
- wide double-sided tape;
- strong threads, thick cord to match the sheets;
- leather needle, scissors, ruler;
- pencil, knife, stationery clips;
- silicone based sealant;
- super glue, padding polyester for the cover;
- foam sponge;
- ribbon for bookmarks;
- ribbon hanger;
- decorative lock and keys.
How to make a notebook with your own hands - progress of work
- Prepare pages for your diary. Each sheet in it is in A5 format with a zebra. To do this, print the lines and dates on both sides on A4 office paper.
- Fold the sheets in the middle and arrange them by date, forming a notebook of 7-8 sheets.


- Use a ruler to press the fold line on each piece so that it holds its shape better.


- Collect each batch of sheets into a bundle.


- This stack needs to be compressed well. To do this, place cardboard on top and bottom and secure with a paper clip. This way the cardboard will not allow the sheets to wrinkle under pressure.


- While the sheets are being pressed, prepare the cover. Cut two pieces of cardboard to the size of your future diary. For the spine of the notebook, use cardboard in the shape of a rectangle, but only twice as narrow as for the cover. Make longitudinal stripes on it, while pressing the lines well with the sharp end of the scissors. This will make the cardboard more flexible.


- Glue the spine to the two parts of the cover.
- Now cover the cardboard with padding polyester from the front side.


- Place the skin with the back side up on the table. Place the blank for the cover on it with padding polyester on the bottom.


- Glue double-sided tape to the corners of the cardboard and fold the corners of the leather inward.


- Then glue the remaining edges of the leather in the same way. Leave the skin to take the desired shape.


- While the leather is leveling, make the strap and latch. This step can be omitted if you want to make a regular diary. But with a lock, the diary will look more original!
- Cut a strip of leather 6 cm wide and longer than the spine of the notebook. Prepare a strip of cardboard 3 cm wide and slightly shorter than a strip of leather. Wrap it in leather.
- Glue one part of such a strip (on the back side) to the notebook in any way convenient for you.

- On the front side, attach the first part for padlock(with a strap). Secure the second one to the notepad itself.

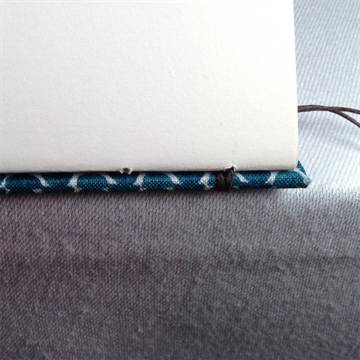
- Now you need to sew a block of sheets. Rearrange the clamps. Along the fold lines, draw stripes at a distance of 3 cm from each other.


- Make shallow cuts along each line, cutting through each sheet.
- Then remove the clamps and take a long thread and two strips of thick fabric.


- Sew each notebook of 8 sheets along the fold, laying fabric in the middle between the stitches.


- Assemble all the pieces of the notebook, gradually sewing them together.
- Place the fabric in the middle stitches and sew it to the sheets.


- Now glue all the parts together with sealant. Coat the gaps between the folds of the sheets well. Don't cut the fabric! Leave the product to dry thoroughly.


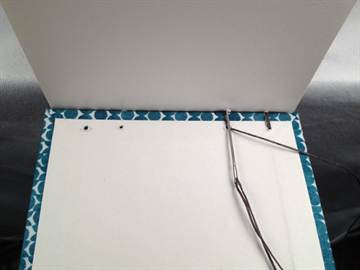
- For endpapers, use paper with any design. Cut two sheets of cardboard or thick paper to the size of your diary. Bend one edge by 0.5 - 1 cm and glue it to the two sides of the stitched sheets.
- On the outside, fasten the fabric, the ends of which remain after stitching.

- Take a printed picture (A4 format), bend it in half and secure it between the cardboard. Apply glue to the entire surface of the paper. Press well with a sponge to avoid bubbles on it.


- Cut the endpaper to the size of the cover and glue them together.
- Decorate the corners of the diary with iron fittings - this way they will wear out less during use. On the front side, write the owner's name in gold paint.

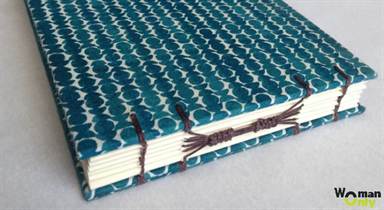
- All that's left is to glue on a nice cord that will serve as a bookmark.


Now you can do it yourself original gift, which will decorate not only your office desk, but also retain a piece of your warmth.
To learn how to make a notebook out of paper without stitching, watch the video:


