A mask is an integral attribute of children's games. Caps, masks and chest emblems for outdoor games
Do-it-yourself physical education and health corner in a preschool educational institution
The corner that took 1st place in the review " Best corner physical education and sports" in our kindergarten!
Half a year ago, when our garden opened after reconstruction, this is what the physical education corner looked like
After my colleague and I worked on its modernization, it began to look much more attractive...

This is how we created a physical education and health corner in our group.
Leopold with the barbell was cut out by my partner, and I painted it, and then varnished it so that it could be processed, attached hooks and began to fill it...

we created file cabinets of games, gymnastics, sports, types of movements, and created an album “Our Athletes” (with photos of the children of our group)


We made attributes for outdoor games...

Geese-geese...

Frogs and mosquito

Sparrows and car

And many different masks and medallions

We made attributes for aerial gymnastics and eye gymnastics


And a lot of different non-standard equipment, the rugs were made by my parents, so they turned out so different, but so wonderful


And of course we issued a passport for the physical education corner:
PASSPORT OF PETS CORNER 2 JUNIOR GROUP No. 4 “GOLDFISH”
No. Name Quantity per group
Aids
1. Stationary physical education corner
2. Shelf for storing physical education equipment - 1 piece
3. Boxes for storing physical education equipment 5 pcs.
4. Shelves for storing physical education equipment – 2 pcs.
5. Card index of the physical education corner:
- morning exercises
- gymnastics after nap
- breathing exercises
- gymnastics for the eyes
- finger gymnastics
- games for coordination of speech with movement
- outdoor games
- formation games healthy image life
- illustration card index sports games and exercises
- d/game – lotto “Sports”
6.Masks and attributes for outdoor games:
- “Sun and Rain”
- "Hares"
- "The Bear and the Bees"
- "Frogs"
- “Cat and Mice”
- “Sparrows and the car”
- “Horses and teams”
7. Folder “Health-saving technologies for children of the second junior group”
8. Folder “Poems about sports for children” 1 pc.
9.Consultations for parents 7 pcs.
10.Album “Our Athletes”
Physical education equipment
1. Staircase – wall 1 pc.
2. Climbing bars 3 pcs.
3.Game – ring toss 3 pieces
4.Set of multi-colored pins (8 pcs.) 3 pcs.
5.Ball – football 1 piece
6. Large hoop 7 pcs
7. Jump ropes 5 pcs.
8. Ribbons 48 pcs (12 pcs each of primary colors)
9.Braids 20 pcs
10. Sultanas 26 pcs
11. Handkerchiefs 48 pcs (12 pcs each of primary colors)
12. Bags of peas for the prevention of posture disorders, 15 pcs.
13.Colored balls 10 pcs
14. Rope 1 piece
15.Soft modules
16. Force meters - manipulators 2 pcs.
17. Game “Hit the ball” 2 pcs
18.Gate 1 piece
Non-standard equipment
1. Hemp 6 pcs
2. Trainer for developing agility “Traps” 5 pcs.
3. Exercise machine for breathing development “Breeze in a bottle” 12 pcs
4. Breathing simulators “Aquarium”, “Apiary”, “Ladybugs”, “Sea”
5.Visual simulators “Flower”, “Butterfly”, “ Ladybug", "Eight",
6. Game “Catch a fish” 2 pcs + plastic aquarium 2 pcs
7.Game “Motalochki” 4 pcs.
8.Bumps 6 pcs.
9. Wall of posture “Palms” 1 piece
10. Quiet trainer
11.Tracks for the prevention of flat feet:
"Rope"
"Flower"
"Sun"
"Footprints"
"Crocodile"
"Flowers"
"Fish"
"Heels and toes"
"Traces - buttons"
Massage mats
Ribbed board
Foot massager
"Turtle"
"Ladybug"
"Swamp"
12.Massage mittens 24 pcs
13.Tunnel 1 piece
14. Mittens for hardening 24 pcs
15. Cones, chestnuts
16.Board games “Football”, “Hockey”, “Golf”
17. Floor-standing “Towns” 2 pcs.
We have created such a favorite corner for our children!
DIY paper carnival masks: crafting with children. Master classes for children preschool age, notes for teachers, collection of ideas.

DIY paper carnival masks: making with children
In this article you will find 5 master classes on making carnival masks from paper with children:
- Mask using cutting technique from paper,
- Master class on making paper headband masks (sample script and step-by-step master class)
- Father Frost's workshop and children making masks together with their parents (sample script and step-by-step master class)
- Master class on making caranival mask using papier-mâché technique together with the children.
- Master class on implementation a simple mask made of paper or cardboard.
All master classes were prepared for you by readers of the “Native Path” website - participants in the competition of the “Native Path” website and a free magazine for parents and teachers
Master class 1. DIY paper cutting technique mask
Paper cutting- This is an appliqué technique in which small pieces of paper are glued onto the base - the design. In this master class we will learn how to use this technique to make a hare mask with your own hands together with your child.
Tools and materials
To make a carnival hare mask we will need:
- White cardboard
- Napkins (various colors)
- Scissors, stationery knife
- Glue stick
- Simple pencil
- Black felt-tip pen.

How to make a carnival bunny mask with children: step-by-step description
Step 1. Draw a bunny's face on cardboard paper or print out a ready-made mask template. Cut out the mask.


Step 3. Next, take some glue and start creating. We figure out which parts of the bunny’s face will be voluminous and glue napkin balls onto them close to each other. We make the fluffy parts of the muzzle using pieces of cotton wool.

Step 4. Using a felt-tip pen, draw the eyes and eyelashes of the hare on the mask. The carnival mask is ready!

Master class 2. “New Year's mask - Snowman headband.
Father Frost's Workshop"
Progress of a master class for children on making carnival masks from paper “Snowman”
Accompanied by music (song " New Year's toys") the group includes children.
Educator: Hello guys! Approaching New Year! This is a magical holiday that both children and adults look forward to equally. To make the New Year holiday fun and memorable, we must prepare well for it. Today we invited you to our creative workshop and invite you to make New Year's craft– mask. Look what I found near our kindergarten - what a big bag! And there was a letter attached to it. Let me open it and read what it says (reads):
“Hello, dear children and kindergarten teachers!
It's snowing outside the window,
That means the new year is coming soon!
I'm going to visit you for a holiday,
I'll be coming to you for a long time,
Through the snowy fields,
through snowdrifts, through forests...
I’ll bring you a Christmas tree covered in snowy needles.
I wish you a Happy New Year,
And I will leave gifts for you.
You don't sit idle,
Decorate the group with snowflakes, firecrackers,
garlands, toys
frosty patterns, silver rain,
multi-colored flags, noticeable drawings...Therefore, throughout the Russian country I issue a Decree:
open to all children's institutions without delay, without any doubt
"Father Frost's Workshops"
Let everyone come to glue, and sculpt, and cut...
Invite everyone to the workshops!
See you soon, friends!”
Educator: This is the necessary decree that Grandfather Frost issued! What's in the bag? Let's open! (Children and teacher open the bag). Look how much Santa Claus gave us - scissors and colored paper, cotton wool, plasticine, glue and a template. Let's try to guess: who does this template look like? (children answer). Of course, for the snowman.
Now the girls will tell us poems about a snowman:
Three balls, a bucket, a carrot
And for the eyes - two coals;
Let’s deftly insert the hand sticks:
We are making a snowman.
The yard is full of snow.
I made a snowman.
Arms, legs, head,
Nose - carrot, two eyes.
I'll paint the mouth.
Let the people rejoice!
Educator: Well done girls! Now we'll play a little. Physical education lesson “Snowman”:
We are making a snowman -
(Children show everything they talk about)
Hat, nose, eyes, sides.
He is neither small nor big
(squat, stand up)
A nice snowman has come out!
(Hands placed on the belt, body turns Left - Right)
Let's make a New Year's craft together - a snowman mask. Let's make a New Year's craft together - a snowman mask. Next, the teacher shows the children the stages of making a mask - a “Snowman” headband. Children perform a mask. How to make a snowman mask with preschool children is presented at step by step photos below.
Step 1. We outline the snowman template.


Step 2. Sculpt a snowman's nose from plasticine, make eyes and buttons. Using the method of spreading plasticine along the contour of the part, make a bucket.

Step 3. Apply glue to the snowman using a pencil. Glue fluffy cotton wool.

Step 4. Decorate the snowman with snowflakes.

Educator: Well done! What beautiful snowmen we made. Let's take a photo together in our carnival masks and send a photo to Grandfather Frost. He will be very pleased that you made such beautiful crafts and that we are all looking forward to the New Year. Ends Master Class"Father Frost's Workshop. Snowman mask" tea party.
Master class 3.
Creative workshop for children and parents “Making masks with children” (for children from 3 years old together with adults)
Materials and tools for making a mask:
- Scissors
- Pencils
- Colored cardboard
- Pearlescent gel
- Decorative decorations
- Ribbons or rubber bands
- Rhinestones and beads
Master class script: 1. Introductory part of the master class.
- Organizational moment, greeting.
- Presentation of the topic of the lesson.
- Conversation about masks.
- Demonstration of samples.
- Explanation of product manufacturing technology.
- Safety precautions when working with scissors.
— Good afternoon, dear guests. We are very glad to see you here in our group. Look how the children and I formed a group for New Year's holiday! New Year is one of the most happy Holidays, miracles happen on New Year's Day. How are you having fun on New Year's? - Guess the riddles. The host asks one riddle about a masquerade with an answer - a rhyme, for example:
Everyone had an outfit.
Was our… ? (masquerade).Everyone has new faces
Loud children's laughter is heard,
Hats, dresses made of paper,
There are wooden swords there,
Like a fairytale parade
This holiday... (masquerade).
3 children wearing masks (samples) come out and recite poems. Parents must guess their children.
1st child:
Colorful, bright, noisy
New Year's masquerade
And a funny costume
And I’m glad for the cheerful mask.
2nd child:
From funny transformations
The world becomes different:
Kind, fabulously magical,
Witty and funny.
3rd child:
New Year's carnival
He hid his faces with masks
And in fancy dress
I danced the whole evening!
The presenter tells the story of the carnival: « Carnival As a type of folk festival with street processions and theatrical games, it lives in many countries. The main attributes of any carnival are costumes and masks, which help hide social differences and equalize everyone during the celebration. In Russia, dressing up and having fun wearing masks was allowed only on Christmas and Maslenitsa. The initiator of masquerades in Russia was Peter I, a passionate lover of dressing up. In 1721, a magnificent street costume procession was organized.” You can not only buy a mask in a store, but you can also make it yourself from the most different materials: paper, leather, fabric, papier-mâché. Adults and children look at samples of masks. We invite you to make a mask today. Try to create your own masterpiece. And let the flight of your creative imagination help you.
The presenter explains the technology for making the mask:
Step 1. Draw the outlines of the mask on cardboard. Or we outline the mask template. Cut it out.
Step 2. We mark the holes for the eyes and cut them out.

Step 3. We decorate the base of the mask with decorative material.

Step 4. Attach an elastic band or ribbon to the carnival mask.

The master class leader reminds children and adults of the safety rules when working with scissors:
- The blades of the scissors must be closed (closed) when not in use.
- The scissors should be passed rings forward with the blades closed (closed).
- Scissors must be used carefully; you cannot swing them so as not to injure your neighbor.
2. The main part of the master class. Practical work for making a New Year's mask. Product design. The hardest part is over, and our masks are almost ready. Let's leave the masks and let them dry a little.
The presenter conducts a physical education session for children.
Here in the cold winter
The wind blows icy
(Children wave their hands to imitate the wind)
And it kicks up a cloud of snow.
He is harsh and powerful.
(Children perform circular movements with their hands like a winter whirlwind)
Hares are hiding in the bushes.
Even the sly fox
(Children sit in a deep squat for a few seconds, then stand up. It's like they're bunnies hiding from a fox)
Hidden and sitting
Well, the snow is flying and flying.
(Children perform hand movements to show snow falling)
But the evil blizzard subsided,
The sun is shining in the sky.
(Stretching - arms to the sides.)
A fox gallops across the field.
(Jumping.)
Well, we'll walk a little
(Walking.)
And we will return home to ourselves.
(Children sit at tables.)
And now the most interesting thing is that we will start decorating our carnival masks. There are many ways to decorate masks - it all depends on your imagination and sleight of hand. The most popular way to decorate a mask is by gluing various accessories. As decorations, you can use everything that lies in front of you on the tables.

3. The final part of the creative workshop:
- Collective analysis of creative works
- Cleaning workplaces.
The presenter thanks the children and adults. Helpful advice: It would be nice at the end of the master class to arrange a real carnival with New Year’s music, everyone to play and dance together.

Master class 4: papier-mâché carnival mask
Another traditional mask-making technique available to children aged 6 years and older is the papier-mâché technique. Using this technique, you can fashion a mask of any, even the most bizarre shape. You will learn from this how to make a papier-mâché mask from a regular roll of... toilet paper step by step video. Children can also be involved in making papier-mâché. Of course, it will still be difficult for them to fashion a mask, but they will be happy to paint it acrylic paints.
An example of a children's carnival mask using papier-mâché technique
This is the kind of mask Daria Kholina (6 years old) made from paper using the papier-mâché technique. Educator - Elena Anatolyevna Rim (MBDOU “Combined kindergarten No. 75 “Fairy Tale”, Moscow region, Sergiev Posad district, Shemetovo village, Novy district).
How to make such a mask:
Step 1. Make a cast from plasticine - the basis for making the mask. You need to make the shape of the mask that you want to make. In this case it is necessary Special attention pay attention to the impression of the nose and eyes. it is very important.
Step 2. Layer the pieces of paper layer by layer ( toilet paper) onto the base using PVA glue. There should be 5-6 such layers (for the strength of the product).
Step 3. After 2-3 days, after the mask has dried, we give it the desired color, decorate it and thread an elastic band to the size of the head. This is what happened to six-year-old Dasha.

Master class 5. Simple carnival mask made of paper
You don't have to make a complex mask at all. The simplest paper mask can be made very simply and quickly, and even kids can make it.
Here are examples of such masks.
Example of mask No. 1
The first mask was made by Kristina Shmatkova, 6 years old. Educator - Yulia Mansurovna Abasheva (MBDOU “Combined kindergarten No. 75 “Fairy Tale”, Moscow region, Sergiev Posad district, Shemetovo village, Novy district).
How to make such a mask quickly and easily:
Step 1. Come up with an image of a mask for a child.
Step 2. Cut out a mask from thick cardboard.
Step 3. Decorate with applique and sequins. Insert the elastic according to the size of the child's head.
The mask is ready!

Tip 1. Such masks can also be made based on ready-made template. In this case, a picture of the mask is printed on a printer and cut out with scissors. It is glued onto thick cardboard. Holes for the elastic are made on the sides of the mask with a hole punch. An elastic band according to the size of the child's head is inserted into the mask.
Tip 2. You can sew parts to the mask. In this case, a part is cut out for the reverse side of the mask, which exactly follows the contour of the mask in shape. The seams are hidden under this part.
Tip 3. Any mask can be painted. It is better to paint masks with acrylic paints, because... They are durable and do not get dirty in the future. The mask can be stored and used in subsequent years.
Example of mask No. 2
Here is another example of a simple paper carnival mask made from cardboard. The mask was drawn on cardboard and cut out according to a template. Next, the child paints the mask. Holes are made along the edges for the elastic band and it is inserted into the mask. You can go to the carnival.
These carnival paper masks were made by children from kindergarten GBOU Lyceum 1564 d/o Raduga together with their parents. Teachers - Nadezhda Alekseevna Kishka and Saigibat Abdulkadyrovna Magomedova.


Happy masquerade! The way carnival masks made by yourself will delight you, your children, friends and loved ones! See you again on the Native Path!
You will find more ideas for making carnival costumes for children with your own hands in the section .
The world of childhood is like a mysterious and wonderful island. It is inhabited by fairy tale characters and movie heroes. Favorite heroes become role models. With pleasure, transforming into a favorite image, the baby voluntarily accepts and assigns the features characteristic of the image.
Thanks to the game, children take away with them adult life The wonderful properties of their games are selflessness and camaraderie, kindness and courage, dreaminess and creativity, humor and good nature, faith and loyalty, truth and honor.
In the practice of education great importance purchased theatrical games. A creator by nature, an active being from birth, a child, while playing, masters the world, models relationships, trying himself in various roles. Play activity serves as the basis for participation in other activities: educational, labor.
Theatrical play involves creating an imaginary situation. For a child entering the game, external signs are extremely important, helping to imagine himself as one or another hero, enter into the image and stay in it for some time. Masks can serve as such signs, expressively and unambiguously characterizing a certain image. Therefore, visual activities and manual labor, during which children make masks.
Masks, good and evil, funny and sad, comic and tragic - all this rich visual material is necessary for a child’s soul. We have no right to reject this art, because it constantly attracts children to itself, arousing aesthetic interest. A mask is an extremely generalized, allegorical image. The mask image reveals the essence of character. How often, unfortunately, children's perception is limited to the external shape of the mask. It is necessary to expand the horizons of their ideas about the mask, to rekindle their interest. Masks must be considered as an element of the game (theatrical, moving, etc.), its integral attribute. This is a lively, fascinating material that will help children to rethink the art of the mask, to better understand its meaning, the closest connection with the artistic and figurative form.
The mask will help make the images of the heroes brighter, better understand the content of the game, and navigate its development. “Trying on” various masks and roles has a very beneficial effect on the child’s psyche: it contributes to the development of the image of the ideal and real “I”, knowledge of the potential of one’s own personality, and helps to establish contact with others. Attributes (elements of costumes, masks, decorations) will help the child immerse himself in a fairy-tale world, better feel his characters, and convey their character. It creates a certain mood, prepares little artists to perceive and convey changes that occur during the course of the plot, promotes knowledge of the potential of their own personality, and helps to establish contact with others.
Putting on a mask and turning into a cunning fox, bunny, mouse or bear, the child seems to be passing through the actions and actions of these characters. Somewhere in the subconscious, he senses the author’s position and, through its prism, gives his own assessment of the actions of these characters, thus assimilating both the norms of public morality and the aesthetic, figurative nature of art.
The process of making masks and the participation of children in theatrical games is of particular relevance in connection with the approaching holidays. And every time you have to think about how to make a mask, how to create a festive mood for your child. By the way, the last one is the most important! What is the use of a costume or mask if it costs the child tears and a ruined holiday?!
About a month before the holiday, invite the children to open a creative workshop. Collect various items in a box (folder): plain and corrugated cardboard, crepe and regular thick paper, foil, colored shreds, pieces of foam rubber, threads, braid, rope, beads, Christmas tree tinsel, and natural material in the form of cones, leaves, acorns, etc. Make sure all items have nice view. Constantly replenish the box with new materials. Consider all these “treasures” with your child. Determine what kind of mask you will make and what materials you will need for it. Prepare scissors, glue, needles and threads, a ruler, etc. for work. Make the base of the mask. Help your child decorate it as he wishes, using the material that is in the box. Encourage children's creativity!
In the hands of young artists, paper, cardboard, fabrics, natural materials, everything that can be used to make a mask will come to life. Search artistic forms will not be divorced from the content. Children will reincarnate the perceived image in their own way and invent a lot in it. As a result, you will be able to see the successful creative embodiment of the ideas of young artists.
Kuzminykh Alevtina Egorovna,
teacher at MDOU DS "Buratino"
With. Krasnoselkup
teaching experience – 37 years
The most common type children's creativity- theatrical activities. It is close and understandable to preschoolers because it is associated with play. Children enter into the role, playing any role, trying to imitate what they saw and what interests them, and receive great emotional pleasure from this.
I offer you a journey into the theatrical world, or rather into the world of masks, which we need in our work for theatrical performances and outdoor games.
You can make masks yourself. To make masks you need: colored cardboard (2 sheets of each desired color); PVA glue (Moment glue, etc.), scissors, a simple pencil, paints, colored paper. And, of course, your creativity and imagination.
Application:
For masks (dog, cat, wolf, pig, squirrel, hare, fox, bear) one pattern required. But everyone’s ears and faces are different.
On the pattern you will see the following icons that indicate:
Hatching - applying glue
Dotted line – fold
Solid line – section
Using simple patterns, we make masks. So, let's get to work.
Mask making plan:
- Transfer the pattern to the selected colored cardboard, cut it out, and cut along the indicated lines.

|

|

- First, we glue together the pattern of a head with a muzzle (for example, a bear), because it will be more convenient to do this on the plane of the table.
- Next we form the volume of the head. Glue the cut parts together on the top of the head. The result is a head.
 |
 |
 |
- We take the ears and glue them to the place allocated for them.
 |
 |
 |
 |
- The mask is almost ready.
- It's time to bring the mask to life: glue on (draw) the eyes and nose. It is possible to apply strokes of paint (pencils, felt-tip pens) using animal fur. This is where creativity and imagination come in handy.

Hedgehog mask:
* For the hedgehog, spines and needles are added to the pattern.
* Cut along the contour.
* The muzzle and ears are cut out.
* Then the muzzle is glued first.
* Then the ears, the headband.
* All that remains is to revive the mask (eyes, nose - applique; apply paint to the needles and lift them slightly). Here you will once again need your imagination.
* The mask is ready.
Bird masks:
- Bird masks can be made in a similar way. Only birds have beaks (they are different in shape).
 |
 |
- Birds can be made like this:
* A double stencil of a bird (magpie) is cut out and painted (or appliquéd).
* The heads are glued together.
* The rim is cut out.
* The bird is glued to the headband on both sides - head first.
In this way you can make any bird (sparrow, tit, bullfinch, etc.).
When making bird masks, you can once again have fun with your
fantasy!
 |
 |
 |
 |
 |
 |
 |
 |
 |
 |
 |
 |
 |

I will be very glad if the masks are useful to you when working with children.
I wish you creative success!
Literature:
1. “Puppet theater for preschoolers” - T.N Karamenko, Yu.G. Karamenko. Moscow "Enlightenment" 1982
2. “Fairy tales and plays for families and kindergartens” - Tatyana Rick. Moscow, 2008
3. “Puppet Theater” - Nadezhda Voydinova. Moscow, Profizdat, 2008.
4. “Preschool education” - magazines.
5. " Theater activities in kindergarten - A.V. Shchetkin. Moscow. Publishing house "Mosaic-synthesis" - 2007
6. “Musical director” - magazines.
7. “Books, sheet music and toys for Katyushka and Andryushka” - magazines.
“Certificate of publication in the media” Series A No. 0002306
We invite teachers preschool education Tyumen region, Yamal-Nenets Autonomous Okrug and Khanty-Mansi Autonomous Okrug-Yugra publish your methodological material:
- Pedagogical experience, original programs, teaching aids, presentations for classes, electronic games;
- Personally developed notes and scripts educational activities, projects, master classes (including videos), forms of work with families and teachers.
Why is it profitable to publish with us?
The other day I noticed that our girls began to treat dolls, hares and bears. They come to eat with their “patients” and sit them next to each other on a chair to observe how they feel at this time. They feed sick dolls with a spoon and carefully wrap them in toy blankets. Then they go to the room and carefully look after the sick. After watching these games, I decided that the little ones clearly lack doctor’s tools and other medical “bells and whistles.” To begin with, we purchased toy set“Doctor”, and then... my mother’s fantasy went wild!
For three days my daughters watched my serious preparations, asked questions and clapped their hands. And finally, they were awarded the big doctor. It contains medical instruments, boxes with medicines, forms for writing down prescriptions, badges with their names and all sorts of interesting and useful things. In addition, the surrounding play space turned into a doctor's office for them.

When I conceived the “Doctor” playset, I really wanted it to come out:
- Interesting and exciting so that you want to play with him again and again.
- Informative, so that thanks to him the girls learn a little more about the profession of a doctor and the structure of the human body.
- Educational so that icons and inscriptions match and are large enough to read. And even though the girls can’t read yet, they know and recognize the letters. This way of presenting words stimulates reading, arouses interest in words and trains photographic memory.
- Compact, since we don't have much space to store it.
- Durable. This step is difficult to accomplish with paper, but possible :) To do this, you need to: print the set on thick landscape paper or whatman paper, glue the boxes and some other printouts onto cardboard, cover the finished boxes and some other printouts with tape.
And now the kit is ready and it seems to me that it fully meets all the listed points.
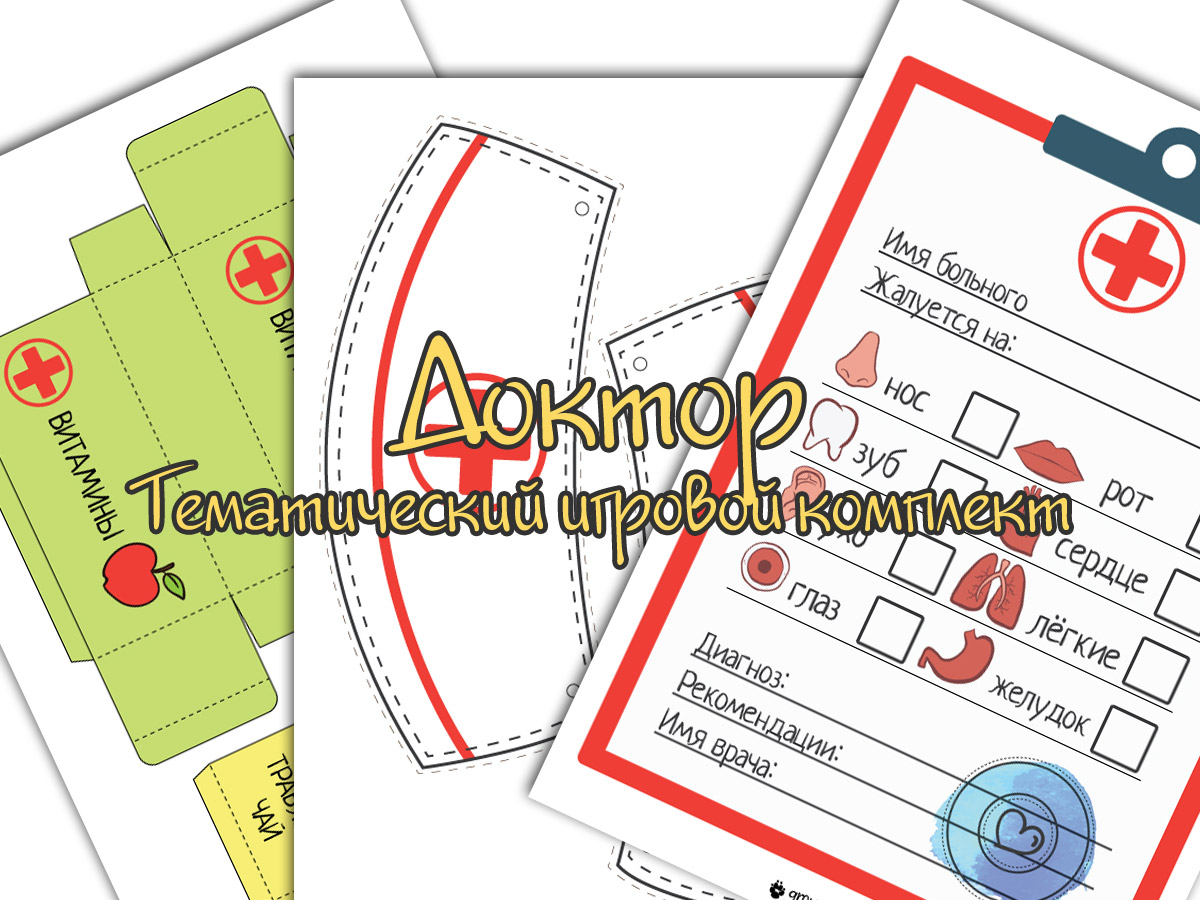
Now I’ll tell you in order what’s in the doctor’s box:

Medicines
Blisters, a regular medical syringe, an antipyretic syringe, a pipette (it was not included in the shot), a measuring spoon.
Paper boxes with medicines (we have them empty inside and sealed with tape on all sides for durability): vitamins, Herb tea, cold medicine, headache medicine, eye drops, heart medicine, foot ointment.

Medicine bottles and jars (some empty, some containing buttons, glass beads and hama beads).


Materials for treating wounds and injuries
Plaster in skeins, plaster (printout), bandage, elastic bandage, dry wipes, wet wipes, a jar of cotton swabs, rubber gloves, protective masks, scissors.


Tools
A phonendoscope (an instrument for listening to the heart and lungs), 2 digital thermometers (plastic and printed), a hammer for a neurological examination, an otoscope (for examining the auricle), a bottle and a syringe (these are not instruments, of course, they just happened to fit into the frame :)

Medical documentation
A questionnaire for examining a patient (it is convenient to use it together with a writing tablet and transparent film, and write on top with a marker for a white board. With each new patient, the notes can be erased and written again: beautiful, convenient and saving paper), forms for prescriptions, cards with some human organs, doctor’s badge, cardiogram tape, x-ray images, medication instructions.
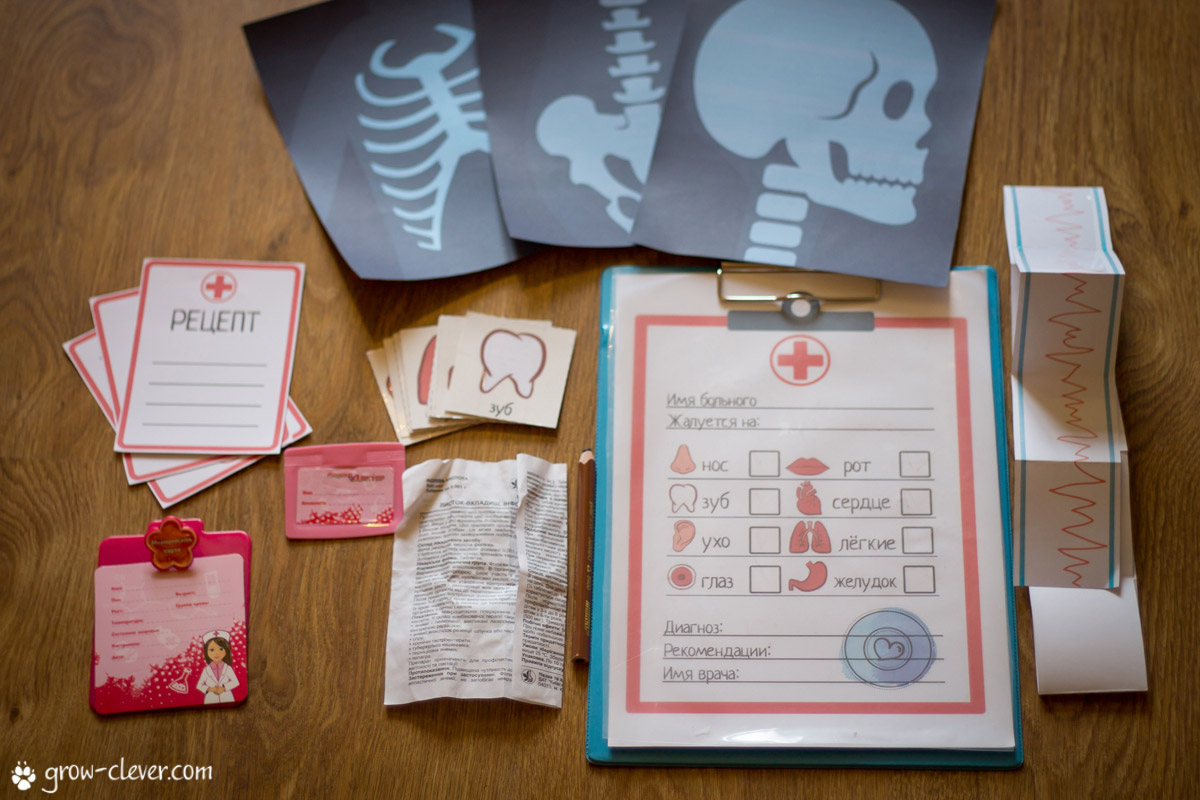
On the walls of the office
Signboard for the office door, posters with the human structure, posters for vision testing in children and adults.


Attributes of a doctor
Name badge, medical headband.


How to play doctor?
To begin with, prepare all the items that you have in mind, rather than giving your child piecemeal. It’s more interesting to become a doctor right away, rather than a little bit at a time. Cut, fold, cover the necessary parts with tape, thread elastic bands through the bandages, prepare jars, glue crosses to them with tape, etc.

Choose a good time when your child can play doctor without rushing anywhere.
Give him a box and be sure to tell and show him what is in it and how to use each item.

Play doctors together for a while to show how a doctor sees a patient, examines and treats him.
Then leave your child to create their own game. It's great if you can organize a game for several children. It's always more interesting, exciting and educational! You can continue the topic with something exciting.
P.S. If you liked our “Doctor” game set, tell your friends about it in social networks . They might also want to play doctor with their children, because such games help children stop being afraid of doctors.
If you want to receive regularly interesting ideas and materials for activities and games with children,
We wish you and your children good health!


