DIY garden figures made of cement (35 photos): classification. Making a boulder for a Japanese rock garden, drinking bowl, sculpture and flower bed
Quite often, even with a successful arrangement of plants in the garden, there remains a feeling of understatement and a general impression of incompleteness. They can help with this problem garden sculptures By successfully placing them on the site you can achieve a magnificent effect.
A little history
Man has been decorating for more than a millennium local area sculptures. But if in the past this was done mainly for practical reasons, for example, protection from evil spirits, now aesthetic considerations have come to the fore.
In Russia, the tradition of installing sculptures in gardens and parks owes its origin to Peter I. Then the works of Italian masters were installed in Summer Garden. The novelty appealed to the taste of the broad masses, and the nobles gladly followed the example of Peter I.

Of course, those sculptures bore little resemblance to DIY garden crafts made from cement. Mainly images of Greek deities and statues of various emperors were used.
About the classification of sculptures
In general, all sculptures used to decorate gardens and parks can be divided into 4 types:
- classical type - most often these are images of deities, emperors, famous people etc. The main materials are bronze and marble. Such sculptures look great in large areas, decorating, for example, the entrance to a luxurious mansion;

- art sculpture - this category includes everything incomprehensible that attracts the eye, and in some cases causes bewilderment. Such sculptures can be made from literally any material. In addition to the usual stone, concrete, metal, even hardened polyurethane foam, etc. can be used;

Note!
Such decorations look somewhat provocative and require special attention when placing them in the garden.
There is a considerable risk that the author's intention will remain unclear.
- sculptural additions;
- small plastic – it is representatives of this group that can most often be found in garden design. Wood, plastic and cement concrete mixture are most often used as the main working materials. Although, instead self-made It’s quite possible to buy a small beautiful one, their price is not that high.
Features of decorating a garden with sculptures
In this case, it is necessary to take into account not only the general design style, but also the nuances of the location of ready-made figures on the site. For example, a majestic human-sized sculpture will look ridiculous against the backdrop of a small, modest house.
The following garden design styles can be distinguished:
- formal style - suitable only for large plots, used when decorating the area around large mansions, etc. In this case, marble and bronze figures would be appropriate; they will look solemn, and expensive appearance will only intensify this feeling;
- registration in english style– in this case, the goal is to bring the situation as close as possible to the natural one. It is allowed to use small homemade figurines, for example, garden gnomes;

- rock garden (design in Japanese style) – boulders will be useful here; natural stones may not be at hand. Below we consider the option of creating a boulder from a cement concrete mixture with your own hands;
- rustic style - DIY garden crafts made from cement would be appropriate here.
Several original ideas
Of course, not every sculptor can make a human-sized sculpture, especially from marble or cast from bronze. Moreover, this task is beyond my capabilities to an ordinary person. But you can show just a little imagination and independently make whatever your heart desires from an ordinary cement concrete mixture.
Using a minimal set of tools you can make the following garden decorations:
- boulders, in appearance they will not differ from natural stones, they will have enough high strength and light weight;

- bright, colorful stone flowers;
- unique ;
- bird drinkers in the form of, for example, a tree leaf;
- just decorative garden figurines made of cement with your own hands– these can be both images of animals and fairy-tale creatures.
It makes sense to consider several “recipes” for making such jewelry.
Homemade boulder for a Japanese rock garden
To make a hollow boulder, in addition to the cement concrete mortar itself, you will also need a plaster mesh - a frame will be formed from it.
The work is performed in the following sequence:
- First, a frame is formed from lightweight material. Anything that is light in weight will do (cuts polyurethane foam, crumpled paper or plastic bags);

- the core is wrapped with plaster mesh;

- after this, the solution is applied to the frame with a small spatula;

Note!
For maximum resemblance to natural stone There is no need to level the surface of the solution.
- after that all that remains is to cover it ready product cellophane and wait until dry. If you dry a boulder on outdoors, then it is likely to crack.

In a similar way, you can make a perfectly round ball, such do-it-yourself cement figures for the garden, painted in bright colors, will revive even the most dull environment.
In this case, the role of formwork will be played by an ordinary children's ball. A small hole is made in its wall and cement mortar is poured inside through it. After a couple of days, the “skin” can be removed, and the cement ball can be primed and painted in a bright color.
Drinker in the form of a leaf
To make an original drinking bowl, you will need an ordinary large leaf of burdock or any other, a little sand, a piece of polyethylene, cement concrete mortar and a piece of pipe with a diameter of about 10-15 cm. The main highlight is that all the veins from the burdock leaf will be imprinted on the surface of the cement mortar.
Instructions for making the figurine look like this:
- polyethylene is spread on a flat surface;
- a small sandy mound forms on it;
Note!
In order for the sand to keep its shape well, it can be moistened.
- another piece of cellophane is laid on top of the sand, stretched and fixed with stones in the corners;
- a sheet is spread and smoothed over it;

Note!
There will most likely be several small holes on the sheet.
To prevent the solution from leaking through them, you can simply lay small pieces of sheet on top of them;
- the sheet is coated with the solution;
- in the central part, a pipe is placed on a layer of cement concrete and filled with mortar.

After this, all that remains is to wait for the mixture to dry. The remains of the sheet are removed, the concrete is primed and painted, you can age its surface when painting, this will only enhance the aesthetic effect.

Homemade sculptures
If free time allows, then you can make more complex garden sculptures with your own hands from cement.
IN general outline the same approach is used:
- It is not advisable to make massive parts of the sculpture solid. So the weight of the figure will be too large and the cement concrete will take too long to dry. It is best to use old containers for the frame;
- for elongated elements, the frame can be made of reinforcing bars or wire.
For those who want to diversify the appearance of the garden, we can recommend a flowerbed-lake on which figurines of swans will be located average size. The swans themselves will be made of cement concrete mixture.

The work is performed in the following order:
- the body frame is an inverted old basin, and for the neck you will have to weave a wire frame;
- the frame is coated with a layer of cement concrete mixture, the head is formed;
- The necessary texture of the surface will be given by small pebbles pressed into cement concrete and painting.
Flowerbed in the shape of a hand
A mini-flower bed (or flower stand) can be made using an ordinary medical glove. To do this, just fill it with the solution and wait for the mixture to harden. Then you just need to remove a thin layer of rubber and the original stone hand ready for use.

These are not all do-it-yourself garden sculptures made of cement; in this matter, the only limit is your imagination. WITH minimal costs With time and effort, you can make cute boletus mushrooms or bright fly agaric mushrooms; they will look great in the depths of the garden.
Another option for simple figurines is stone flowers (from hemispheres), ladybugs and other creatures that do not require attention to detail.

In conclusion
Decorating gardens with sculptures is only gaining popularity. This is a great way to diversify your boring long years view of your favorite area. It is also important that most of the sculptures can be made independently, that is, the financial costs of their production are minimal.
The video in this article shows cute examples of figurines for garden decoration.

Residents of all cities and towns are surrounded by a huge number of concrete sculptures. Probably the most figures produced were V.I. Lenin. Of course, we are interested in something more fun and simpler. Let's get acquainted with the garden figurines that people have made with their own hands and choose the one that suits you.
“Grandfather and grandmother are singing this song next to us”Features and properties of concrete crafts for the garden
The main characteristic of concrete sculptures is strength. Moreover, art concrete is not afraid of frost, sun, or moisture.
This is what predetermined the popularity of using the material to create figures on city streets. Crafts made from it can be painted, but many creations look decent even without painting.
With your own hands, from a mixture of sand and cement, usually in a 2:1 ratio, you can make funny figures for the garden, flower pots, decor for a pond, and so on. We devoted another separate material to concrete paths.
During operation, concrete takes a long time to dry and may spread. A solution that is too thin may crack during drying. But there is time to form the desired surface shape from the material. PVA glue or tile adhesive is added to the solution as a plasticizer.
To create a figurine from artistic concrete, the easiest way is to pour the solution into a ready-made mold. Another option is to sculpt the sculpture on a pre-prepared frame. The original way– soak a cord or fabric in concrete and form a craft. A textured surface can be obtained by covering the casting mold with a corrugated material that will not stick to the workpiece.
Options for figures made from cement mortar

 The plant pot is cast from concrete, and the hairstyle is organized by plants.
 Artistic concrete is best suited for making flower pots, since the finished product is not afraid of moisture. The easiest way to cast a flower container is to use a plastic flowerpot as a mold, with a plastic bottle placed inside to form a void. A true masterpiece is a flowerpot in the shape of a woman’s head, in which flowers grow that imitate a hairstyle.
The simplest option is to pour some cement mortar into an old rubber ball. You will get a ladybug, which remains to be painted. A gnome-shaped mushroom head can be made using a plate as a mold. The leg can be fashioned from mortar on a frame made from a plastic bottle.
 Everything is made of cement: from simple to complex
 Sculptures of people are much more difficult to make; we will talk about them below. Fawns are wonderful role models. To make them, polyethylene film is laid on a flat surface. It is convenient to lay out the contours of the figure from flexible plastic border tape. On the outside of the mold, sand and stone are used to secure the tape. It is convenient to fix the tape inside by sticking pieces of wire into the ground. Immediately after pouring the solution, the wire is pulled out.

 Concrete crafts sleep constantly
 Complex figures are made by pouring cement mortar into special molds, or are molded onto a frame. A description of the manufacture of the following figures follows in the text.

 Masha and the bear are always together
 The wolf and the hare stay away
 Jack has ordinary sand in his chest.
  Shrek finally put the donkey to good use
 Universal rules for creativity from cement mortar
To ensure the strength of any cement-based product, heat and moisture must be provided when the latter hardens. Therefore, it is necessary to comply with general rule: after making the figure, it should be covered plastic film.
Old rags, tights and cord turn into flowerpots and gnomes
A good idea is to soak the fabric in a solution of cement and sand. What will happen is eloquently described in the film “Gentlemen of Fortune.”
To ensure a durable structure, pieces of fabric soaked in the solution are hung on a stand and covered with polyethylene. After the cement hardens, a flowerpot is obtained. It can be painted.

 Old tights are no less functional. You should take a tighter specimen and cut off one stocking. Cement mortar is poured inside. To organize the legs and nose of the gnome, parts of the fabric are tied with lace. The top of the stocking without cement can be tied as in the picture.
The second part of the tights, soaked in cement, is tied around the blank, forming the bottom of the cap. The tails of the knot form a gnome's mustache. The structure is hung on a rope. After the concrete has hardened, the figures can be painted to suit your taste.

 From soaked cement mortar With twine it is possible to compose many compositions. The simplest thing is to wrap it around a regular balloon ik. After the cement has hardened, you need to remove excess pieces of concrete with a sharp object. The structure can be painted. It turned out decorative ball for garden.

 Burdock leaf and balloon form the shape of a fountain and lamp
Using balloon As a form, you can make your own garden lamps, ball-shaped flower pots or decorative concrete balls.
 A large burdock leaf is a wonderful form for DIY concrete crafts. Leaves made from concrete are suitable for creating a path, decorative waterfall or just the scenery of the site.
Master class on making a decorative fountain from concrete leaves:

From the example of a craft using a plant leaf, it is obvious that the surface of art concrete can be very different. In the photo below you see an example of the work of the crumpled film when filling the head of the fungus, thanks to which the figurine acquired more natural look. When making flowerpots, plastic or rubber inserts were used to form stars. Surface ladybug can be put in pieces ceramic tiles. The walls of plant pots are covered with gravel chips. Thus, your craft can be decorated using in various ways.

 Surface texture of cement crafts for every taste
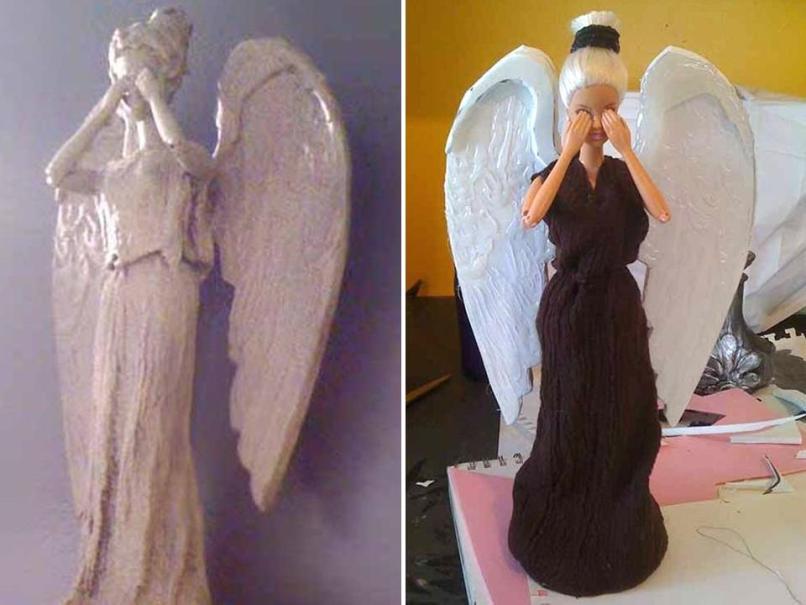
 We sculpt any figure from cement mortar on a frame made of wire, plastic containers and an old toy
In this section we will learn how to sculpt garden figurines from artistic concrete using a frame. In construction, it is believed that a new layer of material cannot be laid on dried concrete. However, sculptors cannot sculpt an entire figure in a short time, and the long-hardening material will not allow this. For this reason, when sculpting from cement mortar, a new layer is applied to the previous one that has not completely dried. At the same time, they try to ensure sufficient thickness and continuity of the new layer of material.
An old doll can be used as a frame for a garden sculpture. To ensure that the solution sticks to the workpiece, it must be primed, for example, with PVA glue. Then a thick solution is gradually applied. Work is carried out with gloves. To speed up the hardening of the solution, add a little gypsum to each portion that you take in your hand and mix directly in the palm of your hand. After the solution has completely hardened, the sculpture is primed and painted.


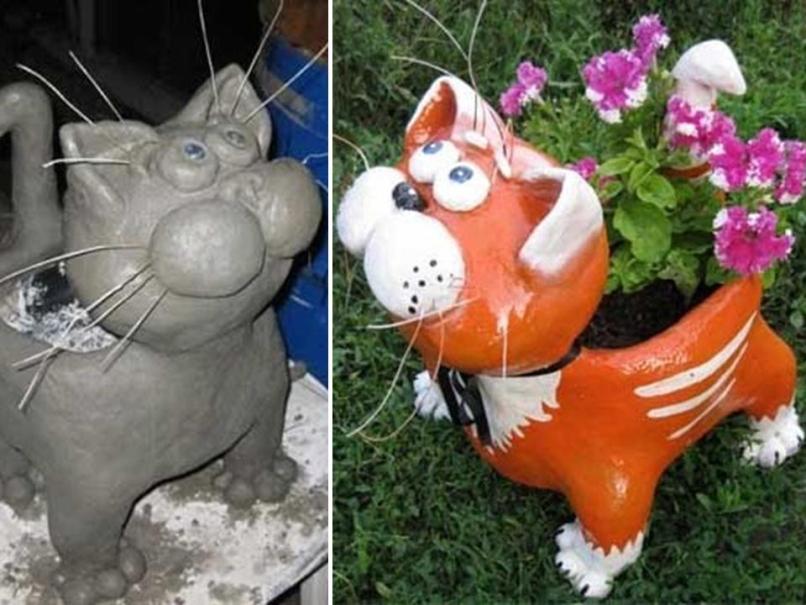
 Using approximately the same scheme, you can make flower pots in the shape of a cat from cement and plaster. Let's look at making the figurine step by step:

 In front of you step by step photo making complex garden sculptures. The scheme for making molded figures on the frame is still the same:
- first, a frame is made of reinforcement and metal mesh;
- then cement mortar is applied in several stages;
- when drying, the figure is covered with polyethylene to ensure the necessary humidity;
- the dried sculpture is decorated.
 At the first stage you won’t guess that it will be Masha and the Bear
  The solution and paints are applied in several stages
 Shrek and Donkey also started with rebar and mesh
  The example of a pair of wolf and hare shows several stages of decoration
 The rebar scarecrow with a bucket inevitably turned into Jack Sparrow
 Of course, to make complex artistic sculptures you need to be at least a little bit of a sculptor. The process of making crafts from cement mortar itself is not difficult. Start simple - and let the end result amaze those around you.
Decoration of garden, backyard, summer cottage- this is an endless process. Something is changing, removed, added all the time. One way to decorate is to make garden figures. If you arrange them correctly, they transform the appearance of the site.
Cement figurines: why they are good and how to make them
You can make garden figures from cement - this is one of the most used and available materials. It is inexpensive and allows you to create a wide variety of figures - from simple and small ones to full-length sculptures. There are several ways to make garden figures from cement mortar: with a frame, without it, from semi-dry mortar. More about everything later.
Very often mushrooms are made from concrete, but they are not always the same...
What to add to the solution
There are many additives to cement that improve/change its properties. There are a lot of them, but they are sold in fairly substantial volumes, which may only be needed for the manufacture of garden sculptures on an industrial scale. But there are ordinary substances that also change the properties of concrete mortar.

These are the main additives that are needed when making concrete garden figurines. It's easier to work with them. But don't add too much. Maximum - one teaspoon per bucket, otherwise you will only make things worse.
How to paint and some technological nuances
After the concrete figure has dried, it must be sanded until smooth, the dust must be removed and it can be painted. In order for the paint to apply more evenly and consume less, you must first coat the product with a layer of primer. The primer is selected depending on the type of paint. The painting process itself is no different - you usually need brushes different sizes. But it is worth knowing some features.

There are still a lot of different technological nuances, but these are the main ones. The rest you will master or come up with as you work.
How to make garden figures: cutting from semi-dry mortar
It will not be possible to make garden figures from fresh cement-sand mortar - it is too liquid. Even if you mix it with a minimum of water, you won’t be able to form anything intelligible. But you can wait until the solution begins to harden, but remains quite soft - it will crumble under pressure. In this state, you can make grooves in it with a metal object and cut off the excess.

From the thick mixture you can form the approximate shape of the intended character - put it in a piece of film, tie it, give it the desired shape. If you have a liquid solution, find a more or less suitable container or use the same film. The solution is left in the mold for 8-12 hours. The time depends on how liquid the cement was initially and the temperature at which you keep the product. Optimal temperature about +20°C, at lower temperatures the hardening time increases, and at higher temperatures there is a possibility that the cement will dry out and not “set”.

Periodically check the condition of the workpiece: there should be a solid mass under your fingers, and when you apply more force, the cement is slightly pressed down. In this state, you can already begin to form the sculpture. You have 7-8 hours to work. For small figures this is more than enough, for large ones right next to each other you will have to hurry. To delay the drying of parts that are not yet being treated, you can wrap them in a wet cloth.
It doesn’t have to be painted... You can cover it with colored glass or crockery shards
Take a knife, wire, spatulas, and begin to cut off the excess little by little. There is no need to be afraid, if you remove something unnecessary, you can later add a little solution and correct it when it dries. In general, the technology is not too complicated, but if you don’t have artistic abilities, it’s difficult to come up with something intelligible yourself. For such cases, there is one trick: find a small figurine from any material, look at it and sculpt your own.
Making cement figures with a base or frame
Manufacturing technology garden figures made of concrete on a base, consists of applying layer-by-layer mortar to the frame. But this technique is required when making large figures - about 150 cm or more. Then bearing capacity The concrete itself may not be enough. In this case, a rigid foundation is necessary. In other cases, a frame or base is needed only to minimize concrete consumption and reduce total weight products.
Frame for complex products they are made (weaved or boiled) from wire; for simpler ones, scrap materials are used. A 1-2 cm layer of mortar (thick) is applied to the finished frame, laid with a glass cloth mesh, then the mortar is applied again, then the mesh again. The process alternates until your product takes the desired shape.

Where and how to find the foundation
The main task is to find a vessel, bottle, box that is shaped to fit the intended product. If the shape is complex, it can be expanded or created entirely from pieces of foam. It is light and cuts well. But such figures - with a foam base - cannot withstand the load. If you expect that someone might sit on your products or have mechanical impact in some other way, it is better to use foam instead wooden blocks or foam concrete blocks. Foam concrete can be cut perfectly with a wood saw; it can be planed with a plane, a large knife, or made grooves with a sharp object. The principles of working with wood are known to everyone.

The found form is covered with mortar, wrapped with rags, tow, ropes, and then also coated with cement. If the mortar layer is more than 2 cm, it is reinforced with a fiberglass mesh (serpyanka mesh is used for plastering walls). If plastic is used as a base, it is very difficult to apply the solution to it - it runs off. Such products are wrapped in rags soaked in a solution. After drying, the next layer is applied very well.
Grooves are made in the dried solution to represent feathers and wool. In general, there are many techniques. Let's give a few examples to make it clearer how to make garden figures from concrete. Another option is to coat it with a solution into which the pebbles are pressed. It creates an uneven terrain.
Swans
For example, we want to make figures of swans. The basis for the body is a small round basin. The neck is a wire curved in the shape of the letter S. We attach the “neck” to the body in any available way.

We apply a thick solution to the basin, forming the desired bend, add polystyrene foam, pieces of rags, etc. Leave to dry. We wrap rags soaked in the solution around the wire (it’s better to find a thicker one, you can use reinforcement). We fix and leave everything for a day. During this time, the concrete will set, and on the “body” you can use scraping to form wings, make grooves, draw feathers, etc.

We work closely on the neck and head. Apply the solution onto the resulting base with your hands (don’t forget to wear rubber gloves), forming a neck of the desired shape and thickness. You won’t be able to “build up” a lot at once - only in thin layers. When the neck becomes more like a real one, you can begin to form the feathers, outline the beak, eyes, etc. We leave the finished birds to dry for a week or more. Next - sanding, priming and painting.
Frog Princess
Using this example, we will demonstrate how you can make garden figurines from cement mortar and stones. A foam block was taken as a base, trimmed and hewn where necessary. The top is coated with a thick solution in several layers.

In the upper, still soft, layer, pebbles are reinforced - small flat pebbles; glass fragments are used on the crown. After drying the figurine is painted acrylic paints, double varnished.
Frameless technology: leaf drinker made of concrete
If the product is small or thin, and a large load is not planned on it, you can make it without a frame. That's what they do various kinds bowls, slabs, small sculptures. For example, a birdbath in the shape of a leaf. It can also be used as a stand for flowerpots and flowerpots, and other figures that are undesirable to come into contact with the ground.
We find a large leaf - burdock, rhubarb, etc. We place the sheet in water, form a flat slide from sand on a flat surface (table), and cover it with film.

We lay out the sheet on a hill, pressing it into the sand. Mix the thick solution - it should not flow. The composition of the solution for sculptures is 1 part cement, 3 parts fine sand, you can add a plasticizer. Spread the solution on top of the sheet, pressing it tightly. In the middle the layer thickness is about 2 cm, towards the edges it becomes thinner - up to 1 cm. Form the edges carefully. It will be possible to straighten them, but this will not be so easy.

In the middle we insert a piece of plastic pipe with a diameter of about 10 cm and a length of 10-15 cm. Coat the joint with a solution and fill the pipe. Cover with plastic wrap. It protects against overheating, rain, and dirt. We press the edges with stones or something heavy, but there is no need to achieve tightness - excess moisture should evaporate.

Leave the garden sculpture without turning it over for at least 2 days. Then remove the outer film, carefully turn it over, and remove the sheet. If it does not come off, moisten it and wait a couple of minutes. Use a brush to remove residues and debris. Wait a few more days before painting - preferably two weeks.

This is what we got... an original birdbath
Before painting, sand with sandpaper and remove dust. If desired, you can coat it with a primer. Its type is selected according to the type of paint. A primer is needed so that the paint goes on more evenly and so that it is used less. When the paint dries, the product is coated with two layers of varnish. Choose varnish for exterior use. Better - matte or semi-matte.
Decorative figures made of polyurethane foam
You can make garden figurines from polyurethane foam very quickly and easily. Just keep in mind that they turn out to be very light, so some kind of weighting agents are needed. Suitable as a base plastic bottles, metal containers, carton boxes, etc. For thin parts - arms, legs, necks - any materials of the desired shape and size are suitable: branches, wire, wire frame, plastic pipes, metal corner etc. and so on.

This is an Alpine goby made of polyurethane foam. Here there is no need to make special wool: the foam itself forms the desired relief
The basis for thin or strongly protruding parts of figures can be stuck in later - after the “body” is ready. You can simply stick a wire, a corner, a stick into the dried foam. If used soft materials, they can be nailed or screwed with self-tapping screws, secured with staples from a stapler, and glued. In general, use any available method.
It’s better not to skimp on the quality of foam - choose an expensive one. It does not flow like rising yeast dough, but increases in size, maintaining the shape specified when applied. But even with expensive polyurethane foam there is no need to rush. The main secret is this: apply a thin layer at a time. Then wait until it stops increasing in volume, hardens (25-40 minutes) and apply the next thin layer. This consistent increase in volume is the key to success.
If you go step by step, then you need to make garden figures from foam like this:

In general, the technology is simple and now you know how to make garden figures from polyurethane foam. But there are nuances. First. If you bought cheap foam and it starts to spread, you need to wait until it starts to harden, wet your hands with water and shape it into what you need. Here it is important to catch the moment when the foam is no longer very sticky, but has not yet completely hardened.

Second. If part of the figure falls off during the process, it can be secured by dropping foam on the joint, inserting a piece of wire - for greater strength - to connect the parts. Cover the seam with mastic or putty.

Third. When the putty dries, cracks form on the surface of the figurine. Covering them with putty again brings almost no results. The cracks appear again. To avoid them, take a bandage, wrap the figure coated with putty, apply another layer on top, and level it.

Fourth. If using a spatula it was not possible to obtain a perfectly flat surface, but you need it, then when the putty dries, you can smooth it out with your hands. If necessary, moisten your hands with water.
Photos of homemade garden figures and sculptures


The most interesting thing about these garden concrete figurines is that the clothes are real, just soaked concrete mortar and after drying it is painted

Garden figurines made of wood are not necessarily carvings. There may also be some - from logs. Wonderful horse!


The cat is tall - more than 160 cm at the base of the pin. The head was made separately, then connected to the “body”

Turtles and mushrooms made of concrete - these are the ones most often made by novice sculptors

Such sculptures require a form...


From the remains of concrete...


Wooden sculpture for garden and personal plot- talent...

Concrete mushrooms - a plastic glass for the stem and a bowl for the cap. In the future hat, before the solution has hardened, dig a cylindrical hole so that the stem fits there. So the fungus will be very similar to the real one


Concrete is a material that is quite easy to work with. You can create any shapes and figures. And even if you have never worked with concrete, the ideas presented in our article can be tried by a beginner. It's about about various cement crops. We have prepared several master classes for you: how to make a concrete fountain, an unusual flower pot, cement benches, a bird bath, garden path, and to help - not only photo instructions, but also videos!
Round concrete fountain
If you don't like the monotony of gray concrete, the finished product can be painted in any color. In general, all the ideas presented here can be modified at your discretion, it all depends on what form you choose to create your product.
Unusual DIY concrete flower pot - photo instructions

At first glance, it does not seem at all that this flower pot is so easy to make. The idea is especially suitable for those who have never dealt with concrete and would like to start with something simple. You just have to remember that when working with cement, you must wear gloves to avoid cement poisoning.
Necessary materials

You will need:
- cement
- wooden stick or other object for stirring cement
- two buckets (the size depends on the desired size of the future flower pot)
- old towel
- dense polyethylene sheet as a backing
Step 1 - mix the concrete

To create a flower pot like the one in the picture, a 19-liter bucket was used. The bucket is half filled with cement, then water is added in the required amount. To make a pot, the consistency should be more watery than is usually used for making concrete, but still not too runny. The mixture should, on the one hand, saturate the towel well enough, on the other hand, it should remain on the towel and not flow down.
Step 2 - prepare the canvas

Now the main stage. Take the second bucket and turn it over. Throw an old towel on top and check if it is long enough for the bucket. Excess fabric can simply be cut off. Preparing the towel is an important step in creating a flower pot because the placement of the fabric will determine the beauty of the final product. Remove the towel from the bucket and soak it completely with concrete. Place the towel back on the bucket and shape it into the shape you like.
Step 3 - form a flower pot

If you suddenly notice areas not covered with concrete while the cement is still wet, you have the opportunity to fix it. Before putting the product to dry, check again the quality of the coating and how aesthetically pleasing the resulting shape of the future looks. After this, let the product dry for a day or two. When the cement is dry, take out the bucket, fill the pot with soil and plant any flowers. Ready!
DIY concrete bird bath

Do you like birdsong? Attract little guests to your garden with a refreshing bath! The product is made quite simply and quickly.
Necessary materials

You will need:
- 2 bags of cement
- mixing bowl
- beaker
- cement trowel
- pouring molds (old bowls and bucket)
- mold lubricant
- piece of linen fabric
Step 1 - prepare the cement

Recommendation: Do not mix two bags of cement at once. It is much more convenient to prepare only half a bag at a time. So, pour half a bag of dry cement into a bowl (large enough so that the mixture does not overflow when stirring), stir with water. Use a measuring cup to know how much water is needed for the first batch of concrete: the remaining batches should have the same consistency. When stirring, try to avoid the appearance of air bubbles.
Step 2 - making the base

To make the base of the bird bath you will need a bag of cement. A bucket that is wider at the top than at the bottom works well as a form for the base. This will make the structure more stable. Fill the bucket with the prepared cement mixture and give it time to dry.
Step 3 - making a bath

Take two bowls of different sizes. Fill in cement mixture into a large bowl, form a depression in it with your hands (don’t forget about gloves!). Press the smaller bowl into the cavity and remove any excess mixture. Weight the small bowl with stones, otherwise the cement may “slide” down during drying and push the bowl out.
Step 4 - decorating and drying the cement

While the cement is still wet, it can be decorated. For example, adding glass or pebbles along the edges. After a few hours of drying, the small bowl can be removed, but the entire bath will need at least a day to dry thoroughly. To prevent cracking, cover the tray with a damp linen cloth. When the bath is dry, place it on the base, fill it with water and enjoy the sight of the birds bathing.
DIY concrete bench

You can make molds for making any concrete products yourself. For example, for such a bench you can build a box, the dimensions of which you determine yourself. This cute bench will be a place to relax on a hot summer day.
How to make inscriptions and drawings on concrete

When the cement dries a little, it becomes easy to make inscriptions or even entire drawings on it. So, a welcome inscription will delight your guests, and flowers painted on the bench will perfectly complement the vegetation in the garden. The drawings and the entire product, again, can be painted after drying.
DIY flower box

The principle of making such a box is probably already clear: two molds of different sizes are taken, and the gap is filled with cement. Such a flower box will perfectly complement the garden or separate a certain area in the garden. Put it in a box different flowers and plants to give concrete surface texture and color.
Concrete garden path

A garden path can become a work of art; all you need is the appropriate form to make concrete circles. However, the shape of concrete elements can be any. Scattering gravel around them will bring life to the landscape.
Do-it-yourself fountain in the country

Such a fountain looks quite complicated, but it is quite possible to make it with your own hands. Follow the directions in the video. Despite the fact that the explanations in the video are in English, you don’t have to be a polyglot: everything is clear there without words.
No matter how carefully and with special diligence the design of the site is carried out, sometimes it seems that something is missing. Often, this feeling is caused by stylistic miscalculations when designing a garden, but sometimes these are just gaps that need to be filled with something.
This is where a simple cement mortar comes to the rescue. Few people know what this unpretentious and cheap material with its correct application and taking into account its main features. For example, you can use it to make figures for the garden, as in the photo:
Any beginner can make simple figures from cement mortar. You need desire, a minimum of knowledge and a lot of patience.
How to choose a place to place sculptures?
The point is that on garden plot There are certain places that need filling, they just ask to place something spectacular and at the same time stylistically justified.
It is imperative to decide on the size and take into account the overall design of the garden, otherwise you may end up with something awkward and clumsy. In this case, the gardener risks spoiling the overall impression of the garden, into which he has invested a huge amount of work and a lot of time.

How to work with cement mortar: a step-by-step guide
Cement is very easy to use and does not require special skills, but some nuances are worth remembering:
- If possible, it is better to take the basis for the figure: plastic products, basins, pots, dolls, ready-made plastic figurines.
- Cement – chemical compound, you must remember that you need to wear gloves when working with it. Of course, nothing fatal will happen, but the skin will become dry and rough, and microcracks may even appear.
- The required proportions are 1:2, that is, one part of cement to two parts of sifted sand. Just enough water should be added so that the finished solution has the consistency of sour cream. To increase the strength of the solution, you can use a 1:1 ratio.
- The time for complete hardening of the cement mortar ranges from three days to a week, depending on weather conditions. It should be taken into account that in cool and humid weather the figurine will take longer to gain strength, but in such conditions it does not require any care, with the exception of shelter from powerful jets of rain, which can change the shape of the figurine.
- After complete hardening time has passed, the figure must be processed by removing excess roughness with sandpaper or even a file. Before painting, the surface must be treated with a concrete primer, otherwise the paint will peel off. After the soil has dried, the statue can be painted, then coated with varnish in 1-2 layers. This way the figurine will acquire a sparkling gloss and will attract attention.
- For figures of large volume or size, it is better to use concrete. It differs from mortar in the presence of a large fraction, that is, the presence of pebbles and stones, which gives the material special strength. To prepare concrete, SGS (sand and gravel mixture) is usually used, usually unsifted sand.
Photo example:

How to make simple cement figures using a regular rag?
For the simplest cement figures, a ready-made base is usually used. An example would be a vase made from an old rag. To do this, hang a soaked rag on some container, say a bucket, turned upside down.
A liquid cement mortar is prepared, with which the same rag is impregnated. After complete drying, the finished product is turned over and turns into an unusually shaped, avant-garde flower pot.
Parts of dolls and other toys are used in a similar way. For example, from the head of a large doll you can make an original flowerpot in an antique style. The method is absolutely the same, only the consistency of the solution is different and the head will have to be thoroughly coated, giving the required shape.
It is extremely easy to make an openwork ball. To make it you need rope or twine and a balloon. The inflated ball is wrapped in rope, which must be coated and soaked with liquid cement mortar. After drying, the ball is removed, and the finished structure can be painted.
Casting complex shapes from a frame
More complex figures are made from the base frame, but the solution will have to be shaped independently. You can take as an example any small flower bed. You can take anything as a shape, for example, a pig.
- For the frame, take a ready-made container, wooden blocks simulating legs are attached to it with self-tapping screws, and the frame should also be secured in place of the head and tail in order to increase strength.
- A thick, creamy solution is mixed, and the frame is gradually coated with it.
- Then, using small lumps of the same solution, the figure is given the desired shape.
- Excess must be removed with hands soaked in water. At this stage, skills in working with materials and certain artistic inclinations are already required.

Complex figures are sculpted by professionals. At their core - metal carcass, giving strength to the entire structure. The figure itself is either made by pouring mortar into a ready-made mold, or made individually by hand. In the latter case, the cost of the figure will be considerable.


