Diagram of a 220V Gauss gun. Making an electromagnetic Gauss gun
15,253 ViewsQuite a powerful model of the famous Gauss cannon, which you can make with your own hands from available materials. This homemade Gauss gun is very simple to make, has a lightweight design, all the parts used can be found in every homemade hobbyist and radio amateur. Using the coil calculation program, you can get maximum power.
So, to make a Gauss Cannon we need:
- A piece of plywood.
- Sheet plastic.
- Plastic tube for muzzle ∅5 mm.
- Copper wire for coil ∅0.8 mm.
- Large capacity electrolytic capacitors
- Start button
- Thyristor 70TPS12
- Batteries 4X1.5V
- Incandescent lamp and socket for it 40W
- Diode 1N4007
Assembling the housing for the Gauss gun circuit
The body shape can be any, it is not necessary to adhere to the presented scheme. To give the body an aesthetic appearance, you can paint it with spray paint.


Installing parts into the housing for the Gauss Cannon
To begin with, we attach the capacitors, in this case they were attached to plastic ties, but you can come up with another fastening.

Then we install the socket for the incandescent lamp on the outside of the housing. Don't forget to connect two wires to it for power.


Then we place the battery compartment inside the case and fix it, for example, with wood screws or in another way.

Winding a Coil for a Gauss Gun
To calculate a Gaussian coil, you can use the FEMM program; you can download the FEMM program from this link https://code.google.com/archive/p/femm-coilgun
Using the program is very easy, you need to enter the necessary parameters in the template, load them into the program and at the output we get all the characteristics of the coil and the future gun as a whole, right down to the projectile speed.
So let's start winding! First you need to take the prepared tube and wrap paper on it using PVA glue so that the outer diameter of the tube is 6 mm.


Then we drill holes in the center of the segments and place them on the tube. Using hot glue we fix them. The distance between the walls should be 25 mm.


We place the coil on the barrel and proceed to the next stage...

Scheme of Gauss Cannon. Assembly

We assemble the circuit inside the case using hinged mounting.

Then we install the button on the body, drill two holes and thread the wires for the coil there.

To simplify use, you can make a stand for the gun. In this case it was made from wooden block. In this version of the carriage, gaps were left along the edges of the barrel, this is necessary in order to adjust the coil, moving the coil, you can achieve the greatest power.

The cannon shells are made from a metal nail. The segments are made 24 mm long and 4 mm in diameter. Shell blanks need to be sharpened.


The project was started in 2011. It was a project involving a fully autonomous automatic system for entertainment purposes, with a projectile energy of about 6-7 J, which is comparable to pneumatics. It was planned to have 3 automatic stages with launch from optical sensors, plus a powerful injector-impactor that fires a projectile from the magazine into the barrel.
The layout was planned as follows:
That is, a classic Bullpup, which made it possible to move heavy batteries into the butt and thereby shift the center of gravity closer to the handle.
The diagram looks like this:

The control unit was subsequently divided into a power unit control unit and a general control unit. The capacitor block and switching block were combined into one. Backup systems were also developed. From these, a control unit for the power unit, a power unit, a converter, a voltage distributor, and part of the display unit were assembled.
It consists of 3 comparators with optical sensors.
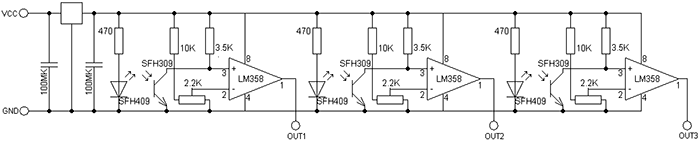
Each sensor has its own comparator. This was done to increase reliability, so if one microcircuit fails, only one stage will fail, and not 2. When the projectile blocks the sensor beam, the resistance of the phototransistor changes and the comparator is triggered. With classical thyristor switching, the control terminals of the thyristors can be connected directly to the outputs of the comparators.
The sensors must be installed as follows:

And the device looks like this:

The power block has the following simple circuit:

Capacitors C1-C4 have a voltage of 450V and a capacity of 560uF. Diodes VD1-VD5 are used type HER307/ Power thyristors VT1-VT4 type 70TPS12 are used as switching.

The assembled unit connected to the control unit in the photo below:

The converter was low-voltage, you can find out more about it

The voltage distribution unit is implemented by a banal capacitor filter with a power switch and an indicator notifying the process of charging the batteries. The block has 2 outputs - the first is power, the second is for everything else. It also has terminals for connecting a charger.

In the photo the distribution block is on the far right at the top:

In the lower left corner there is a backup converter; it was assembled according to the simplest circuit using NE555 and IRL3705 and has a power of about 40W. It was supposed to be used with a separate small battery, including a backup system in case of failure of the main battery or discharge of the main battery.
Using a backup converter, preliminary checks of the coils were carried out and the possibility of using lead batteries was checked. The video shows a single-stage model shooting at a pine board. A bullet with a special tip of increased penetration capacity enters the tree 5mm.
Within the project, a universal stage was also developed as the main block for subsequent projects.
This circuit is a block for an electromagnetic accelerator, on the basis of which it is possible to assemble a multi-stage accelerator with a number of stages up to 20. The stage has a classic thyristor switching and an optical sensor. The energy pumped into the capacitors is 100J. Efficiency is about 2 percent.

A 70W converter with a master oscillator based on the NE555 chip and an IRL3705 power field-effect transistor was used. Between the transistor and the output of the microcircuit, a repeater is provided on a complementary pair of transistors, which is necessary to reduce the load on the microcircuit. Comparator optical sensor assembled on the LM358 chip, it controls the thyristor by connecting capacitors to the winding when the projectile passes the sensor. Good snubber circuits are used in parallel with the transformer and the accelerating coil.
Methods for increasing efficiency
Methods for increasing efficiency were also considered, such as magnetic circuits, coil cooling and energy recovery. I’ll tell you more about the latter.
GaussGan has a very low efficiency; people working in this area have long been looking for ways to increase efficiency. One of these methods is recovery. Its essence is to return unused energy in the coil back to the capacitors. Thus, the energy of the induced reverse impulse does not go anywhere and does not catch the projectile with residual magnetic field, and is pumped back into the capacitors. This method can return up to 30 percent of the energy, which in turn will increase efficiency by 3-4 percent and reduce reload time, increasing the rate of fire in automatic systems. And so - the diagram using the example of a three-stage accelerator.

For galvanic isolation in the thyristor control circuit, transformers T1-T3 are used. Let's consider the operation of one stage. We apply the charging voltage to the capacitors, through VD1, capacitor C1 is charged to the nominal voltage, the gun is ready to fire. When a pulse is applied to input IN1, it is transformed by transformer T1 and goes to the control terminals VT1 and VT2. VT1 and VT2 open and connect coil L1 to capacitor C1. The graph below shows the processes during the shot.

We are most interested in the part starting at 0.40ms, when the voltage becomes negative. It is this voltage that can be caught and returned to the capacitors using recuperation. When the voltage becomes negative, it passes through VD4 and VD7 and is pumped into the next stage accumulator. This process also cuts off part of the magnetic pulse, which allows you to get rid of the inhibitory residual effect. The remaining stages work similarly to the first.
Project status
The project and my developments in this direction were generally suspended. Probably in the near future I will continue my work in this area, but I don’t promise anything.
List of radioelements
| Designation | Type | Denomination | Quantity | Note | Shop | My notepad | |
|---|---|---|---|---|---|---|---|
| Power section control unit | |||||||
| Operational amplifier | LM358 | 3 | To notepad | ||||
| Linear regulator | 1 | To notepad | |||||
| Phototransistor | SFH309 | 3 | To notepad | ||||
| Light-emitting diode | SFH409 | 3 | To notepad | ||||
| Capacitor | 100 µF | 2 | To notepad | ||||
| Resistor | 470 Ohm | 3 | To notepad | ||||
| Resistor | 2.2 kOhm | 3 | To notepad | ||||
| Resistor | 3.5 kOhm | 3 | To notepad | ||||
| Resistor | 10 kOhm | 3 | To notepad | ||||
| Power block | |||||||
| VT1-VT4 | Thyristor | 70TPS12 | 4 | To notepad | |||
| VD1-VD5 | Rectifier diode | HER307 | 5 | To notepad | |||
| C1-C4 | Capacitor | 560 µF 450 V | 4 | To notepad | |||
| L1-L4 | Inductor | 4 | To notepad | ||||
LM555 | 1 | To notepad | |||||
| Linear regulator | L78S15CV | 1 | To notepad | ||||
| Comparator | LM393 | 2 | To notepad | ||||
| Bipolar transistor | MPSA42 | 1 | To notepad | ||||
| Bipolar transistor | MPSA92 | 1 | To notepad | ||||
| MOSFET transistor | IRL2505 | 1 | To notepad | ||||
| Zener diode | BZX55C5V1 | 1 | To notepad | ||||
| Rectifier diode | HER207 | 2 | To notepad | ||||
| Rectifier diode | HER307 | 3 | To notepad | ||||
| Schottky diode | 1N5817 | 1 | To notepad | ||||
| Light-emitting diode | 2 | To notepad | |||||
| 470 µF | 2 | To notepad | |||||
| Electrolytic capacitor | 2200 µF | 1 | To notepad | ||||
| Electrolytic capacitor | 220 µF | 2 | To notepad | ||||
| Capacitor | 10 µF 450 V | 2 | To notepad | ||||
| Capacitor | 1 µF 630 V | 1 | To notepad | ||||
| Capacitor | 10 nF | 2 | To notepad | ||||
| Capacitor | 100 nF | 1 | To notepad | ||||
| Resistor | 10 MOhm | 1 | To notepad | ||||
| Resistor | 300 kOhm | 1 | To notepad | ||||
| Resistor | 15 kOhm | 1 | To notepad | ||||
| Resistor | 6.8 kOhm | 1 | To notepad | ||||
| Resistor | 2.4 kOhm | 1 | To notepad | ||||
| Resistor | 1 kOhm | 3 | To notepad | ||||
| Resistor | 100 Ohm | 1 | To notepad | ||||
| Resistor | 30 ohm | 2 | To notepad | ||||
| Resistor | 20 ohm | 1 | To notepad | ||||
| Resistor | 5 ohm | 2 | To notepad | ||||
| T1 | Transformer | 1 | To notepad | ||||
| Voltage distribution block | |||||||
| VD1, VD2 | Diode | 2 | To notepad | ||||
| Light-emitting diode | 1 | To notepad | |||||
| C1-C4 | Capacitor | 4 | To notepad | ||||
| R1 | Resistor | 10 ohm | 1 | To notepad | |||
| R2 | Resistor | 1 kOhm | 1 | To notepad | |||
| Switch | 1 | To notepad | |||||
| Battery | 1 | To notepad | |||||
| Programmable timer and oscillator | LM555 | 1 | To notepad | ||||
| Operational amplifier | LM358 | 1 | To notepad | ||||
| Linear regulator | LM7812 | 1 | To notepad | ||||
| Bipolar transistor | BC547 | 1 | To notepad | ||||
| Bipolar transistor | BC307 | 1 | To notepad | ||||
| MOSFET transistor | AUIRL3705N | 1 | To notepad | ||||
| Phototransistor | SFH309 | 1 | To notepad | ||||
| Thyristor | 25 A | 1 | To notepad | ||||
| Rectifier diode | HER207 | 3 | To notepad | ||||
| Diode | 20 A | 1 | To notepad | ||||
| Diode | 50 A | 1 | To notepad | ||||
| Light-emitting diode | SFH409 | 1 | |||||
The scope of application of thermal electric guns is quite wide. Industrial units are used to heat production, warehouse and even residential premises. And in small areas you can get by with homemade design a heat generator that is quite capable of heating a garage or country house.
If you make an electric heat gun with your own hands, it will cost literally pennies. However, in production useful homemade product rules must be followed. Only in this case will the device serve no worse than the factory product.
We will tell you how to properly make an electric gun. From the article we have proposed, you will learn what materials and components will be required to assemble the unit. Our advice will help in the manufacture of efficient and economical equipment.
Unlike other types of heat guns, electrical appliance Can be done by almost any home craftsman familiar with the basics of electronics.
Although the efficiency of an electric gun is much lower than diesel or, it does not emit combustion products harmful to health and can be installed in any room - a residential building, a greenhouse, outbuildings.
The power of industrial guns varies from 2 to 45 kW, and the number of heating elements in them can reach up to 15 pieces
Let's look at how an electric unit works.
Design and principle of operation of the heat generator
Any electric gun consists of three main components: a housing, an electric motor with a fan and heating element. The varieties of this type of device are described in detail, devoted to the classification and principles of operation of heat guns.
Additionally, the device can be equipped with any “bonuses” from the factory units - speed switch, heat regulator, room thermostat, housing heating sensor, engine protection and other elements, but they increase not only comfort and safety during operation, but also the cost of the homemade product.

The rate of heating of air throughout the entire volume of the room depends on the number and power of heating elements - the larger their area, the more active heat transfer will occur
Works electric gun So:
- when connected to the network, the heating element converts electric current into thermal energy, due to which it heats itself;
- the electric motor drives the impeller blades;
- the fan drives air from the room inside the case;
- the cold air flow comes into contact with the surface of the heating element, heats up and, forced by the fan, is removed from the “barrel” of the gun.
If the appliance is equipped with a thermostatic element, it will stop the heater when the programmed temperature is reached. In primitive devices you will have to control the heating yourself.
Advantages and disadvantages of homemade guns
The main advantage of a thermal electric generator is the ability to use it in any room where there is a network of at least 220 W.
Such devices, even in a home-made version, are mobile, weigh little and are quite capable of heating an area of up to 50 m2 (theoretically, more is possible, but it is better not to experiment with high-power devices and buy a ready-made unit, and a gun from 5 kW will already require connection to a three-phase network ).

The performance characteristics of the device must correspond to the heated area. On average, for every 10 m2 you will need 1 kW, but much depends on the room itself - building materials, quality of glazing and presence of insulation
Pros of a homemade electric gun:
- Saving money– factory units are not cheap, and a heating device can be assembled with a minimum of purchased parts or even entirely from improvised means, removing the missing elements from old devices.
- Safety– of all the homemade heat generators, the electric device is the easiest to operate, since it does not require a connection to gas or refueling with flammable fuel. With proper assembly of the electrical circuit, the risk of spontaneous combustion for such guns is minimal.
- Fast room heating– the operation of a heat gun is much more efficient than other options for homemade electric heaters, for example, fireplaces or oil radiators.
One of the disadvantages is the high energy consumption (the amount depends on the power of the engine and heating element). In addition, the operation of the fan is quite noisy, and the larger the wingspan and rotation speed, the stronger the noise produced will be.
Well, any disadvantage of homemade electrical device– the likelihood of an error during assembly or connection, which can cause a short circuit in the network, electric shock and spontaneous combustion of the device.
Electric gun manufacturing options
The most difficult stage in assembling the device is to make correct scheme electrical circuits for connecting the device to the network. Therefore, we suggest using already ready-made example, taking it as the basis for a future heat gun. As can be seen in the diagram, the toggle switch and thermostats must be connected in series, and the circuit must be closed on the heating element and the electric motor with the fan.

The thermostat is responsible for the heating level of the heating element and automatically disconnecting the circuit when the desired temperature in the room is reached, and if you exclude it from the circuit, you will have to independently monitor the equipment to avoid overheating
Let's look at the manufacturing features of two simple options.
A simple fan heater with a ready-made heating element
For the body of the future gun, you can select a piece of metal or asbestos-cement pipe of a suitable diameter. It is best to adjust the size according to the span of the fan “wings”, because it should overlap one of the ends of the device.
If desired, the heat generator can be made from a small metal tank, a galvanized bucket, an old saucepan or a waste gas cylinder, the main thing is that the walls of the “casing” are not thin.

The power of the fan for a heat gun is not decisive, because the speed of heating the air depends solely on the heating element, and the impeller only disperses the warm flow throughout the room, so you can safely take a fragment from a household hood or vacuum cleaner
As for the heating element, you can remove this element from a used tile or boiler, or purchase it in a store - now it’s not a problem to find a heater of any shape. If you buy ready-made, the best option there will be a finned part specifically designed to quickly warm up the moving air flow.

The power of the heating element must be stamped on its body or stated in the accompanying documentation, but if this old device, you can measure its resistance with a multimeter and determine the power using the above formula
In addition to the three main elements (housing, motor and heating element), for work you will need a three-core cable, bolts, and an RCD that disconnects the network in a dangerous situation.
Step-by-step work plan:
- Determining the required power for a future electric gun. As a starting point, you can take the common formula, according to which 1 kW is required per 10 m2 (with a ceiling height of 2.5-3 m). And if the room is not insulated, is located in the basement or has a large glass area, feel free to add another 20-30% to the data obtained. But if the required power exceeds 2.5-3 kW, think about whether your wiring can withstand such a load.
- Case manufacturing. If this a metal sheet– it needs to be bent and fixed in shape by welding, hoops or rivets. For a bucket, cylinder or pan, saw off the bottom and lid. In short, the result should be a cylindrical or rectangular frame with two open holes at the ends.
- Checking the resistance of the heating element and comparing it with the calculated one. If necessary, you can add 1-2 more elements by connecting them in series, or increase the power by shortening the element.
- Mounting the electric motor with fan(you can use standard fasteners). The impeller should close the gap as tightly as possible, but at the same time rotate freely. The wires are connected to the network through a 6A fuse and are equipped with a switch.
- Securing the heating element inside the pipe(approximately in the center) using rivets or plates made of refractory materials. The distance should be far enough away from the fan so as not to overheat the electric motor. The wires are led out of the housing and are also connected to the network, but through a 25A fuse.
After checking the insulation of all connections, you can test run the device. If everything is assembled correctly, when you plug the plug into the socket, a fan will begin to rotate at one end of the gun, and warm air will come out of the other, gradually increasing in temperature.
Device with nichrome heater
If in your arsenal home handyman there was no old one household appliance, from where you can remove the heating element, but for some reason you don’t want to buy a ready-made heater, you can make it yourself from a nichrome spiral.
In addition to low cost, such an element has an important advantage over factory copies - the ability to independently adjust right size according to the housing format and increase the heating speed to a safe maximum.

Devices with an open spiral are considered a fire hazard by default, so making a heating element yourself requires good electrical skills
For homemade products, you will need to buy nichrome wire with a suitable diameter and resistance parameter. And this depends on the planned power of your device (for household devices and 220 V network it is advisable not to exceed 5 kW).
For example, for a gun up to 2 kW you will need wire with a resistance of 27-30 ohm, which must be wound on a ceramic rod or other heat-resistant material (in extreme cases, you can break off a plate of refractory brick).

The size of the spiral can be determined experimentally by selecting the number of turns according to the degree of heating of the wire, but it is much easier to use the table, where D is the diameter of the rod on which the wire of length L will be wound
Another option is to make a homemade heating element from a small piece of asbestos-cement pipe, placing a coiled spiral of the same nichrome wire inside. The coils can be arranged horizontally and vertically to cover a larger area.

Homemade heating element for 1.6 kW from six spiral fragments that almost completely block the lumen of the pipe, which ensures rapid heating of the air flow
The assembly of the structure is carried out by analogy with the instructions described above, so we will not repeat the same points, but will only consider the nuances of connecting a homemade heating element:
- To keep the spiral in the correct shape, make special notches on the rod for each turn. The wire must be wound tightly enough, but always in one layer.
- The ends of the wire must be connected to electrical wires using bolted connections and insulated.
- The wires brought out through the holes drilled in the housing must be connected to the network through a 25A fuse.
A significant drawback of such a homemade product, in addition to energy consumption and other disadvantages of electric guns, is the unpleasant burnt smell that arises from the combustion of dust on an open coil.
The rules for the safe operation of a homemade gun are practically no different from the operation of other electrical appliances: you must avoid tipping the device and getting moisture inside it, do not touch the heated body and do not leave the unit working unattended.
From important features– before turning off, you must first stop the operation of the heating element, let the fan run idle for a few minutes and only then pull out the plug from the power supply.

Homemade heat guns without thermostats are not intended for long-term operation - they can cause a short circuit in the network or ignite from a hot spiral, in addition, electrical appliances dry out the air very much, so it is recommended to ventilate the room more often
Tips for assembling homemade products:
- The body for any type of electric gun is best made of metal with a wall thickness of at least 1 mm or asbestos cement. Although you can buy a thermoplastic container of suitable size, such a “casing” can emit unpleasant odors when heated, and will require strict control over the temperature of the coil.
- The annoying noise from the operation of the impeller can be reduced if relatively quiet car fans are used for the design.
- To prevent the hot surface of the housing from causing a fire, it can be installed on a frame made of reinforcement, an asbestos-cement stand, or a heat-absorbing coating can be applied.
- The power supply to the fan and heating element is always carried out separately.
- Monitor the quality of the insulation of all wires protruding beyond the gun body.
Grounding the metal body of the device will help prevent accidental electric shock.
And the last piece of advice - if your knowledge of electrical equipment is at the level of an amateur beginner, then before connecting homemade apparatus to the network, consult with a master who will evaluate the performance and safety of your creation with a professional eye.
With selection criteria electric fan heater factory production will introduce . If you doubt your own abilities or you don’t have time to assemble a homemade product, read the material we recommend.
Video #3. 2 kW heat gun from an old fire extinguisher:
As you can see, making an electric gun with your own hands is really not difficult. But if you are not confident in your skills in working with the electrical part, it is better to consult an experienced electrician or buy a ready-made device.
If you have recommendations or have any questions while reading the material, leave posts in the block below. Please comment on the material we present and post photos on the topic. Perhaps your advice will be useful to site visitors.
A variety of devices have been invented to heat rooms of all sizes, but none of them can be compared in efficiency to a heat gun. It is noteworthy that such a device is easy to assemble yourself, having a set of ready-made parts and assemblies available. How to do it yourself and which variety to give preference to is the subject of our conversation.
Purpose and principle of operation of a heat gun
Today, a special type of heating device is often used in everyday life - fan heaters. A relatively small device due to the forced supply of air blowing heating coils, can heat a room in minutes. A heat gun is like the older brother of a fan heater. Here's how it differs from him:
- both the heater and fan are more powerful;
- Not only electricity, but also various types of fuel are used as a heat source.
A heat gun is indispensable if you need to heat a room with a large area and high ceilings: a hangar, warehouse, trade or exhibition pavilion, greenhouse. Such facilities are not equipped with a traditional heating system with radiators, since with such volumes it is pointless: dozens of radiators or convectors would have to be installed. A heat gun with sufficient power, even alone, will easily solve the problem of heating a large space.
In addition to the purely heating function, heat guns help solve various technical problems, for example:
- in everyday life: heating a polymer stretch ceiling and the room in which it is installed (makes it possible to greatly stretch the panel);
- in food production: fruit drying;
- in construction: drying freshly laid plaster and screed.
Types of heat guns
Electrical
The function of the heat generator in such a device is performed by a spiral made of nichrome or other alloy with high electrical resistance or a tubular electric heater (TEH). In the heating element, the main role is played by the same spiral, but it is placed in a copper or brass tube filled with sand.
The electric heat gun is characterized by the absence of increased noise and harmful emissions
Thus, the heating element heats up less than the spiral in its pure form, but the difference in temperature is compensated by the increased surface area. That is, the heating element is not inferior in performance to the spiral, but dust does not burn on it and, therefore, users will not experience an unpleasant odor.
An electric heat gun has the following advantages:
- simple design, minimum parts;
- light weight;
- minimal noise level (only the fan makes noise);
- absence of any emissions;
- safety due to the absence of open flame.
All these properties make electric heat guns the most convenient. But you also need to take into account the following features:
- Electric heating, even despite its efficiency close to 100%, is by far the most expensive.
- The permissible power of the device depends on the load the supply network is designed for. There are often significant restrictions, for example, the household electrical network allows you to connect devices with a power of no more than 7 kW.
- At high humidity the electric gun becomes dangerous.
Burner
Heaters of this type are equipped with a burner, through which one or another type of fuel is burned. An important advantage of burner heat guns compared to electric ones is their practically unlimited power, which does not depend on anything. An equally important drawback is the emission of smoke. The units are available in two versions:

Based on the type of fuel used, burner heat guns are divided into several types.
Gas

The disadvantages are the following:
- For battery life you need to fill the cylinder with liquefied gas, which requires special equipment;
- Gas fuel is explosive, but its leakage is not visually detectable.
In case of spontaneous extinguishing of the burner, the gas gun is equipped solenoid valve, which in such a situation automatically shuts off the gas supply based on a signal from the temperature sensor.
Diesel
In addition to the housing, heater and fan, a diesel heat gun is necessarily equipped with a tank, a pump for supplying fuel and a filter for cleaning it. High pressure pump (it’s called a fuel pump high pressure or injection pump) supplies fuel to the injector installed in the combustion chamber. At the exit it is sprayed into a fog. To make the fuel more liquid, a preheating chamber is installed near the injector.
Indirectly heated diesel heat gun equipped with a stainless flue pipe
There may not be a fuel pump: some heat guns use the ejector principle of fuel supply. Due to the pressure difference, it is drawn into the fast-moving air flow, as a result of which a fuel-air mixture enters the chamber.
Gas analogues diesel units lose in the following:
- use more expensive fuel;
- they make louder noise;
- they work poorly in cold weather (fuel becomes viscous);
- publish bad smell even in the version with indirect heating;
- are more expensive (the cost increases due to the high pressure fuel injection pump and injector being difficult to manufacture);
- due to more complex design less reliable, but repairs are more expensive;
- need a fuel tank and periodically require refilling.
Positive qualities are explosion safety and the ability to pour fuel into the tank without the use of special equipment.
Under no circumstances should you refuel diesel gun gasoline or any other flammable fuel!
Multi-fuel
These guns are similar to diesel ones, only they can also run on waste oil. When using such fuel, the operation of the installation is even cheaper than gas.
Kerosene and waste oils - motor, hydraulic, etc. - are used as fuel for multi-fuel guns.
Solid fuel
This is a cumbersome and least practical option, since fuel must be added manually all the time. But such an installation is most accessible to self-made: Of the purchased components, only a fan is required.
Diagram of a solid fuel heat gun
Water and steam
In such models, air blows over a radiator into which hot water or steam is supplied. Guns of this type are an excellent option for facilities with a centralized heating system (in enterprises it is steam) or hot water supply. No electric heaters or burners are needed. It is enough to connect the heater to any of the listed systems - and you can use the energy hot water or coolant.
Water heat guns are hung on the wall or ceiling without taking up usable area heated room
Infrared
As is known, bodies give off thermal energy not only through contact with the environment, but also by emitting infrared (IR) electromagnetic waves. The higher the body temperature, the more intense the infrared radiation is. The operation of IR heat guns is based on this phenomenon: in the heater they have a metal element that is heated to very high temperatures. high temperature(red glow).
A reflector is installed behind it, so that all radiation is directed in one direction. There is no fan, since it is not necessary: heat is transferred without the participation of air directly to the object located in the field of action of the device.
An infrared heat gun differs from other types in the absence of a fan, which ensures its quiet operation
The following can be said about IR guns:
- They are very effective on open areas and in well-ventilated areas, that is, in such objects where the air heated by a conventional heat gun would quickly evaporate.
- Due to the absence of a fan, they produce less noise.
- People find it more comfortable to bask in their rays, since they do not create an air flow.
- An IR gun is unable to create an even microclimate in a large room, since it does not provide forced air mixing.
- Heating with such a gun is not always comfortable, since it can be hot at a close distance from it, and cool at a distance. In addition, it only heats on one side, and if the user’s head gets into the field of action, unpleasant sensations are possible.
IR guns can be either electric or burner.
Many of the modern heat guns, except for solid fuel ones, are capable of automatically maintaining a user-specified room temperature by timely switching on and off. In burner guns, automatic ignition is carried out by a piezoelectric element that generates a spark.
What guns can you make with your own hands?
You can independently assemble the following types of guns:
- electrical;
- diesel;
- gas;
- solid fuel (designed for wood fuel).
What elements does it consist of?
So, in general this device comprises:
- a cylindrical body (it gives the device a resemblance to a cannon) with gratings at the inlet and outlet;
- heating element;
- a fan blowing the heating element;
- filters for suction air purification.
This set can be expanded or, conversely, reduced, depending on what is used as a heat source. There are several options and each of them is worth considering in detail.
Diagram of a heat gun running on diesel fuel
Calculation
First of all, you need to determine how much power a homemade heat gun should have. Obviously, this parameter will depend on the volume of the room, as well as on how quickly the generated heat is dissipated into the external environment. It is customary to use the following empirical formula: Q = V x T x K, where Q is the power of the heat gun, kcal/h; V is the volume of the room, m3; T - temperature difference inside and outside the room, 0 C; K is a dimensionless coefficient that takes into account the intensity of thermal energy dissipation in environment, in other words, the heat loss of the building. Taken equal to:
- for non-insulated frame buildings with wooden or metal casing: K = 3–4;
- for poorly insulated light buildings with single-layer brick walls, ordinary non-heat-saving windows and a non-insulated roof: K = 2–2.9;
- For permanent buildings with two-layer brick walls, windows of regular sizes and a moderately insulated roof: K = 1–1.9;
- for buildings well insulated with modern highly efficient thermal insulators (including the roof and floor) and equipped with modern energy-saving windows with double-glazed windows: K = 0.6–0.9.
To convert power Q into more familiar kilowatts, its value in kcal/h must be divided by 860.
Thus, to heat an uninsulated warehouse sheathed with corrugated steel sheets (assuming K = 4) with an area of 10x15 m with a ceiling height of 5 m at an outside temperature of -5 0 C (inside it is necessary to maintain a temperature of +18 0 C), heat guns with a total capacity will be required:
Q = (10 x 15 x 5) x (18 – (-5)) x 4 = 750 x 23 x 4 = 69,000 kcal/h = 69,000 / 860 = 80.2 kW.
Tools and materials
To make a heat gun you will need:
- steel equal angles 40x4 mm or 50x4 mm;
- a pipe with a diameter of about 250 cm or a sheet of galvanized steel 0.7–1 mm thick;
- a duct fan with an impeller diameter corresponding to the diameter of the pipe (you can take a fan with a motor from an old vacuum cleaner);
- copper two-core wire with plug;
- a metal tank lined with heat-insulating material (for a diesel heat gun).
Depending on the type homemade heater additionally required:
- For electric model: heating elements (it is better to remove the spiral heater from the old electric furnace), ceramic insulator, terminals, fuses;
- for gas: gas-burner with piezo ignition and solenoid valve;
- for diesel: nozzle, injection pump, fuel filter, copper tube;
- for wood burning: sheet steel, corners.
You also need to prepare the following tools:
- electric welding machine;
- soldering iron;
- drill with a set of metal drills;
- hacksaw for metal;
- spanners;
- pliers;
- rivet machine.
Making a heat gun with your own hands
The process of creating a homemade heat gun always begins with making a frame from the corners to which the body and other components will be attached. Further actions depend on the type of installation.
First, a diagram is drawn up electrical circuit installations. If the master does not have the relevant knowledge, he can use ready-made developments.
This is what the basic drawing looks like electrical diagram heat gun
Mistakes made when assembling an electric heater can result in electrical damage or electric shock. When performing work, follow safety regulations.
An electric heat gun is made as follows:

Video: DIY electric gun for heating the garage
Heat gun on diesel fuel and diesel fuel
The manufacturing process consists of the following stages:

We draw the reader's attention to the fact that this heat gun operates according to a direct heating scheme, so it cannot be used in residential or other premises with people or animals.
To check the correct assembly, it is advisable to invite a specialist from some auto repair shop.
IN homemade model There is no flame control sensor and overheat protection system, so it cannot be left unattended during operation.
Video: multi-fuel heat gun
Gas heat gun
This installation is made as follows:
- A meter section of pipe with a diameter of 180 mm is used as a body. In the absence of a finished pipe, it is made from a galvanized sheet, fastening its edges with rivets.
- At the ends of the housing on the side you need to cut a hole with a diameter of 80 mm (here the pipe for removing heated air will be connected) and 10 mm (here the burner will be installed).
- A combustion chamber is made from a meter-long piece of pipe with a diameter of 80 mm. It needs to be welded into the body exactly in the center, for which it is necessary to use several plates.
- Next, a disk is cut out of the steel sheet to be used as a plug. Its diameter must correspond to the diameter of the heat gun body (180 mm). A hole with a diameter of 80 mm is cut in the center of the disk for the combustion chamber. Thus, a plug welded to the body on one side will close the gap between it and the combustion chamber. The plug must be welded on the heated air supply side.
- A heated air supply pipe is welded to a hole with a diameter of 80 mm made in the housing.
- A burner with a piezoelectric element is installed in a 10 mm hole. Next, a gas supply hose is connected to it using a clamp.
- The manufacture of the heat gun is completed by installing the fan and connecting it and the piezo igniter to the power supply via a switch.
Video: homemade gas heat gun
The easiest way to make such a heater is from an old gas cylinder. If it is not available, you can use a thick-walled pipe with a diameter of 300–400 mm as the main blank - then the lid and bottom will need to be welded yourself (the cylinder already has these elements).
One of the options for a wood-burning heat gun is shown in the drawing:
Drawing general view heat gun indicating its main dimensions
As you can see, the body of the heat gun is divided into a firebox and an air chamber with inlet and outlet openings. The partition between them and the improvised plate radiator act as a heating element for the air passed through the chamber. The location of the radiator fins is shown in the sections.
Sections - frontal and horizontal, which show internal organization guns
By attaching a corrugated hose to the outlet pipe of the air chamber, the user will be able to supply hot air to any point in the room.
The installation is made as follows:

Too much powerful fan This heat gun is not required. It is enough to install a model for bathroom exhaust with a capacity of about 50 m 3 /h. You can use a fan from a car heater. If the room is very small, a cooler made of computer unit nutrition.
Video: solid fuel homemade gun
Features of operation and care
The owner of a heat gun should adhere to the following rules:
- Do not use the heater if there are gasoline or solvent vapors in the air. High humidity is also unacceptable for an electric gun.
- The exhaust pipe must be located no closer than 1.5 m to any kind of flammable substances.
- There should be a pause of at least 2 minutes between turning off and then turning on the heat gun.
- If the unit is equipped with air filters, they should be changed or washed with soap, if possible, every 500 hours of operation.
- Fuel filters of diesel and multi-fuel heat guns should be cleaned every 2-3 months. Operation.
- The fan should be cleaned at the beginning or end of each season.
- At the end of the season, you need to clean the combustion chamber of carbon deposits using a vacuum cleaner or brush.
- Transportation of diesel and multi-fuel guns is permitted only with an empty fuel tank. If, during emptying, sediment is found in the drained fuel, the tank should be flushed with kerosene (fill in a couple of liters and shake). Without flushing, the next time you start, the fuel filter is likely to be clogged.
- It is not recommended to fill the cannon with fuel left over from last season. It is more correct to dispose of such residues and refill the installation with fresh fuel.
- During storage, the heat gun should be covered with plastic film or thick fabric so that it does not become covered with dust.
- If the gas heat gun is supposed to be powered from the gas supply network, then the connection to the pipe must be made using a special steel liner. To ensure that the gas pressure at the connection point remains constant, the connection angle must be at least 10 degrees towards the outlet.
- The gun is connected to the electrical network after connecting to the pipe.
- Installation on gas gun liquid gas cylinder and its connection may only be carried out on outdoors. In this case, all joints must be lubricated with a soap solution to make sure there are no leaks (if there is one, the solution will bubble).
- When starting the heat gun, you need to set the maximum temperature on the thermostat. The desired temperature is set after the combustion chamber has warmed up and the main fan has started.
- The operation of the heat gun must necessarily end with a cooling cycle: the burner goes out (the electric heater turns off), but the fan continues to work for some time. In factory-made heaters, this mode starts automatically when the switch is set to the “off” position. If you simply remove the plug from the socket, the cooling phase will not be completed and the unit may fail as a result of overheating.
- For a homemade heat gun, the user must provide cooling manually: turn off the burner and turn off the fan only after the installation has cooled down sufficiently.
- Fuel guns can only be refueled when they are cold.
- To prevent fuel leakage, the heat gun should be placed on a flat, stable surface.
- It is allowed to store only a daily supply of fuel near the heat gun and other equipment (no closer than 0.5 m). The main stock should be stored in a separate room.
- Do not hang or block a working heat gun, especially the openings for air intake and supply. Also, you should not place things to dry on a running unit.
The effectiveness of heat guns has been proven in practice: if you need to warm up a large room or dry something, you won’t find a more suitable installation. At the same time, its design is quite simple, which allows you to make a simple model with your own hands. The main thing is to remember that such heaters, by definition, are very powerful, so when using them, especially homemade options, you should be extremely careful.
DIY Gauss Gun
Since they have already started to appear in one of the articles with Gauss guns, or in another way Gauss Gun which are made with your own hands, in this article I publish another design and video footage of a Gauss gun.
This Gauss gun powered by battery in 12 Volt. You can see it in the picture.
This article can also be used as an instruction, as it describes in detail the assembly of the gun.
Gun characteristics:
Weight:2.5 kg
Projectile speed: approximately 9 m/s
Projectile weight: 29 g
Projectile kinetic energy: approximately 1.17 J.
Charging time of capacitors from the battery through the converter: 2 sec
Charging time of capacitors from the network through the converter: about 30 seconds
Dimensions: 200x70x170 mm
This electromagnetic accelerator is capable of firing any metal projectiles that are magnetic. A Gauss gun consists of a coil and capacitors. When leaking electric current through the coil, an electromagnetic field is formed, which in turn accelerates the metal projectile. The purpose is very different - mainly to scare your classmates. In this article I will tell you how to make such a Gauss gun for yourself.
Block diagram of Gauss Cannon

I would like to clarify this point. structural diagram the capacitor is 450 Volts. And 500 Volts come out of the multiplier. Absurd. Isn’t it? Well, the author didn’t take this into account a bit. We set the capacitor to at least 500 Volts.
And now the multiplier circuit itself:

In the diagram field is used transistor IRF 3205.With this transistor charging speed a 1000 uF capacitor for a voltage of 500 volts will be approximately equal to 2 seconds(with 4 amp/hour battery). You can use the IRL3705 transistor, but the charging speed will be approximately 10 seconds. Here is a video of the converter working:
The video multiplier contains an IRL3705 transistor, so the capacitors take a long time to charge. Later I replaced the IRL3705 with the IRF 3205, the charging speed became equal to 2 seconds.
Resistor R7 regulated output voltage from 50 to 900 volts; LED 1 indicates when the capacitors have been charged to the required voltage. If the multiplier transformer is noisy, try reducing the capacitance of capacitor C1, inductor L1 is not necessary, the capacitance of capacitor C2 can be reduced to 1000 µF, diodes D1 and D2 can be replaced with other diodes with similar characteristics. IMPORTANT! Switch S1 is closed only after voltage is applied to the power terminals. Otherwise, if voltage is applied to the terminals and switch S1 is closed, the transistor may fail due to a sharp voltage surge!
The circuit itself works simply: the UC3845 microcircuit produces rectangular pulses, which are fed to the gate of a powerful field-effect transistor, where they are amplified in amplitude and fed to the primary winding of a pulse transformer. Next, the pulses, pumped up by a pulse transformer to an amplitude of 500-600 volts, are rectified by diode D2 and the rectified voltage charges the capacitors. The transformer is taken from a computer power supply. The diagram shows dots near the transformer. These points indicate the beginning of the winding. The method of winding the transformer is as follows:
1 . We cook a transformer taken from an unnecessary computer power supply (the largest transformer) in boiling water for 5-10 minutes, then carefully disassemble the W-shaped ferrite core and unwind the entire transformer.
2
. First, we wind HALF of the secondary winding with a wire with a diameter of 0.5-0.7 mm. You need to wind it from the leg at the point indicated in the diagram.
Having wound 27 turns, we remove the wire without biting it off, insulate 27 turns with paper or cardboard and remember in which direction the wire was wound. THIS IS IMPORTANT!!! If the primary winding is wound in the other direction, then nothing will work, since the currents will be subtracted!!!

3 . Next we wind the primary winding. We also wind it from the beginning indicated in the diagram. We wind it in the same direction in which the first part of the primary winding was wound. The primary winding consists of 6 wires soldered together and wound with 4 turns. We wind all 6 wires parallel to each other, laying them out evenly in 4 turns in two layers. Between the layers we place a layer of insulating paper.
4 . Next, we wind the secondary winding (another 27 turns). We head in the same direction as before. And now the transformer is ready! All that remains is to assemble the circuit itself. If the circuit is made correctly, the circuit works immediately without any adjustments.
Converter parts:

The converter requires a powerful energy source such as a 4 amp/hour battery. How more powerful battery, the faster the capacitors charge.
Here is the converter itself:

Converter printed circuit board - bottom view:

This board is quite large and after a little work, I drew a smaller board in Sprint-layout:

For those who are not able to make a converter, there is a version of the Gauss gun from a ~220 volt network. Here is the circuit of the multiplier from the network:

You can take any diodes that maintain a voltage above 600 volts; the capacitance of the capacitor is selected experimentally from 0.5 to 3.3 μF.
If the circuit is created correctly, it will work immediately without any settings.
My coil is 8 ohm. It is wound with varnished copper wire with a diameter of 0.7 mm. The total length of the wire is about 90 meters.

Now that everything is done, all that remains is to assemble the gun itself. The total cost of the gun is about 1000 rubles. The cost was calculated as follows:
- Battery 500 rub.
- The wire can be found for 100 rubles.
- All sorts of little things and details 400 rubles.
For those who want to make the same gun as mine, here are step-by-step instructions:
1) Cut out a piece of plywood measuring 200x70x5 mm.
2) We make a special mount for the handle. You can make a handle from a toy pistol, but I have the handle of an insulin injection pistol. A button with two positions (three outputs) is installed inside the handle.
3) Install the handle.
4) We make fastenings on plywood for the converter.

5) Install the converter on the plywood.
6) We make a protective shield on the converter so that the projectile does not damage the converter.

7) Install the coil and solder all the wires as in the block diagram.

8) We make the body from fiberboard

9) We install all the switches in place, secure the battery with large ties. That's all! The gun is ready! This gun fires the following projectiles:

The diameter of the projectile is 10 mm, and the length is 50 mm. Weight 29 grams.
Raised body gun:

And finally, a few videos
Here is a video of a Gauss gun in action. Shot into a corrugated cardboard box
Shot at 0.8mm thick tile:


