CNC burning. Which CNC burner is better – wire or laser? Various models of homemade devices
What characteristics should a CNC burner have, how do the products differ, and is it possible to design them yourself? Experts warn that before you go to the store to buy a device or try to assemble it, you need to understand the mechanism of operation of the CNC machine and think about which one will be optimal.
IN lately Pyrography is developing and gaining particular demand; people order wood-burned paintings and portraits from professionals as souvenirs and gifts. Therefore experienced craftsmen and lovers of this activity came up with the idea to open their own small business, based on image burning.
The CNC laser burner is one of the latest developments.
CNC Laser Burner
Home distinctive feature the device is the ability to accurately cut and draw boundaries, high result is achieved due to the fact that the machine draws dots on the wood. Advantages of the laser machine:
- Thanks to the high precision, the machine is convenient for burning small inscriptions and signs - the image will be clear with bright contours.
- The laser burner is suitable for processing wood, leather, paper and film.
- The machine works properly in a room with low or high temperature; drafts and changes do not affect operation.
There are major disadvantages.
Since the machine draws with dots, it will not be possible to remove halftones and shadows with a laser. Even an experienced artist with an optimally configured program will not be able to achieve a three-dimensional image.
The CNC laser machine is slow. Experts assure that to draw a portrait measuring 25x25 centimeters, the master will have to spend about 13 hours. It is necessary to take into account that the picture will be light, and additional drawing may be required.
When you enlarge a photo before transferring it to the canvas, the burner will draw it in pixels. Externally, the image will resemble a mosaic.
Masters claim that it emits too bright a glow; over time, such brightness will negatively affect vision.
Burner with nichrome thread
The device is equipped with a different impact mechanism, which gives the burnt images significant volume, the drawings seem natural and rich. The image is applied to wood nichrome thread, the brightness of the color depends on the heating temperature of the thread and the time of exposure to the surface.
When drawing shadows, the wire tip must be quickly passed over the surface, without stopping on the tree. But if the drawing requires bright and thick lines, the wire can be left for 3-4 seconds.
Experts include the following advantages of the machine:
- The saturation of the picture is adjusted on the device with a special button.
- The function helps to give the image any intensity depending on the client’s wishes.
- It's easy to burn pictures on wood and leather.
- To draw a picture measuring 25x25 centimeters, it will take an experienced specialist 3 hours.
- The drawing will not be pixelated when you stretch and enlarge the photo.
- During burning, the device does not emit harmful light.
Disadvantages of the unit
To perform the job efficiently, the master needs to maintain a constant temperature in the room. A small draft will cool the nichrome tip, white stripes and light areas will appear on the image, and the work will have to be redone.
The nichrome tip wears out quickly; it must be replaced every 5 paintings. Despite the fact that the thread has a low price, replacing it takes a lot of time.
Self-production of the machine
Since a wood burner is expensive, a person with a high income can purchase the product; craftsmen are trying to build machines with their own hands.
It is difficult to design such a product; a person will have to spend a lot of time, effort and money.

An engraving machine can serve as the basis for the manufacture of a laser burner
If the craftsman has certain skills in electronics and is good at using tools, it is not difficult to build the base yourself.
Experts say easy way– construct a machine from an unnecessary printer; the device will use a belt drive and computer control to move the table in the transverse direction.
It is recommended to attach a typewriter carriage with a moving part that moves in all directions above the table. The burner needle is fixed to the moving element. The final stage is connecting the engine to the computer through a special unit and installing the optimal program suitable for burning images.
Experienced craftsmen assure that it is quite difficult to assemble a burner with your own hands. The chance that the product will work properly the first time is about 50%. The indicators make specialists think about the feasibility of producing such a unit at home.
You can read advertisements online: “I will sell (buy) a CNC laser burner!” It is perceived as an opportunity to open a business. The CNC burner kit with nichrome thread (an alloy of nickel and chromium) must include a laptop, a CNC unit and a thread made of this alloy. How to decide?
Which one should you prefer?
The main advantage of a CNC laser burning machine (it is also called a CNC pyrograph, and the burning process on it is called pyrography) is the highest accuracy. The pattern on wood and leather is applied with dots. Thus, they write texts, badges and apply images that have clearly defined boundaries, and create drawings. They even make wedding invitations on leather and a board with a burnt photo of the newlyweds and the text of the invitation.
Among the disadvantages of laser-type burners:
- the impossibility of obtaining adequate halftones, shadows on the face are obtained due to the fact that the density of blackheads decreases, and this is noticeable from a short distance;
- very low speed (the device burns 10 image pixels per second), it will take 10 hours to obtain a 20x20 cm image;
- by editing the image (enlarging the photo), we get a mosaic of squares on the burned surface of the material;
- the brightness of the glow from the laser negatively affects vision (you can only work with specialized glasses selected for the type of glow of this laser);
- The disadvantage of the work is the tar of trees that gets onto the picture when burned; You can make additional airflow, but a lot of noise is generated and it is difficult to talk about comfortable work;
- complexity of combing board preparation. Those who work with wood reduce the intensity of the wood grain soda solution. After this, the workpiece must be washed and dried well. And if it’s plywood, it can swell at the edges due to moisture.
Therefore, many craftsmen reject a CNC laser burner and opt for a nichrome CNC burner.
Wire burner and its advantages
If you burn with nichrome (wire or so-called thread made of this material), then the following “advantages” are available:
- The result is “live” images, where there are shadows, penumbras and tints. Halftones are achieved by changing the temperature (the nichrome thread is heated more or less, while simultaneously adjusting the time of contact of the wire tip with the surface;
- actually control the saturation of the image on the CNC itself to obtain images with different intensities;
- The master burned the same 20x20 cm portrait in about 2 hours, 5 times faster compared to a laser machine. And this is a great advantage when burning large format paintings on CNC wood.
- it is easier to prepare the workpiece for work;
- bright light does not harm the eyes;
- no tar is released, which means no blowing is needed.

The nichrome burning device has a drawback: the need to maintain a stable temperature in the room. But there is a way out - close the window so that there is no draft. There is a slight smell when burning, the room will have to be ventilated after finishing the work.
Another disadvantage is that the nichrome thread in the burners must be changed after 5-7 pictures. It does not affect expenses, so business will not be affected. 1 sting made of nichrome costs 2-3 rubles.
Therefore, if you decide to assemble a burner with your own hands, then it will be with nichrome thread.
Various models of homemade devices
On the Internet you can actually get acquainted with burners that can create designs on plywood, metal and even glass, achieving high photographic similarity of images. It's worth taking a quick look at a few options:
- Homemade laser machine for burning, it is also called a pyroprinter, it can be controlled from a laptop, then an LPT cable is not needed. But in practice, given the high cost, the CNC laser burner is used much less frequently, although it also has its adherents.
- For the simplest option – a laser pen – you will need the following elements:
- IR laser diode (1W output) and optical fiber;
- one type of mechanical pencil;
- a cooling radiator from an unnecessary TV with thermal grease applied to improve thermal conductivity;
- batteries, preferably type 2AA or D;
- eye protection – filter glasses laser radiation– 750 – 900 nm.

Having disassembled a thin mechanical pencil (it is better to take one with a metal body), you need to cut the optical fiber along the length of the pencil and insert it into the tip. Secure with epoxy or a drop of glue, connecting to the wire and power. As you can see, there is nothing complicated in this example.
- A small plywood engraver - CNC for wood burning can be created from old 3D printers. This homemade laser has a lens that adjusts its focus; its travel is sufficient to focus the light spot (along the height of the material) within 10 mm. And if we take into account the costs of numerical software control of the device, then the entire structure, including drivers and guides, costs around 5,500 rubles.
- You can make a CNC engraving machine from old CD/DVD drives. As an example, let's look at three DVD drive, leaving the motor and sliding mechanism on the metal chassis. The control wires must be soldered to the motor (or to the motor contacts or to the cable loop).
Each X and Y axis platform is glued to the engine mechanism parts. This CNC laser burner has 2 movement mechanisms; it does not require vertical movements. An electric motor with 2 screw clamps is used in the form of a spindle. To control the motor, use Easydrivers complete with Arduino. A laser LED from a previously dismantled DVD-R drive is assigned the role of a tool for pyrography.
- If we assemble CNC machines for our needs with our own hands according to the scheme - burning machines with nichrome (it has high heat resistance and is capable of heating to very high temperatures, is not subject to corrosion, and is very elastic); you need to purchase wire from this material.

It can be removed from an old laboratory rheostat or an electric stove with a nichrome spiral.
Attention! Choose a nichrome thread, taking into account the diameter, length and grade of alloy.
The most popular diameter is considered to be from 0.17 – 0.8 mm, capable of withstanding a glow temperature of 1200˚C.
In the photo below: 3 examples of a burned image, according to the principle - I burn it, let others know what pyrography is with program controlled machines and what the result is.
All photos from the article
In artistic graphics, there is such a term as pyrography, which literally means drawing with fire and for this they use a homemade or professional wood burning device. But we should not forget that not only solid wood can be finished here, but also plywood and cork, leather and thick fabric, cardboard and felt.
Only the tip of the tool itself, of course, will differ in size and even in configuration. We will tell you what types of devices there are and whether you can make them yourself, and also bring to your attention a video in this article.

Pyrography Tools
Types of burners

Note. Regardless of the brand or even the brand of the manufacturer, all burning devices can be different not only in the price-quality ratio, but also in the method of applying the design.

- The most common device for wood burning is a device with a nichrome loop, which is precisely the carrier high temperature, acting on the principle of a spiral - for closure, that is, it heats up during the closure of zero and phase through it. Factory units often have a power switch that can be smooth or step (click), which essentially makes no difference.
The main convenience of a wire loop is that it heats up and completely cools down in a few seconds, therefore, you do not have to keep such a device on all the time, and this, in turn, will have a positive effect on energy consumption.

- In addition, for self made the device is used with replaceable nozzles, as in the photo above, which can also be used as a soldering iron when working with tin and rosin ( electrical devices and boards). Such a device also heats up, like a regular soldering iron, with the help of a built-in spiral at the nozzle holder, therefore, the process of heating and cooling takes a long time and during operation it is usually not disconnected from the network.
But this drawback is to some extent compensated for by the power switch and so that the nozzle does not completely cool down, the toggle switch is switched to the weakest mode, although it is better to replace nozzles in a cold state, since the metal expands when heated and the holder can be broken.

- In addition to the usual, pointed nozzles, on a burner that works on the principle of an electric soldering iron, you can put on a nozzle in the form of a stamp, that is, it will be the same nozzle, only with an end in the form of a plane with a relief image. Such devices are most often used for marking or mass production of any crafts and operate on a 220V network.

- Of course, the most expensive tool is a machine - laser burning wood with high accuracy achievable only with mechanized processing with numerical control. The advantage of a pyrograph is that it is controlled via a computer, and you can upload a program with the image (drawing or inscription) you need.
We assemble the device ourselves
Note. To make an electric wood burner with your own hands, in this case we will need a soldering iron, an old power supply, for example, from a screwdriver or mobile phone(in our case it will be a 5.1V 2A iPhone charger), two thick needles (from a syringe and a sewing needle) and a barbecue skewer.
In addition, we need shoe thread, flux (rosin) and solder (tin).

To begin with, we bite off the nozzle bell from the syringe needle - we won’t need it, but it’s best to take the second copy not for medical purposes, but for sewing.

Now we take a barbecue skewer (by the way, you can make it yourself by breaking off a piece of pine wooden slats) and tie the needles to it with synthetic shoe thread so that they are located along the wooden holder on opposite sides, as shown in the photo above. At the same time, try to make the sewing needle a little longer than the medical needle, about 2 mm.

Now we need to carefully bend the tip of the sewing needle to the medical one so that its tip hits the outlet cut of the hole (this way the fixation will be more reliable). But do not try to close the ends so that they are in tension - a light touch will be enough.
CNC wood burning with nichrome thread simple controls via computer or laptop
Ease of use
To you NOT required to pass special training or study complex programs for dear production equipment. To burn a picture, simply load the image in BMR format into the control program and press START. The nichrome CNC burner with nichrome thread will do the rest of the process on its own. For best quality You can pre-process the photo in Photoshop.
To do this, you do not need to know Photoshop - we give video lessons on preparing photographs.
It is not difficult to assemble, for this we wrote down detailed lessons, which is provided with all materials. To now make sure that it is not difficult to install, see the story below. Lisa completed the assembly in 35 minutes and spent another 10 minutes editing her photo.
With our equipment Even schoolchildren and girls work. We have made management as simple as possible and does not require special knowledge.
The entire process is as automated as possible. You don't need special separate room— You can burn portraits on wood right at home. When burned, a slight smell of wood appears, which does not cause discomfort.
Characteristics of a CNC burner with nichrome thread for wood:
Control program of the same name.
The machine automatically turns on before starting to apply the painting and turns itself off when finished, adjusting the heat of the burning head.
The drawing is raster (line by line), shades are created at the expense of speed. For each shade, the pyroprinter selects the required speed, so it moves along the dark elements of the picture at a reduced speed, and the light ones at an increased speed.
Without additional independent adjustment, the machine works with wooden surfaces from 4 to 10 mm.
The device is equipped with a contactless sensor that will monitor unusual situations and will be turned off if they occur. This reduces the likelihood of fire to zero.
Specifications:
- Working field size: 42 x 40 cm (easily increased to 90 x 40 cm)*
- Power consumption: 150 W
- Power supply 110 V/220 V (switch on the rear wall of the unit)
- Supported files: bmp, jpg, tiff, gif
- Table in working position: 75 x 75 cm
- Boxes in transport position: 75 x 16 x 20 cm
- Speed (depending on the darkness of the picture):
| Plywood format | Burn-in time |
| A4 (21*30 cm) | 1.5-2.5 hours |
| A3 (30*40 cm) | 3-4.5 hours |
| A2 (60*40 cm) | 6.5-7.5 hours |
| panel (90*40 cm) | 8.5-10 hours |
- The software runs on Windows XP, 7, 8, 10 (all updates are free, can be installed on any number of computers)
- Connection is via USB port
* - to increase the working field, it is necessary to replace a pair of M8 studs with meter-long studs (sold in construction stores and fastener stores, cost 50-70 rubles. per piece). We do not put long pins in the box due to the fact that they do not fit into the shipping container. When sent second place, they were often bent, which rendered the studs unusable.
Dimensions
The unfolded table, which is assembled from a box, measures 75x75 cm.

Fits easily into the trunk or back seat of a car

Burner with nichrome thread
Each piece of equipment is shipped in a plywood box that converts into a table. To assemble, you will need about twenty minutes and a simple screwdriver (or screwdriver).
We provide video instructions for assembling and setting up equipment on a computer. Among our clients there were girls who easily coped with self-assembly.
Consumables and Maintenance
You won't need any complicated or expensive maintenance. All you need:
- Every 5-7 plywood it is necessary to change the tip made of nichrome wire. It is made from nichrome wire. Cost 1 piece. approximately 3 rubles. The wire for its manufacture is sold here or in online electronics stores.
- It is important to periodically lubricate the guides with oil to sewing machines(cost 50-80 rubles per oil can).
Easy start of business at home
Everything you need to get started:
- Equipment
- Computer or laptop with Windows (XP, 7, 8, 10)
- Plywood
- Electric jigsaw
- Sandpaper
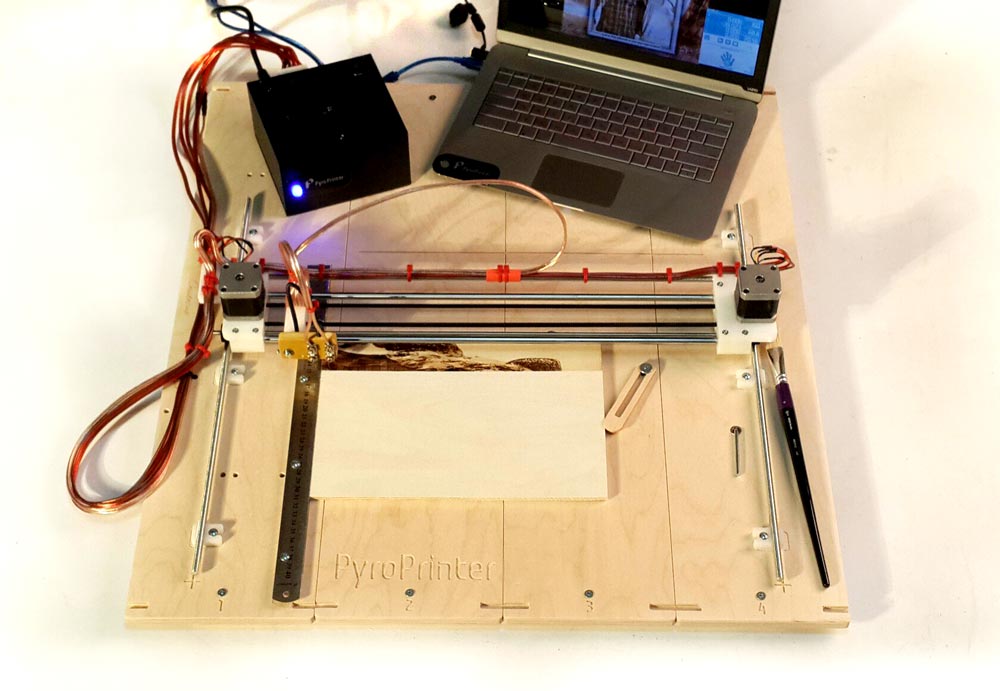
PyroPrinter is the pride of our engineers
It took us two years and the work of 5 engineers to develop. We conducted hundreds of tests and burned thousands of images, simplifying the process of operating the device as much as possible before we finished developing this nichrome burner. All this so that every time you make a board you get an image high quality. Such products are practically no different from the work of an artist who can work on a painting for a week. The Pyroprinter will create high quality A4 in 2 hours.
Such a business is becoming popular in Germany, Ukraine, Kazakhstan, Russia and a number of European countries. Already more than 25 people from Russia, the CIS and Europe have bought a nichrome CNC burner to create their own home business and successfully produce custom paintings.
What's included?
- Controller
- Hairpins (2 pcs.)
- Controlled nichrome burner (carriage)
- Plywood blanks (2 pcs.)
- Brush
- Sandpaper
- Ruler for removing carbon deposits
- Linings for rulers for different thicknesses (2 pcs.)
- Workpiece mounts (2 pcs.)
- A set of spare tips and wire (nichrome and tungsten alloy made in Germany)
- Plywood box-table
Weight about 9.0 kg. dimensions of transport container: 75*18*20 cm
Electronic materials:
- Licensed Pyroprinter software (all updates are free, can be installed on any number of operating systems)
- Video:
- assembly and configuration, first launch
- photo processing (burning in photographic style)
- photo processing (effect of a hand-made drawing)
- how to quickly find clients
- changing the burning sting
- preparing the solution for pre-treatment plywood
- Instructions and master classes:
- Internet promotion (website, VK, Instagram, etc.)
- for plywood preparation, treatment with solutions
- officially for work
- machine maintenance
Support:
1. If you are afraid that you won’t be able to cope, don’t worry. Our technical support will help you if something doesn’t work out for you.
2. If there are problems installing the program, our engineer can install it remotely via Teamviewer.