How to properly make curbs for paths. DIY border for garden paths
The garden border is an indispensable element landscape design. With its help, you can accurately mark the boundaries of flower beds, beds, lawns and flower beds, thanks to which garden paths and the area as a whole acquire a laconic and complete look. However, in addition to the aesthetic function, garden borders perform a lot of practical tasks - they prevent the destruction of the cladding, protect the path from grass sprouting and delay the flow of water during rainstorms or.
Modern borders for garden paths are carried out from the most various materials, including metal, plastic, wood, stone, brick, etc. Material selection in to a greater extent depends on the features of the landscape design of the site. However, it is also important to consider some of them when installing this element. characteristics. “House of Dreams” will help its readers understand all these nuances today.
Features of metal borders
The design of metal borders consists of entire strips of steel, aluminum or copper. They are installed in the ground strictly along the contour of the lawn, protecting the path from grass and weed germination, as well as clearly marking their boundaries.

Due to its simplicity and conciseness, a metal garden border fits perfectly into appearance any landscape design. This design is especially harmonious for areas with strict geometry. It is also recommended to use metal curbs to enclose crushed stone paths.

Choosing plastic borders for the site
Plastic borders for garden paths have many advantages. Firstly, their affordable price, and secondly, high durability, which is ensured by special durable material plastic, and thirdly, plastic borders are very easy to install.
To install these elements, there is no need to dig a trench, prepare a foundation or use special fasteners. Installation of plastic curbs is carried out using anchor pins, which very firmly fix the structure. In addition, the lightness and plasticity of borders made of this material makes it possible to lay them along curves and winding lines. However, despite their lightness, such borders perfectly fulfill their main tasks - they strengthen the contours of the paths and prevent the growth of grass.
Plastic borders can be installed along the contour with absolutely any coating. Due to the external “invisibility” of their design, takei borders will perfectly complement any landscape design style.

Plastic garden border
Wooden garden borders
Wooden borders not only protect paths from creeping, but also emphasize their appearance, giving the area an interesting expressiveness. Wooden borders for lawns and flower beds can be made in a wide variety of shapes and solutions.


The most simple option creating wooden borders involves laying specially treated boards along the edge of the paths. This option is not the most reliable in terms of strength, but if you are thinking about how to make a border for paths yourself, then start with a wooden structure.
Also, wooden borders are often made in the form of driven boards or bars installed longitudinally. The most important advantage of wood from a decorative point of view is the ability to paint this material with any colors, create designs using paint and firing, as well as bring to life any shape and independently adjust the height of the structure. In addition, wooden borders perfectly complement any landscape design and harmoniously combine with a variety of garden accessories and decorations.


How to make a border for paths
However, when choosing wooden borders for summer cottages, keep in mind that their service life often does not exceed 10-12 years, even with regular treatment with antiseptic agents.

Natural stone borders: simple and natural
Perhaps the most fundamental and aesthetically attractive are borders created from natural stone. Such borders are great for decorating flower beds, flower beds and lawns of any shape. However, such an option for decorating borders can hardly be called budgetary, because, firstly, the natural material itself is not cheap, and, secondly, the installation of borders made of natural stone requires careful preparatory work.


A stone border can be created using marble, sandstone, artificial or natural granite, pebbles or limestone. Stone granite combines most harmoniously with paths made of smooth paving slabs, paving stones or stones. To create a holistic picture of landscape design, stones of the same size are placed close to each other.


Borders for flower beds with imitation stone
As is known, a natural stone- this is an expensive pleasure if it is not collected from nature. Therefore, owners of household plots and garden plots often resort to such a solution as imitation stone. Moreover, the borders are made of artificial stone they look very neat and aesthetically pleasing, in perfect harmony with lush greenery and flowers. And caring for them is quite simple and not troublesome.

Decorative stone border

Simple garden borders made of bricks
A very popular material for creating borders is facing brick. Brick borders harmoniously complement crushed stone and other materials.
Most often it is laid out along the line of the garden path at a slight angle, in the form of oblique teeth. Installation of brick borders is quite simple and not labor-intensive. However, despite the relative strength of facing bricks, this material is not entirely suitable for areas with frequent rainfall.


Hedge borders
There is also an alternative type of borders created from, which ideally emphasize natural beauty plot. To create such “green” borders, plants are planted along the paths so that the width of the fence is 20-30 cm. Plants that will later turn into borders must be low-growing and undemanding to care for. If you wish and have a little skill, you can use hedges to create any shape for garden borders.

Living green border photo
In most cases, borders on garden paths perform a threefold task: they protect the surface from destruction, prevent path components from getting into the beds and lawn, and make both the path and the landscape of the site as a whole neat and organized. Depending on the type of path, soil composition and design requirements, the solution may vary.
Curbs for paths - what are they?
There are a large number of options and specific designs of borders for garden paths. When deciding what a border can be made from, it makes sense to get acquainted with the range of possibilities.
Some curbs merge with the path, others protrude above the canvasConcrete fences are the most popular, due to a number of positive factors:
- reliability, strength and durability;
- relatively low price;
- availability of a wide range of factory products;
- the opportunity to make borders with your own hands;
- easy installation;
- acceptable appearance.

Fences for pedestrian surfaces, made of natural stone, are no less reliable than concrete ones, and are perfectly consistent with the landscape, but they have a considerable price. Stone is used to frame paths made of brick, stone, paving slabs and crushed stone. It can be laid at or above the surface level.

As follows from the photo, a brick border can be installed at the border of the path in different ways. A clinker brick fence will last a long time. In the simplest case, the brick can simply be laid along the edges of the finished coating. When installing a path made of bricks or paving slabs, it is placed on the sand along with laying the main sheet.
To organize a permanent brick border, dig a groove under it, lay crushed stone and sand, and then lay the brick on cement mortar. The structure can be strengthened by placing reinforcement under the brick.

A wooden border fits well with a country-style landscape and is suitable for wooden and embankment paths. You can use timber, boards and logs. The wood fencing option can be budget-friendly. At the same time, the service life of a wooden border is limited even with serious processing.

Metal corners and profiles are successfully used when arranging paths. It performs the functions of a curb while remaining practically invisible. Craftsmen were able to adapt even trimmings metal pipes for fencing the path.

Plastic borders are very convenient to use, border tape and special plastic profile for paths. The listed elements cannot withstand large mechanical loads, but they perform excellent decorative functions.

Plastic fences for garden paths have a number of positive properties:
- are not afraid of frost and moisture;
- have long term services;
- There is a wide range of plastic fencing;
- low cost;
- are not afraid of mechanical soil movements.

Small shrubs are successfully used as a “green” fence: cotoneaster, boxwood and others. The roots of the plants hold the edge of the path together, and the plants themselves serve as wonderful decoration.

You can use a variety of available materials as a border for a path in your country house. Bottles, both glass and plastic, can for a long time perform functions unusual decor and fencing. Old slate will perfectly serve as formwork and border for concrete path. A low wattle fence will enliven the path of wood chips and prevent the wood chips from scattering to the sides.
Making a concrete border with your own hands
It is probably easier to purchase a ready-made curb stone. If you want to save or make non-standard option You can make fences for concrete paths with your own hands.
 To make curb stones, you can use purchased plastic or metal molds that can withstand a large number of cycles. You can make it yourself wooden formwork for casting curbs. The material can be plywood, OSB, boards and timber. Wherein internal surfaces structures must be smooth.
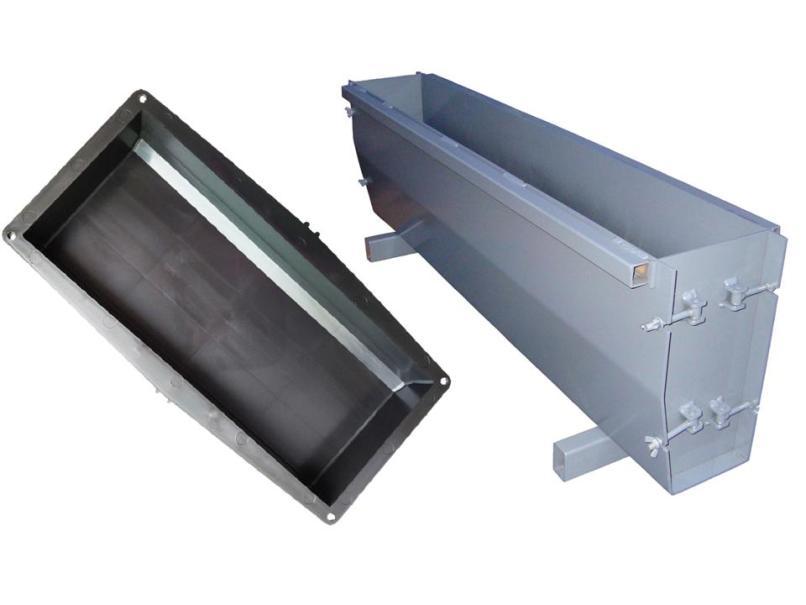
It is very convenient to use a steel channel as a mold.
To do this, cut both profile flanges with a grinder opposite each other and insert a metal plate into the resulting gaps.  A wonderful shape for a border is obtained from a channel
Two such jumpers form the ends of the form. Making a border using a mold is done in the following order:
- The internal surfaces of the mold are lubricated with used automobile oil so that the casting does not stick to the walls.
- If car wheels will drive along the curb, a reinforcement frame is inserted inside the formwork. It is placed on stones and should not touch the walls of the matrix.
- Prepare a solution that consists of three parts sand, two parts crushed stone and one part cement. If necessary, a plasticizer and dye are added to the concrete. The consistency of the solution should correspond to thick sour cream.
- The composition is poured into the mold. To remove air bubbles, the solution is pierced and the formwork is tapped with a hammer. The workpiece is covered and kept for two days.
- The product is carefully removed from the mold. The border will be ready for use in 20 days, after the cement has completely hardened.
We pour the fence for the path directly on the ground
You can make a border for a path with your own hands by pouring concrete directly into the formwork installed on the ground. To do this kind of work you will need the following tool:

This option is noticeably simpler, but the quality of the fence may not be the best. Installation of the curb with formwork is carried out according to the following scheme:

A homemade border, cast on site yourself, can be decorated in pieces ceramic tiles, pressed into the surface of the concrete. Sides, protruding above the surface of the fence path, can be decorated by attaching corrugated material to the walls of the formwork: rubber, plastic or metal plates.
Installation of curbs on paths

Concrete products have significant weight, so it is difficult to work with a curb longer than 0.6 m. To install a concrete curb yourself, you may need the following tools.

Installation of the finished fence is carried out according to the following plan:
- The location of the borders is marked using twine and pegs. The distance between the internal planes of the fences on both sides of the path corresponds to the width of the coating.
- A trench is dug in accordance with the dimensions of the curb and the height of the path surface. It is necessary to take into account the height of the layers of sand and mortar, a total of about 8 cm. As a result, the depth of the groove should be about 20 cm. The bottom of the trench is leveled and compacted.
- Sand is poured into the trench in a layer of 5-7 cm, which is leveled, moistened and compacted.
- The cord is exposed for correct installation fences in height and direction. It is convenient to place it on the side of the smoothed corner of the curb.
- Prepare a solution that consists of three parts sand and one part cement. The consistency should not spread when laying.
- The solution is spread in an even layer on the bottom of the trench.
- The concrete curb is carefully lowered onto the mortar and leveled along the cord, tapping it with a rubber hammer.
- The groove next to the installed curb can be carefully covered with soil without touching the concrete fence. The operation will provide comfortable conditions for cement hardening.
- The border is not touched until the solution is completely mature, that is, 10-20 days.
- As the fence is ready, the soil next to the curb is leveled and compacted.
Thus, we have armed you with everything necessary tools knowledge for self-installation borders in the garden and country house. I hope this video will resolve any questions you may have.
Any self-respecting summer resident always makes paths on his property to make walking more convenient, and with his own hands. To make this garden design look complete, you need to lay a garden border. If we draw a parallel, it can be compared to a frame for a picture, without which the latter is not fully perceived.
What is a border for?
The framing of flower beds or paths is not only aesthetic, but also functional. It divides the entire area into several zones, be it vegetable beds, paths or flower beds. The height of the border is usually 10-30 cm, if necessary it can be more, depending on the height vegetable crop. The main thing is that the border frame does not block the plants from the sun.
In addition, the curbs themselves must be dense enough to prevent soil from getting onto the paths. And don’t forget about the appearance; after all, beauty should be in everything and the garden is no exception.
What can you use to make a border at your dacha?
Almost any material can be used to make a border. That is, they can be from:
- concrete;
- bricks;
- stone;
- metal;
- plastic;
- tree.
Except natural material A garden border can be made from improvised items such as plastic bottles, car tires and other items. It is worth noting that plastic borders are inexpensive, and their shape can be very diverse. In addition, when installing a plastic border there is no need for preparatory work.
Let's look at some of the most common options for flowerbeds or road fences, which you can easily make with your own hands.
Stone framing
This perfect option in order to add some zest to your country cottage area. Such a border can add a special touch when framing flower beds or fruit trees. The following types of natural stone can be used to make it:
- limestone;
- shell rock;
- marble;
- granite;
- sandstone.

Stone border
Laying stones can be done “dry” or with cement mortar. When using the first method, it is advisable to place the stones on a sand cushion so that they can be leveled. But the second method is more reliable, since it allows you to get a strong and durable frame. In addition, you can thereby avoid the need to constantly get rid of weeds.
Before installation, you should decide on the shape of the frame. Then dig a shallow trench, which will immediately mark the boundaries.
When laying stone, you should fill the trench with cement, but not all at once, otherwise the concrete will set and nothing good will come of it.
The stones should be placed as close to each other as possible, and the gaps that form should also be filled with mortar or covered with small pebbles. The work requires effort, but the finished result is worth it.
Concrete framing
A border made of concrete, like stone, is durable and strong. You can build such an edging different ways. To begin with, you can pour out the finished sections, for this you will need forms for borders, and then assemble them together. Or make formwork, which is then filled with concrete to obtain a continuous structure.
Segment fencing
To create a frame from ready-made concrete sections, you need a mold for casting them. You can buy it in a store, or you can make it yourself. There is just one caveat. The finished form is solid, that is, non-separable, from which it is very difficult to remove the finished segment without damaging it. And if in production they are used for this purpose special means, then at the dacha there will be nothing but oil. Since most often the mold may lie unevenly, the oil will not be distributed over all surfaces. Then there's no point in it. Therefore, it is best to make the mold yourself.

An excellent option for a concrete section for a curb
To ensure strength, the length of the segments should not exceed 2 meters. In this case, it is advisable to maintain a height to length ratio in the range from 1:2 to 1:4. Also, do not make the border too thin or thick. In the first case, the section will break, and in the second it will look like a beam, which is not aesthetically pleasing.
Monolithic fencing
It is easier to make a one-piece edging with your own hands, since you do not need to pour out sections of concrete separately. To do this, you need to dig a trench to a depth of 1/3 of the planned height of the curb. The bottom needs to be well leveled, then a sand cushion should be made or covered with gravel. After this, you can begin to create the formwork. It can be constructed from wave slate, corrugated sheets, metal or plywood sheets. To prevent the formwork from breaking and the concrete mixture from leaking out, it should be reinforced with reinforcing bars on both sides, distributing them at a certain distance from each other.

Stages of creating a monolithic garden border
The prepared cement mortar is poured into the formwork and leveled to its level. Using a metal rod or pipe, the concrete should be compacted to prevent the formation of unwanted voids. To do this, each time you immerse a rod or pipe in the solution, swing it in different sides. Walk this way along the entire length of the edging, taking your time. After pouring, the mixture must be closed from sunlight and moisturize daily. It will take five days, no less, for the concrete mixture to completely dry, and only then can the formwork be dismantled.

In the end, a monolithic border made by yourself looks just great!
Brick frame
DIY border made from brickwork fits organically into any style garden landscape. It will look especially good against a brick background. country house. Brick can be laid either on the end or on the edge; it looks equally attractive. In some cases, the bricks are slightly deeper into the ground at an angle. In this case, such a decorative border for the flower bed will have the shape of teeth.

But not every brick is suitable for framing. An ordinary one will quickly collapse under the influence of severe frosts. Therefore it is better to take facing material, which has greater strength and resistance to low temperatures and humidity.
Framing from scrap materials
At almost everyone's dacha you can find almost a whole warehouse of plastic bottles. But you shouldn’t immediately get rid of such material, since it will also be suitable for creating a border with your own hands.

White plastic bottles must be painted. This makes them look more attractive. Any one is suitable for this waterproof paint. If necessary, you can show a little imagination and cover them different colors or even paint it. After painting, plastic bottles need to be given time to dry thoroughly, preferably at least a day. But if you are too lazy to do this, then you should use bottles made of dark plastic.
First you need to mark the flowerbed and dig a groove along its perimeter to a depth of half the height of the bottle. It is good to clear the bottom of debris and weeds, and also, if possible, remove all the roots so that the grass does not sprout later. Place plastic bottles in this groove close to each other, bottom up, simultaneously covering them with earth and compacting them well. The ground near the bottles can be sprinkled with a little sand or laid out with small pebbles. In this case, it will be more difficult for weeds to find their way out, and the flowerbed itself will take on an interesting and complete look.
In addition to using plastic bottles, decorative borders for lawns and flower beds can be made with your own hands from other available materials - car tires. Moreover, depending on your imagination, they can be in the form of different animals - swan, turtle, elephant, zebra and others.
They say that the garden looks like a young maiden, and the garden paths are like a belt on her dress, emphasizing the shape of the flower bed and adding grace. We will now talk about how to make a border with your own hands, or in other words, how to make a fence separating a belt from a seasonally changing outfit.
What and how to make a border with your own hands?
Using your imagination, you can make a frame for the garden from almost any available materials: wood, wicker, brick, hedge from plants and much more. However, they all have a number of disadvantages: wood and vines simply rot and dry out, brick cracks due to high temperature changes, and a hedge of plants must be maintained. Another thing is a concrete curb, which is the most practical, weather-resistant, durable, and does not require attention.
There are two options for making concrete edging, each of which has its own pros and cons. The first option is the casting of curb blocks using molds and further installation on personal plot. If you decide to change the size of a garden path or flower bed, then such a fence can be easily dismantled and moved to another place. It is suitable for creating regular geometric shapes.
The second option is a monolithic border. It is used for making flower beds, as well as flower beds next to buildings - steps or porches. It will no longer be possible to change its configuration and dimensions in the future. However, when casting, you can give it an oval, smooth rounding or bend.
DIY forms for borders
If the theater begins with a hanger, then the border begins with a form. It is not worth buying a matrix for casting for several reasons. Firstly, as strange as it may sound, it is solid. It is problematic to get a frozen piece of concrete out of it without damage. In factories, molds are covered special composition so that they don't stick. The use of oil or waste (used motor oil) does not simplify the removal process finished product. In addition, if the mold being poured was not level, then the oil will flow into the corner, as a result, the frozen section will have a flaw in this place.
Secondly, factory matrices have standard sizes, beyond which we cannot go. It is best to make the form for the border yourself, with your own hands. For this we need:
- a clean and even sheet of metal or thick plywood (at least 5 mm). Chipboard and QSB sheets will not work. They have a rough surface, resulting in an uneven face of the curb. And when it hardens, the solution, having grabbed the surface of the sheet, will not allow the formwork to be dismantled without damage. If you can’t find a perfectly smooth sheet and you decide to use QSB, then wrap it in thick polyethylene. It will hide surface imperfections;
- long planed bars. Be sure to be smooth, as they say, without a hitch;
- two dozen screws. It is better to take ones with non-hidden hats;
- screwdriver or screwdriver.
On the surface of plywood or a sheet of metal, we fix the bars with screws according to the dimensions of the future block. If the sheet used is large, then several formworks with adjacent sides can be built at once. Border stones, for ease of use, have one beveled corner, which, when installed, faces the inside of the garden path. You can make it by screwing a triangular block inside the mold to one of the sides. Or, after making the block, cut desired angle grinding machine.
You should not make curbs longer than 1000-1200 mm, as in this case the risk of breaking the concrete block increases. The width and height of the curb should have an approximate ratio of 1/2-1/4. If we make it narrower, we will additionally increase the risk of fracture; if it is less high, then it is no longer a fence, but a floor beam. (The curb stones for sale have dimensions: length/width/height - 1000/150/300 mm, 1000/80/200 mm, 500/80/200 mm.)
Making borders with your own hands - preparing concrete and pouring molds
For the concrete mixture poured into the curb mold, we will need:
- cement. Brand 400 or 500 will do; sand. At the rate of 1 part cement (grade 400) to 3 parts sand, or 1 part cement (grade 500) to 4 parts sand;
- water;
- crushed stone At the rate of 1 part dry mortar to 2 or 3 parts crushed stone;
- fittings Or wire; at least 4-6 mm thick, depending on the size of the border;
- decorative elements.
Before mixing, the crushed stone must be watered or immersed in water so that it is saturated with moisture and better adheres to the solution. Mix cement with sand, without adding water for now, in a ratio of 1 to 4 or 1 to 3, depending on the brand of cement. Mix until a uniform mass is formed; it is best to use construction mixer, since a lot of concrete is needed. After this, add crushed stone and water to the dry mixture. Mix everything thoroughly again. It is very important that there are no lumps of sand left in the solution.
Before pouring the concrete, level the form using a level, lubricate the bottom and formwork with oil or sand, they will not allow the form to stick to the concrete.
Fill the prepared form halfway. Next you need to lay the reinforcement, we do it in the form of a canvas railway- two long straight lines, along the entire length of the casting, and many small transverse ones. The places where the reinforcement is connected to each other must be secured by welding or tied with wire. Size steel frame it should be smaller size block so that metal parts do not protrude outward and do not come into contact with environment, otherwise the metal will begin to rust.
After laying, fill the remaining space with concrete mixture. Level the surface of the future block with a trowel. For better setting of concrete, poured forms should be kept in the shade. If there is no shade, then future blocks should be covered with burlap or periodically, once a day, moistened with water. Drying the concrete mixture too quickly will cause it to crack.
The hardening time is approximately 3-4 days, after which the form can be unrolled, the sections can be placed in the shade for further hardening (5-7 days), the formwork can be cleaned, reassembled and further production of borders can begin. To create originality and maintain the architectural style of your cottage or home, after lubricating the mold with oil, before pouring concrete, the bottom, as well as side surfaces can be laid out with wild stones, shells, sea stones or broken porcelain. This is where fantasy spreads its wings.
DIY monolithic concrete curbs
The cast curb is a kind of mini-track. It is somewhat simpler to manufacture. There is no need to prepare a form; instead, we dig a flat trench at the site of construction of the fence. The width is slightly larger than the width of the proposed fence, the depth is 1/3 of the total height of the future border. We make the bottom flat; it can be lined with crushed stone, stone or sprinkled with sand. We place formwork on both sides of the trench.
For formwork you can use sheets of plywood, metal, wave slate, corrugated sheets. Sheets of corrugated sheets and wave slate are even preferable in this case. Concrete mix When filling such a fence, it will take on a wave form, and as a result, it will fit more harmoniously into the exterior. Using flexible material - a thin steel sheet or corrugated sheeting, the future fence can be given smooth shapes.
The walls are supported from the outside by driving steel pins into the ground. The manufacture of formwork should be taken seriously. Liquid concrete is twice as heavy as soil; if the fence falls off or cracks, the mixture being poured will leak out, and all the work will have to be done again. The composition of the filling mixture remains the same. Using this method, we also fill the form, but in this case, as if from the side. Because of this, the height of the casting is greater and equal to the height of the curb stone. To prevent the formation of voids, the concrete must be compacted.
In construction, special vibrators are used for this. When pouring by hand, a thin pipe or pin will do. First, we immerse it in the solution with frequent jerking movements with a small amplitude, and then quickly swing it from side to side. Then we slowly remove the pin, also giving it vertical and horizontal vibration. We repeat the operation, moving from one edge of the fill to the other. It is important to pierce the entire volume of concrete. In this way, we achieve compaction of the crushed stone, while water and air rise to the top. That is, making a border with your own hands, in this case, imitates technological process at the factory.
Similar to the first case of manufacturing, the monolithic product must be protected from direct sunlight and moistened with water every day. The formwork can be removed only after the concrete has completely hardened, after 5-7 days. It will most likely not be possible to decorate such a fence on the side, unless it is flat and large stones, like a savage. But at the same time, it is convenient to decorate the upper part of the future hedge with the same shells, pieces of tiles or something else.
Making your own borders is just the beginning. If desired, you can cast a beautiful full-fledged fence from concrete, pillars for it, and anything else you like. Hopefully, starting with a small fence, you will eventually work your way up to creating a concrete frame for your pool.


