Storm drain in private. Storm sewerage in a private house - types, design, installation rules
Sometimes for a summer resident, long-awaited rain at the height of the season becomes a real natural disaster. As a result of a prolonged summer rain, as well as during a spring flood, a real lake may form on the site.
In order to avoid stagnation of water, a system for collecting and draining it from the territory is needed. If you build a storm drain with your own hands, then the costs of its construction will be minimal.
The article presented for review describes in detail the principle of constructing an atmospheric water drainage system and describes the components of the structure. We will tell you how best to build it and how to maintain it. Taking into account our advice, organizing a storm drain will not cause the slightest difficulty.
Storm drainage is a specific design. The water discharged through this system contains both small and large debris. Therefore, there must be primary cleaning in the storm drain.
The system may differ in the volume of water it is able to accept, design, and duration of effective operation.
Image gallery
Storm sewerage is a system of canals, water inlets, sand traps, inspection and collector wells built in the ground. It is designed to collect and drain rainwater from the territory.
The installation of a storm drain will prevent watering of the site during flood periods and during heavy rainfall, which is especially important for areas with clay soils
The storm drain will protect the underground parts of structures from erosion by water and will prevent subsidence of the foundations due to eroded soil underneath them.
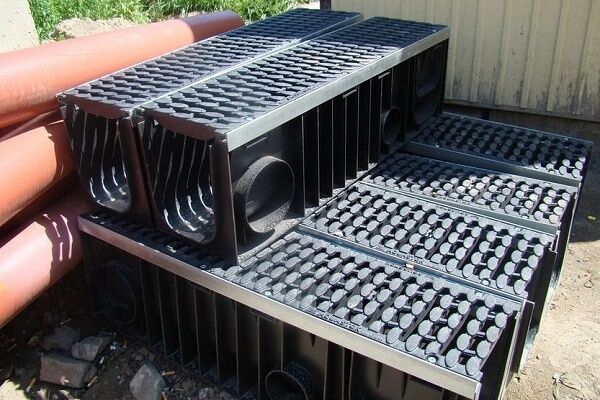
A wide range of components are now produced for storm sewer installations, from which you can easily assemble a system of any degree of complexity
Point storm water inlet
Construction of canals and installation of storm water inlets
Protecting the foundation from weakening
Components for assembling a stormwater system
Based on the design of the system, 3 types of storm drainage can be distinguished:
- Open. It has the simplest design, is easy to implement, and is inexpensive.
- Closed. This option is more complex. Here you will have to deal with underground pipes and storm water inlets. The system needs to be planned in advance, and installation is best done by a specialist.
- Mixed. They are chosen when there is not enough finance to implement option 2, and also if you need to cover a large area. It is something between the first two.
Storm drainage of the first type is made in the form of drainage trays built into the coating. Through them, water flows to a specially designated place or is simply drained into the garden. The second type of system is located below the zero point, which requires significant excavation work and corresponding financial investments.
Surface drainage can fit perfectly into the landscape design of a dacha, and even become its decoration. Use the system in small areas
Such a storm drain is installed mainly during the development of a site, since it is a freezing option that is easier to implement. The system is not buried very deeply - up to a meter maximum, but both in winter and in early spring it is not involved in work.
To prevent the sewage system from freezing, the pipes are buried below the freezing point. With the third type of storm drainage, the sewerage elements are partially located both on top and in the soil.
Experts say that the choice of such an expensive option as a closed storm drain must be justified. This decision can be justified by high requirements for territory design
Storm drain design is always individual. It is unlikely that there will be areas with absolutely similar conditions. They will always differ, if not in relief, then in layout, soil properties, and the number of outbuildings.
Storm drains are needed both at enterprises and in private properties. The difference in their design is that large-scale systems are combined with the discharge of treated water, which is used for the needs of the enterprise
Basic elements of classic sewerage
Storm drainage can be point or linear. The first option involves collecting water from surfaces that do not absorb moisture, such as the roof, hard surface areas. The wastewater then flows into receiving tanks, and then enters the drainage system.
With the linear method of drainage, water is drained into trays located near paths and platforms. A simplified version of a storm drain consists of the following elements:
- a central pipe laid under a layer of earth and finishing coating and carrying collected water to the extreme point of the scheme;
- trays - the main part of the system that transports excess water to sand traps; the efficiency of drainage largely depends on them;
- a storm inlet located under a pipe or low point in the yard to collect liquid;
- filters and distributors - invisible, but extremely important components.
All elements included in the system are equally important. If any of them fails, the efficiency of the entire structure decreases.
Image gallery
Point storm inlets are designed to receive precipitation at one point. They are cheaper and easier to install, but require underground pipes to carry water into the sewer system
Point-type rainwater inlets are positioned so that they receive water collected from the roof by the drainage system. Sometimes at these points the storm drain is even connected to the drain
The drainage of rainwater collected by point sewerage is carried out through a pipeline laid in the ground. This circumstance minimizes the priorities of simple installation of storm water inlets
The disadvantages of a point storm system are the possibility of soil subsidence with a change in the slope of the pipeline, the difficulty of determining a leak if it occurs, and the need to protect the pipes in the form of paving a developed area
Point type storm water inlet
Connection with drainage system
The principle of point sewerage
Paving a storm drain area
Types of storm water inlets for sewerage
The purpose of a rainwater inlet is to collect moisture coming from pipes and yard coverings. This element is the first to absorb the entire volume of water coming from the drainpipes. When choosing a storm drain, we are guided by such data as the average volume of precipitation, its intensity, topography, and the area occupied by the storm drain.
Image gallery
The method of installing a storm sewer depends on the type of water intake device chosen for its construction
A system with point water intakes located directly under the drain risers is arranged in the form of pipes laid in the ground
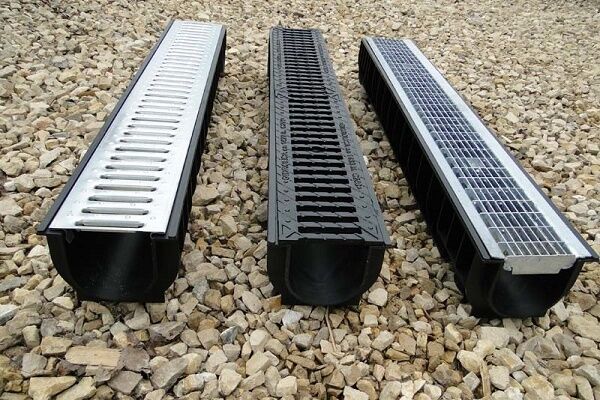
A storm drain with linear water intakes is a network of channels covered with a grid made of steel alloy, plastic or cast iron, depending on the required load-bearing capacity
Both point and linear water intakes are covered with protective and decorative grilles. They are needed for ease of movement around the site, preventing accidents and protecting the system from clogging with leaves, branches, dust
Storm drain with linear water inlet
Point rainwater system
Installation of storm drainage trays
Protective decorative grille
You can buy a cast iron or plastic storm inlet. The former are preferable in case of heavy loads, while the latter are attractive due to their moderate cost, low weight, simplifying installation. A cheaper option is to make a rainwater well for storm drainage at your dacha yourself from brick.
The walls of the pit are lined with brick, leaving a hole for the pipe, then plastered from the inside. Better yet, leave a gap between the soil wall and the cover and fill it with concrete. The bottom of the rainwater inlet must be concreted.
No storm drain can do without a rainwater inlet. It preserves both the foundation of the building and the covering around it. If you try to save money on its installation, then water falling on the foundation will lead to shrinkage and cracks on the walls of the building
This important element is also made from concrete rings. Then the bottom ring can be purchased with a finished bottom and you won’t have to fill the slab. Sometimes factory rain inlets go on sale complete with a basket, siphon, and decorative grille.
Most often used for private construction, rainwater inlets made of plastic or composite materials are produced in the shape of a cube, each side of which is 30-40 cm. There are adapters for inserting pipes from below and on all sides of the product.
In order not to clog the pipes with debris falling through the grid cells, rainwater inlets are equipped with baskets. Once they are full, they are removed and cleaned, then returned to their place.
The design of the factory rainwater inlet includes partitions dividing it inner space into compartments and creating a water seal. As a result bad smell from decaying organic matter does not penetrate outside.
The efficiency of a point storm drain depends not only on its volume, but also on the installation location. It should be located under a drain or in a place where moisture constantly collects. If it is installed under a pipe, then the jets must accurately hit the center of the grate, otherwise some of the water will fall on the foundation or yard surface in the form of splashes.
Why are sand traps needed?
Rain and melt water in any case contains a certain percentage of insoluble particles. If sand traps are not included in the scheme, dirt will settle in the sewer and it will cease to function fully. Flushing the system is expensive.
A sand trap is a chamber installed behind point receivers in places where water is discharged into underground pipes. It is designed in such a way that the flow of water entering it reduces its speed.
As a result, under the influence of gravity, suspended particles sink to the bottom, and the liquid released from them leaves through a special hole. The shape of the sand catcher is a trap with many chambers located horizontally or a chamber in a vertical design.
Image gallery
Point storm water inlets are equipped with devices for retaining sand and filtering water. In fact, such a system does not require additional sand-collecting components
In combined stormwater systems, sand traps are installed in linear sections and before discharge into the collector/absorber.
The dimensions and volume of sand traps depend on the volume of collected water and the class of the storm sewer itself
Regardless of the size, all types of sand catchers are equipped with devices for collecting sand, allowing you to empty the device in a simple and accessible way
The sand trap is built into the rain inlet
Sand traps in combined systems
Sand catcher for public storm drainage
Trap device for household system
What are drainage channels?
If the blind area around the house has already been completed, but the drainage system has not been taken care of, drainage gutters, which are also called linear rainwater inlets, can be used as a way out of the situation. Channels made of concrete or plastic are laid outside the blind area parallel to the paths and roof overhangs with a slight slope.
Water enters the linear drainage channels and roof gutters, and from the entire yard, covered with asphalt or slabs. Such a sewer can cover much more objects than a point one. When purchasing ready-made trays, you need to pay attention to such important parameters as permissible load class and mechanical strength limit.
The tray, at first glance, is a very simple product, but if the calculation is done incorrectly, the system will not work fully. It is necessary to take into account the throughput of the storm drain, the type of coating, and the degree of contamination of the drained water.
The weakest products are marked A15. This means that their use is permissible with a maximum load of up to 1.5 tons. They are installed around the perimeter of the house, in pedestrian and bicycle areas. Trays of class B125 can handle loads of up to 12.5 tons without compromising their integrity. They will not be damaged by the weight passenger car, so they are appropriate in the garage area.
For private construction, you should not buy massive concrete gutters; plastic trays are quite suitable here. They have strength classes A, B, C. The material for their manufacture is polyethylene or polypropylene.
An important parameter when selecting trays is the hydraulic section, denoted by the abbreviation DN. It must correspond to the diameter of the pipes supplied to these elements. For plastic gutters, the DN value ranges from 70 to 300.
The length of a standard tray is 1 m. The products are equipped with a locking system, with its help the gutters can be lined up in one line, connected to pipes or branches can be made. A rational choice for a summer house, private home - models from DN100 to DN200.
Image gallery
Manufacturers of storm sewer assembly kits offer a wide selection of trays that vary in bandwidth and the material used in production
To equip areas with pedestrian traffic, storm sewer system components are made from galvanized steel. This is not the most durable option, attracting mainly due to its simplicity of construction.
Concrete and polymer-sand products will last at least 50 years. They handle transport loads without problems, including the weight of cargo units. However, due to the weight of the trays and the need to use construction equipment for installation, they are rarely used in the private sector
Trays made of frost-resistant polypropylene are actively in demand in the landscaping of suburban areas. They do not deform and do not lose strength in the range of -40º - (+65º) C. Ideal for self-improvement of the territory
Trays with different capacities
Construction of a storm drain from steel parts
Concrete gutters
Practical plastic option
How to choose pipes?
For storm sewerage, according to SNiP, pipes made of metal, asbestos or plastic can be used. Most often, for private homes and cottages, the choice is made of plastic pipes. They are lightweight, decorative, do not corrode, their installation is simple, but the mechanical strength of the material is low compared to metal.
Having chosen the material, you need to decide on the diameter of the pipes.
The initial value is the largest volume of drained rain and melt water. This parameter is determined by the formula:
Q=q20×F×Ψ
Here: Q is the required volume, q20 is the coefficient characterizing the intensity of precipitation within 20 seconds. (l per second per 1 ha). F is the area of the farmstead in hectares, if the roof is pitched, the area is calculated on the horizontal plane. Ψ - absorption coefficient.
Different surfaces have their own absorption coefficient. To perform independent calculations, its value can be taken from the table
Based on the calculated value and using the Lukin tables, not only the diameter but also the slope of the system is found.
At correct selection diameter of the pipes, the storm sewer will cope with the task even in moments of the heaviest rainfall. If flows from several gutters enter the pipe, they are all summed up. Professional practitioners for pipes with a cross-section of 110 mm and gutters of the same diameter usually use a slope of 20 mm/linear. M.
If the pipe is connected to a storm inlet, the slope value is slightly increased to avoid stagnation of liquid, and when entering the sand trap, the slope is reduced. This slows down the flow of water, and suspended particles settle to the bottom in greater quantities.
Water in a sewer system of this type drains by gravity, which occurs due to the formed. There is no pressure pumps, therefore, at the dacha or in a country yard, it is not necessary to look for a team of professionals to install a storm drain.
The owner can do all the work himself. It is written in detail about the calculations for organizing storm drainage, the contents of which we recommend that you familiarize yourself with.
Where do you need a well and a collector?
As in any system consisting of underground pipes, there must be a well in the storm sewer.
Its installation is advisable in the following circumstances:
- if 2 or more flows converge;
- when it is necessary to radically change the height, direction of the pipeline or its slope;
- if there is a need to switch to a larger pipe diameter.
Wells are also provided at established intervals of straight sections of the system. If the diameter of the well does not exceed 150 mm, then the next one is located at a distance of 30 to 35 m. With a diameter of 200 mm - from 45 to 50 m, and if the diameter is 0.5 m, the interval is increased to 70-75 m.
The diameter of a well in a private house does not exceed 1 m. The deeper the well, the larger its diameter should be.
Some owners lay out wells the old fashioned way from brick or reinforced concrete rings. Others prefer more advanced materials - plastic and fiberglass. By design wells are either collapsible or solid.
They have the shape of a cylinder with a completely sealed bottom and a hole at the top. There are nozzles for connecting pipes. Several assembled storm water inlets are also used as wells.
All fluid flows are redirected to the collector after combining them into one. The choice of material for this storm drainage element is individual and depends on the preferences and capabilities of the owner
To redirect the collected water to ground treatment facilities or to a sewer, a collector is included in the system. Sometimes his role is played by a big one. It is converted into a storage tank by hermetically sealing the outlet pipes. To use water, a submersible pump is used.
Large cross-section pipes are also used for the collector - reinforced concrete or plastic with all pipelines connected to them. On the construction market you can also purchase ready-made containers for underground use. There are multi-chamber tanks where rainwater and melt water are cleaned according to the same principle as in septic tanks.
Image gallery
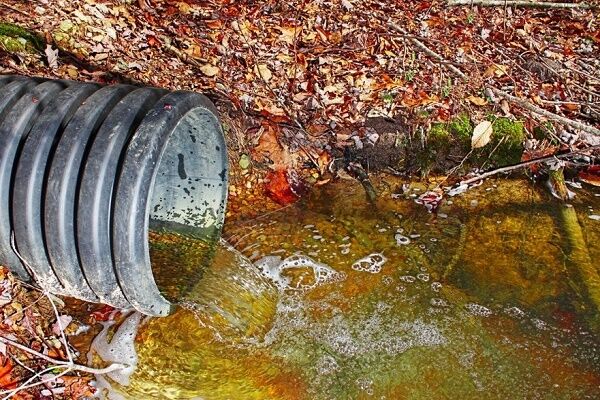
If the site does not have conditions for the disposal of collected water into the ground, then storm water is redirected to a public system or an off-site drainage ditch.
If the conditions and size of the site allow, the collected rainwater is disposed of through an absorption well. When constructing a well in sandy loam soils, the walls are assembled from perforated rings to increase the outflow rate
An almost free, but quite suitable option for discharging rainwater is a filter well made from old tires
The easiest way to collect and drain rainwater is into a public drain. It doesn't need serious cleaning
Collector well for redirecting water
Absorption well made of perforated rings
Budget option for an absorption well
Discharging rainwater into a drain
How to install a storm drain?
The storm drain is installed using the same technology as a conventional sewer system. In any case, the installation of a storm sewer system is preceded by calculation and selection of necessary materials. Before rainwater enters the pipes, it collects on the roof of the house, so it is logical that the construction of a drainage system begins from the top point of the building.
To install gutters on the roof, mark the upper and lower points, between which a fishing line is pulled. Gutters will be installed along this route taking into account the slope. The direction of their installation depends on the location of the drainage pipes.
To fix gutters and pipes, brackets are installed, securing them with self-tapping screws. To ensure that water gets into the drain, funnels are needed at the lowest points. When assembling trays and pipes, sealant is applied to the joints. Sometimes there are factory seals on the edges of the parts, then when they are joined, a tight connection is obtained.
Water collected from the roof by gutters is carried through vertical downpipes into the storm drain. The cycle of work on installing a linear storm drain, regardless of its technical complexity, includes a number of traditional stages, these are:
Image gallery
We are developing a trench for the installation of storm drainage. We dig the soil by hand, destroy the asphalt with special equipment or an ordinary crowbar
We fill the bottom of the trench with moving concrete to the depth of the tray so that the tray shelves are flush with the surface. We give the bottom of the trench a slope of 2 - 3 cm per 1 m. The slope should be directed towards the collector well
Having beaten off the storm sewer lines with twine stretched between the pegs, we assemble a system of trays with a protective and decorative grille. We level the channels according to the design slope figure until the concrete begins to harden
We install sand traps in the places indicated in the project and connect them to the channels laid in the trenches
We construct formwork from boards along the side of the trench and pour concrete mortar between it and the tray laid in the trench
While filling the free space in the formwork with concrete, we level the poured mass. At the same time, we check the slope and, if necessary, adjust the position of the trays
We expect the solution to harden for at least 14 days, it is better to wait 28 days. At this time, it should be covered with polyethylene and periodically sprayed with water.
Upon completion of the technological break, we dismantle the formwork, level the site with sand and gravel, pave it with paving slabs or the coating of your choice
Stage 1: Development of the trench manually or using machinery
Stage 2: Laying concrete mortar at the bottom of the trench
Stage 3: Assembling the storm drain tray
Stage 4: Installation and connection of sand traps
Stage 5: Construction of formwork and pouring concrete
Step 6: Leveling the System During Pouring
Step 7: Process break for hardening
Step 8: Paving the site with the selected surface
Point drainage of rain and melt water
The first step is to mark the pipeline, consisting of channels, receivers, and wells. Pegs are driven in at the locations of all elements. To see the full picture, a cord is laid between the pegs. The second stage is digging a trench and small depressions for storm water inlets. A sand cushion is placed at the bottom.
If there is a threat of roots growing in the places where the pipeline is laid, the bottom is covered with geotextiles. The installation process begins with the installation of wells and collectors.
Next are smaller elements - rainwater inlets, sand traps, trays. All this is combined with pipes of the calculated diameter under a slope selected from the table or recommended by SNiP. When laying the pipeline, sagging is unacceptable.
The assembled structure is tested. Water is poured onto each section to check the tightness of the joints. The amount of water poured in and out should be approximately the same. A defect such as sagging may be detected, which will be indicated by a significant difference in the volumes of water at the inlet and outlet.
If tests do not reveal problems, the system is covered with a sand-cement layer and soil. Sometimes some parts of the storm drain are combined with the drainage system. In this case, the pipes of the first must be on top of the second pipeline, but they can approach the same collector.
Water that accumulates during rain or from melting snow near the house can lead to flooding and destruction of the foundation. To prevent this from happening, storm sewerage is required in a private house.
In addition, it is required for the accumulation of water resources in regions with arid climates. And also to remove excess moisture from vegetation in the local area. It can be installed quite easily by yourself.
Storm sewerage in a private house: device
 Drainage is a system that collects and filters melt and rainwater that accumulates in a special reservoir. They are then used as process water.
Trays or storm water inlets for storm drainage are divided into:
- closed type;
- open;
- combined type.
Open and closed storm drains in a private house are considered part of the path. In the first case (simple point sewerage), water flows from the roof through a drainpipe into the tray. In the second (closed) option, water enters a buried pipe, then into a collector to collect water. Closed trays are directly mounted in them, leaving only gratings on the surface. Through them, moisture goes into the underground pipeline. This type is used for large building perimeters.
 For open storm drainage in a private house, external water intakes are used. They are open and installed on the surface.
 In design they do not differ from closed ones, but they are flooded more often, so it is necessary more care. Use this or a small cottage. There is a third type of storm drainage system - mixed or combined. The features of internal and external drainage are combined here. In it, one part of the storm drainage is carried out with closed drains, the other with open drains.
Drainage elements

Drainage drains and water pipes come from:
- plastic;
- concrete;
- cast iron;
- alloy steel;
- aluminum
To install storm drains in a private house with your own hands, plastic and steel materials are used, since they are reliable in operation and easy to install.
The storm drainage system consists of:
- gutters and storm water inlets;
- collectors for collecting water.
Gutters and storm water inlets
 This is the initial link of the system, through which wastewater enters the drain and pipeline. When choosing a material, preference should be given to concrete or plastic, since metal ones are very noisy under the impacts of rain and gusts of wind, if they are not buried in the ground. In addition, they are susceptible to corrosion. Concrete is more reliable and has long term services. However, such gutters have strictly regulated dimensions and it is not always possible to install them on site. Plastic is easy to cut and combine, and the rainwater inlet can have different well depths. With an existing blind area, they can be easily installed without dismantling it.
Filters
 Designed to retain stones, leaves, sand, branches and other debris that can clog pipes. The grates allow you to clean storm drains less frequently and eliminate the risk of tripping. Cast iron is reliable as a grate material, but requires painting every 2 years. Steel rusts quickly.
  Aluminum can be considered the best option because it has a long service life and looks stylish. However, it is somewhat more expensive.
The size of the holes should not be very small, as they should allow a lot of water to pass through at once, but not large either, otherwise debris will penetrate into the system and lead to its clogging.
Pipe networks
 Pipes carry the flow to a water collection point. If they are made of PVC, then this is an ideal solution for installing storm drains. Their smooth surface eliminates the risk of silting. Their diameter is 100-150 mm.
Collector for collecting water
 The collector is part of a closed and mixed storm drainage system and is a reservoir for receiving the main flow of water. Such a well can be constructed from a sand and gravel cushion and concrete rings or concrete ring with a bottom for later use of liquid. A plastic well is assembled from PVC molds. It is perfect for those areas where groundwater lies superficially. Water disposal occurs using a pipeline system, and moisture can also be used for economic purposes on the site.
Instead of a collector, it is permissible to make drainage from a special perforated plastic container to discharge water into the ground, placing it horizontally and burying it in the sand. Through the holes, moisture will gradually seep into the sand and go deeper.
 In addition, the storm drainage system can be supplemented with an under-door tray installed near the porch at the front door, pipes for soil drainage, and a hatch for access to the system.
Operating principle
The main principle of sewerage operation is compliance with gravity, which requires taking into account the following factors:
- The location of the building to determine the length of the stormwater pipes around the house.
- Relief features of the area.
- Climate and precipitation to determine the volume and number of wells and pipes.
With an average annual precipitation of 60-90 cubic meters. m pipe diameter should be 11-12 cm.
 The installation scheme for storm gutters in the courtyard of a house depends on the type of precipitation collection. It can be linear or point.
The system placement plan should be considered when designing a house so that wastewater is discharged in a straight line and there is less problems with cleaning.
The diagram indicates the location of communications, storage, equipment and drainage circuits. When combining drainage and storm water into the sewer system, a more serious approach will be required and a geodetic survey of the territory will be required to identify the level groundwater. This will make it possible to determine the most convenient place for the storage tank and drainage.
Installation
Before installation, the area is marked in order to determine the location of the trenches. If turns are necessary, they must be made at right angles and inspection hatches must be made in these places.
The construction of ground channels, trays and gutters should be carried out in open areas of the site. When installing a tray, the soil around it should be compacted to prevent soil subsidence.
Pipes are laid with a slope of 1 cm per 1 m length.
It is better to use them from PVC, since the material is not subject to corrosion. The pipes are laid in a trench, into which crushed stone and sand are first poured, and geotextiles are spread. 
The pipe is then completely wrapped in geomaterial and the trench is backfilled with excavated soil. 
Connections are made with couplings of suitable size and type. 
Finally the receiver is installed. 
Installation is carried out with a bias towards the drive.
If the system elements pass under functional areas (entrance, parking), then additional reinforcement in the form of a floor with further backfilling with soil will be required.
Cleaning function
 A storm drainage system, unlike a septic tank, does not require deep cleaning. In this case, water can be discharged into the ground, the nearest stream, ravine, or used for irrigation.
At the same time, without violating sanitary and hygienic standards and soil ecology. But basic filtration is necessary, for which sand traps are used to trap various debris, stones, leaves, etc. The pipes are also periodically washed with jet pressure using a pump. The flow can eliminate contaminants in hard-to-reach places. The drive is cleaned separately using disinfectants.
The construction market offers all kinds of storm drainage options, so any configuration can be used. The most reliable is considered to be a trench system using trays, wells, a collector, and filter membranes. But it is intended for a large area, for a small the plot is suitable open storm drain around the perimeter of the house. Drainage can be connected to sewer septic tank with multi-stage biological wastewater treatment.
Only rain and melt water do not require fine filtration. For them, it is enough to equip the system with grilles and filters, but they need to be cleaned mechanically, otherwise the channels may become clogged, causing flooding of the area.
Unusual do-it-yourself storm sewer - video
Any individual building is exposed to precipitation.
Among other things, if your garden plot is dominated by soils mixed with clay, then after each rain the soil becomes soggy and the dirt is spread throughout the entire area.
And not drying out for a long time puddles will not add attractiveness to your land plot.
How to overcome the problem associated with rainwater drainage?
Do it yourself
 The issue can be resolved quickly and efficiently by installing a storm drain in a country mansion.
It is possible to build a sewerage system in a private house (about a septic tank) home handyman with your own hands.
This job is not very difficult.
The only condition is that it must be approached with knowledge of the matter.
Before you begin to implement your plan, study the Internet or books on this topic.
And so that you do not spend a long time searching the vastness of the World Wide Web for the information you are interested in, this article will, to the maximum extent possible, expand all the necessary information on the topic:
- “How to make a storm drain in a private house”.
For what purposes is it needed?
Under the influence of precipitation, the foundation of the house, slowly but surely, over time, collapses.
Water will accumulate in the basement of the house.
In addition, the root system of plants planted on the site will soon undergo a process of rotting - this will happen if storm drainage is not organized in time (how to make the most best septic tank for the dacha, read the article).
A complex of special devices and channels, the task of which is to collect, filter and drain atmospheric precipitation into:
- special reservoirs,
- containers,
- septic tanks (),
- filtration fields,
- all this is created with the aim of eliminating excess moisture.
Scheme - what it consists of
The composition of the system components is as follows.
Installation of drains on the roof of a building- these are fixed, along with bevels, drainage trays.
They collect precipitation from the roof surface. They flow down through cone funnels and drainpipes.
Specific number of receivers atmospheric precipitation on the surface of the earth:
- prefabricated funnels,
- linear drainage systems,
- sand traps, etc.
The devices need to be arranged so that they can absorb as much moisture as possible.
 As a rule, point receivers are installed directly under drainpipes, and for some, they find a place on asphalt paths or in places where paving slabs are laid.
Linear water intakes are installed along paths. And in order for water to drain well, the coating must be laid on a slope.
Rainwater receivers are made of polymer concrete or plastic of a special composition.
Collector well
This device is necessary for collecting and further filtering liquid into the ground. The reservoir should be as large as possible.
Inspection hatches
Without them, it is impossible to carry out preventive inspections and clean the channels if they are dirty.
They are mainly installed at the junctions of channels and at their intersection points. It is in these fragments that the possibility of channel clogging is maximum.
Storm drain options
Underground
This is when all components of the device are located below ground level.
If we consider this issue from an aesthetic point of view, then there are many positive aspects.
But, on the other hand, in order to carry out underground storm drainage, you will have to do a large amount of earthwork and shell out a significant amount of money.
This instruction must be followed.
If desired, you can build a storm drain for the needs of a private house of any configuration and complexity.
How to correctly calculate the depth of laying channels
If the underground pipeline has a cross-section of no more than 0.5 m, then it should be buried in the ground to a level of 30 - 35 cm.
If the diameters of the channels exceed this figure, then the storm sewer must be laid at a depth of at least 70 cm.
If your land plot already has a drainage system, then the storm drain should be located above it.
In order for water to move freely through the pipeline, you need to choose the correct slope.
Step-by-step instruction
Before you begin implementing your storm drainage plans, make sure that your mansion is equipped with water collection and drainage installations.
Digging a ditch, its depth and width should take into account the slope.
If you consider it necessary to insulate the structure, then the dimensions of the pit must meet these additional requirements.
Compact thoroughly bottom of the trench. After this, pour a layer of sand there, at least 20 cm thick.
We dig a pit in a specially designated place, we will place a tank in it to collect wastewater.
Most likely, it will be a ready-made plastic container (septic tank).
An alternative method is to make a tank out of concrete.
We lay gutters on the sand preparation or pipes.
It depends on what type of storm drain you will install.
Next step– we connect all the individual components into one device.
We connect the pipes using fittings.
All joints must be sealed.
Where the trays connect to the collector, we install sand catchers.
In areas that are long (more than 9 - 10 meters), and in places where pipes are broken, it is impossible to do without installing inspection wells.
We check the functionality of the design check for leaks by pouring liquid into the water inlet. If problems are found, they must be corrected.
The final stage. The pipes that are located underground are covered with soil, and the channels located above the ground level are covered with decorative protective grilles.
In any private building installation work for the arrangement of storm drainage systems should be carried out in the sequence described above.
Do not forget to drain drainage from all roof slopes. This is the only way you can protect your land plot and surrounding area from the influence of excess moisture.
Remember! Never combine stormwater and drainage into one system. These schemes should complement each other, not be mutually exclusive.
Because during heavy rains, the joint device may not withstand the onslaught of the water elements.
Owners country mansions can safely connect the storm drain to own sewerage system. Because there are no harmful ingredients in rainwater, and it does not require cleaning measures.
If you improve your home and the surrounding area with a surface water drainage device, this will significantly extend the life of the structures.
This way, you will save yourself and your household from puddles that won’t dry out.
You can make a simple device with your own hands. There is nothing complicated about it.
The master's work is fearful. You just have to start. And if any difficulties arise, all the answers to your questions can be found in this article.
What pipes to use and how deep to bury them in the ground, watch in the video provided.
A clean and dry yard after rain, no puddles on the lawn or washed-out beds, healthy plants and perfectly smooth paths are the result of proper planning and installation of surface drainage. It is difficult to achieve such a result on your own without significant expenses, but it is possible if you make storm drainage with your own hands to drain the surface and remove rainwater. In combination with a storm drain (a system for draining water from the roof), the drainage network will also reduce the amount of moisture penetrating into the deep layers of the soil - the load on the deep foundation drainage network will decrease.
It is worth planning the layout of drainage networks and storm water systems even before the start of construction. Foundation protection in the form of a wall system is easier to install if the pit is not backfilled. While construction is underway and there is equipment on site, it is advisable to order trench digging so as not to dig manually and carry dirt into the landscaped area. Protection from melt and rain water is:

Stormwater and drainage around the perimeter of the house
- Surface linear storm drainage – collection and drainage of rainwater from the ground surface.
- Storm drainage is the removal of water flowing down drainpipes.
- Point drainage – drainage of local areas with problematic natural outflow.

Scheme for removing moisture from the surface: drainage system
Storm sewer network
Stormwater sewer network it is arranged with a connection to a common highway, if there is a collector or city stormwater pipe nearby. In the case when the branches of the city network are located at a large distance, the output of the local drainage system and storm sewer is organized in 2 ways: to a filtration field (an area covered with crushed stone to drain moisture into the ground), or to a receiving tank (drainage well, pond, roadside ditch) . Discharge from a private storm drain into the public sewer system is prohibited.
System elements:
- Drainage gutters, which are mounted along the edge of the roof slopes.
- Drainpipes.
- Water receiving tanks.

Receiving tank with outlet
- External sewer pipes that are connected to water intake tanks.
The containers are mounted under the outlet of the drainpipe and the pipe is connected to the sewer pipe. Pipes are dug in at an angle to the drainage point.
Drainage: features of a surface storm system
The site surface drainage system consists of point and linear outlet branches connected into one network with outlet to the water intake. Storm drainage on the site is arranged in the form of open channels dug at a slope to the drainage point. Marking is carried out only after studying the direction of natural outflow during heavy rain. Be sure to form drainage lines:

Drainage network: point catch basins and storm trenches
- Along the perimeter of the site.
- On slopes and on sites in natural depressions.

Drainage branches on a slope
- Around the paths.
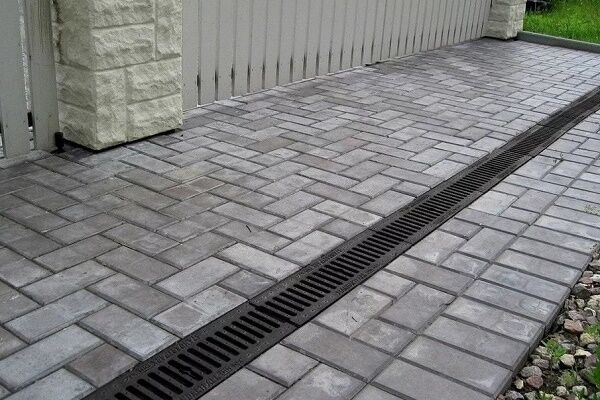
Storm drainage around the house is a line of trenches laid along the blind area along the entire perimeter of the buildings. To drain the tiled yard, channels are formed at the entrance to the garage, near the porch, and steps.

Point drainage outlets are dug in places where there is no need to lay drainage channels: under watering taps, near the outlet of drainpipes (in areas where there is no storm sewer). Drainage from point drainage wells is discharged into a discharge pipe of a common surface network.
Integration: is it possible to combine stormwater with a drainage network?

Two separate networks: drainage and stormwater
Optimal scheme drainage of the area with the house - separate drainage networks and storm drains around the house. It is undesirable to connect linear channels with sewerage: during heavy rainfalls or rapid melting of snow, one pipe may not cope and overflow will occur through the water intakes.
It is advisable to connect stormwater and drainage in one trench only in one case: if the trench is dug for a drainage outlet from a point drainage and sewer pipes are used rather than perforated pipes. The pipes are laid parallel along the bottom of the concreted trench. It is impossible to lay a sealed sewer pipe in a channel with drainage backfill: the diameter of the pipe will reduce the useful volume of the ditch and create difficulties when cleaning the trench.

General drainage of point drainage and storm water into a filtration tunnel
Instead of trying to connect stormwater and linear drainage in one pipe, it is better to make a common receiver, especially if it is not possible to tie into a city highway. Rainwater can be used for irrigation or filling artificial reservoirs. Plastic tanks are installed as a receiver, or wells are made without a bottom to drain the incoming liquid into the ground.
How to make storm drainage in and around a country house
Storm drainage is a surface system that does not require extensive excavation work or digging deep trenches, so you can do a simple installation yourself. Before starting work, the places where lines and drainage points must be constructed are determined, and the drainage trajectory is planned. It is possible to detect all places where natural outflow is insufficient during heavy rainfall and after the snow begins to melt. An area with clayey, supersaturated soil that does not absorb water from the surface also requires the installation of branched linear storm drainage.
For preliminary calculations of quantity necessary materials It is worth drawing a diagram of the canals on the site plan.

Storm drainage installation plan
Materials: what you will need to install a storm drainage network
List of materials needed for independent device storm drainage of the site and installation of the system around the perimeter of the house:
- Trays (gutters) for installation around the foundation. Manufacturing materials – plastic, polymer concrete mixture, concrete. Plastic channels are installed in areas where there is minimal physical impact on the grates: along the edges of the lawn, in flower beds. Concrete gutters are strong and durable. This tray can withstand loads of up to 25 tons. Installed in places of high loads: in courtyards where there is constant traffic, on access roads. Protective grilles are also chosen: metal and cast iron - for areas with intense load, decorative plastic - for lawns and gardens.

- Connecting elements, spacers, bases. Auxiliary materials that the manufacturer recommends to use when assembling channels. Be sure to install spacers inside plastic trays.
- Sand catchers. Separately, products are purchased for installation in a linear system and for installation in storm water inlets.

On the walls - preparation for pipe outlet
- Storm water inlets. They use mainly ready-made plastic containers. The outer walls are equipped with preparation for connection to the outlet. Plastic receivers are easily installed on top of each other - you can assemble a container of any height.

Containers with basket and attachments
- Geotextiles. Cloth for drainage backfill channels not equipped with gutters.

Synthetic water-permeable fabric
- Crushed stone, sand. The crushed stone fraction is medium and coarse.
- Mortar for pouring the base under gutters and water inlets.
- Drainage wells. Ready-made plastic or large-diameter corrugated pipes.

Factory PVC drainage wells
- Pipes for external sewerage with fittings.
- Construction tool. You will need rough boards for formwork in the channels, pegs and fishing line for marking, shovels, picks, and a building level.
Installation of point water intakes
Point water inlets are stormwater and drainage elements installed under the outlet of drains. It is necessary to plan the installation so that the flow from the drain falls exactly in the center of the grate.

The edge of the well should be flush with the decorative coating
The dimensions of the hole for installing the container are determined by the height of the receiver, adding up to 30 - 40 cm for bedding and base. There should be a gap of up to 5 cm along the perimeter on each side. Dig a hole, level the walls and bottom. Be sure to check the horizontalness of the bottom and the angle so that the container does not move during installation.

Checking horizontal level
A dense ten-centimeter layer of compacted sand is formed at the bottom. A layer of crushed stone up to 25 cm high is laid on the sand cushion. It is advisable to fill the bottom concrete mortar. The poured base is left for several days until it hardens completely, or the container is fixed in fresh solution (if necessary, permanent fixation).

A rainwater inlet is installed on a concrete base so that the container lid is at the same level as the blind area. If the installation is carried out before laying the decorative covering, then leave the free edge of the well above the ground to the height of the tile or stone.

Correct installation of the receiver
The side gaps are filled with crushed stone or filled with concrete. Before backfilling, a fitting is connected to the outlet to drain the pipe. Install internal parts: basket, partitions, fix the lid.
Arrangement of an open storm system around the foundation
Stormwater drainage along the perimeter of the building can be planned in the form of a ring closed at the collection point, without inspection wells. Demountable sand traps are provided for cleaning. Device Rules linear system:
- The distance from the edge of the foundation should be 50 cm. It is optimal to plan the channels along the edge of the paths or blind area.

Trays - along the edge of the blind area with a height reserve for paving slabs
- The depth of the channels is determined by the height of the tray with a decorative lid with the addition of the height of the bulk layer - up to 40 cm.
- Width – up to 50 cm.
To ensure that the installed gutters do not move or deform over time, several rules must be followed during excavation work. The bottom and walls must be smooth and solid. At the bottom, a standard sand cushion and crushed stone bedding must be made.

Plastic tray mounted on factory stand
To prevent the tray (especially a plastic one) from becoming deformed, it is better to make a concrete base for installation. The thickness of the concrete layer is 5 cm.

Laying the gutter on the solution
Gutters are installed in the prepared trenches. The structures are connected to each other with special locks. The extreme points (at the beginning and end of the line) are covered with plastic or metal plugs. If plastic gutters are used, factory spacers are installed inside.

Sand trap in drainage line
The gaps between the trays and the walls of the trench are filled with crushed stone or concreted. On long sections, sand traps are installed - deep trays with a mechanical filter. At the installation sites, discharge pipes are connected to the sand traps. Trenches for discharge pipes are dug at an angle.
Budget storm drainage of the site: building open channels
Drain rainwater from garden paths, flower beds and along the fence can be done in an economical open way. Instead of ready-made trays, backfill storm drainage channels are installed. Trenches are dug along the planned lines. Depth – from 50 cm, width – from 50 – 60 cm.

Instead of gutters - backfill trench
The branch is formed with a slope towards the receiving tank. The walls are at an angle to the bottom to reduce the pressure of flowing water. The bottom is filled with sand. Check the correctness of the slope. For one meter – up to 3 cm height difference.

Pipe in crushed stone backfill
Geotextiles are laid on the sand layer. The edges are left free. The entire width of the trench is filled with crushed stone in a layer of up to 30 cm. A system with a perforated drainage pipe inside the crushed stone backfill will be more durable. Fold the edges of the fabric overlapping.

Dry stream with decorative backfill - a beautiful drainage line
The drainage clip is covered on top decorative material: river pebbles, multi-colored crumbs, stones. Dry streams - aesthetic and economical solution.
Drainage well and drain outlet
The drainage well is the connection point of the system. With a moderate amount of water and good water-absorbing characteristics of the soil, the drainage tank is installed on a crushed stone bed. Through a well without a bottom, water penetrates into the ground.

Drainage well with backfill bottom
If installing a filter well is not possible, then drainage tank the liquid is discharged into the general storm water main or discharged outside the site - into a natural reservoir or ditch. The outlet from the well can be connected to a pond or receiving tank dug into the area.
Video: installation of storm drains around the house
Stormwater and linear open drain– only the superficial part of the foundation protection. Along the perimeter of buildings on different depths it is necessary to create 3 – 4 types drainage systems. The choice of method of organization and technical parameters of networks depends on the composition of the soil and the depth of the foundation. It’s not worth making deep drainage networks yourself. Calculations should be carried out by specialists, and it is better to install trench branches immediately after pouring the foundation. Even before the start of construction, deep reservoir drainage is installed. Not only the ability of the system to drain large quantities of water, but also the durability of the foundation depends on the accuracy of the calculations.
Storm drainage for a private house is very necessary, because it drains rain and melt water from the house and site.
If you do not equip this system, then rain or melt water will accumulate in the soil, and this will have a detrimental effect on buildings.
In this article we will consider the topic of arranging a storm water system in a private house.
If the soil is too wet, the structure may settle and tilt.
To avoid this problem, storm drainage equipment is needed.
You can make this system yourself at the beginning of construction or install it near the built house. Next, we will analyze the storm sewer system.
Structure
- if the pipe diameter is 20 cm, then the slope will be 7 mm,
- if the pipe diameter is 15cm, the pipe diameter should be 8mm,
These parameters are suitable for a closed storm drainage system.
For an open type of storm sewer there are completely different parameters, for example, the slope will be 3-5 mm per 1 linear meter pipes.
Where there are pipe connections with storm wells, the slope should be two centimeters per linear meter.
Installation of storm drainage in a private household
- To begin with, prepare trenches of the required width and depth, taking into account the slope;
- The bottom of the trench is well compacted and a sand cushion is made, the height of which should be twenty centimeters;
- A pit is made in a predetermined place in order to later install a container there to collect water. You can make such a container with your own hands from concrete;
- Channels and pipes are placed on the sand bed, everything is connected and the joints are sealed;
- At the junction with the collector, devices are installed to retain sand and debris, inspection wells are also made, in places the pipes have bends and in areas of more than ten meters;
- All underground channels are covered with earth and covered with gratings. When you install storm drainage systems, keep in mind that there should be drains on each roof slope.


