DIY wooden smoking cabinet. Wooden cold smoked smokehouse
Smoking is a popular way of preparing various products, giving them a specific taste and aroma. To cook in this way, you can use various smokehouses, including those made by yourself. One of the not most popular options is a wooden structure. Note that the smokehouse can be made for both hot and cold smoking.
Advantages and disadvantages
Smokehouses made from wood have both positive and negative sides.
The advantages of such designs are much greater:
- availability of material;
- ease of processing of the material - a wooden structure can have any shape, size and even decorative finish;
- ease of repair - damaged fragments of a wooden smokehouse are easy to replace;
- possibility of internal insulation of the smokehouse - you can use materials that do not emit when heated harmful substances;
- environmental friendliness;
- ergonomics.
Due to the ease of working with wood, smokehouses can be manufactured in various designs. If desired, you can make a design that fits perfectly into the landscape design.

A wooden smokehouse also has some disadvantages. They are associated with the characteristics of the material used. The disadvantages of wood smokehouses are as follows:
- Risk of fire - the tree can ignite, and the fire can spread to other structures, trees, dry grass. It is fair to say that fire occurs when the smokehouse is not used correctly.
- Sensitivity to changes in temperature and humidity. This disadvantage can be overcome using external processing smokehouse, but even without this technique the structure will last quite a long time.
Design Features
A special feature of a wooden smokehouse is its design. This device is made in the form of a house with a pointed roof.
The firebox for a hot smoked smokehouse is located directly in its lower part or at a short distance from it. The firebox and cold smokehouse are mounted separately at a distance of several meters from each other and connected by a pipe.

The firebox and the pipe leading from it to the smokehouse must be sealed. This condition is necessary for fire safety– even one spark can cause a fire, especially when smoking hot, which involves maintaining a fairly high temperature.
Required tools and materials
To make a smokehouse from wood, you should choose non-resinous species. It could be:
- Linden;
- alder;
- cedar;
- aspen;
- birch.
Plywood can be used as a material for a wooden smokehouse ( minimum thickness 8 mm), planed boards, bars, lining, block house. The selected material should be treated with a special antiseptic.
For the manufacture of a wooden smokehouse, materials that consist of several layers and are impregnated with an adhesive composition are not suitable. The selected wood should also have a minimum of knots.

In addition to the selected wood, other materials and tools will be needed to make a smokehouse:
- wood hacksaw;
- hammer and nails or screwdriver and screws;
- screwdriver;
- door hinges;
- chimney pipe;
- thermometer;
- metal tray for collecting fat;
- gratings for products or fittings for their production;
- hooks for hanging products;
- metal corners or wooden blocks as guides for the pallet and gratings;
- roofing material – the roof can be covered with slate or profile;
- bricks or blocks for the firebox and smokehouse base;
- cement, sand, crushed stone for the foundation;
- for sealing joints - tow, moisture-resistant sealant.

Manufacturing a device for hot smoking
A smokehouse for hot smoking involves maintaining a fairly high temperature in the chamber. This is achieved by close proximity to the heat source. The firebox can be mounted under the smokehouse body, but this option is fire hazardous, so it should be moved outside the structure.
- Dig a hole. The width of one side is 1 m, the depth is 0.3-0.4 m.
- Make a sand cushion and add a layer of crushed stone.
- Install bricks or blocks around the perimeter and pour mortar.
- Lay out a small base of bricks or blocks, installing a pipe into it at the bottom. Inside the base, it should bend upward - smoke will flow from it into the smokehouse chamber. In the chamber, the pipe should extend upward in the center, its total length is 1.5 m, diameter 0.2 m.
- Make a small recess, the edge of which should be approached by a pipe coming out of the smokehouse body. Line the bottom and walls of the recess with bricks - the walls should rise slightly above the top edge of the pipe.
- Install a door in the front of the firebox. Cover the top with a ceramic slab or bricks, first lining it with a sheet of iron. Coat all joints with fireproof clay.
- Mount the smokehouse frame. It is more convenient to do this directly on the spot. It is necessary to provide transverse crossbars on the sides of the body. In the future, grates for food products will be installed on them. At the bottom of the chamber, such crossbars are needed to place a tray for collecting fat. In the upper part of the body, several recesses should be made on the crossbars - wooden crossbars or reinforcement rods will be attached to them, on which hooks with products can be hung.
- Cover all sides of the frame with boards. The joints should be tight, all cracks should be sealed with tow.
- The front wall of the chamber is partially covered with boards; a door should be built into it. It should be attached to strong hinges. Be sure to make a latch or latch and a comfortable handle. The door must strictly correspond to the dimensions of the opening. It is also made from tightly fitted boards or bars.
- Do gable roof. The slope towards the firebox needs to be extended and installed on supports. Mount above the pipe wood flooring– the depth corresponds to the dimensions of the smokehouse. In the resulting space it is convenient to store a supply of firewood that will remain dry.
- Make a hole in the roof and bring out the pipe. Be sure to mount a “mushroom” above it. To seal joints, use moisture-resistant sealant.
- To protect against precipitation, cover the roof with suitable roofing material.
- Install grates for smoking food. You need to leave enough space between them so that the smoke circulates well.
- Mount in the door or side smokehouse thermometer.

The optimal temperature for hot smoking is 90-120°C degrees. This indicator means increased risk fire, so it is important to carefully seal all joints and follow fire safety rules. You should always keep a container of sand near the smokehouse - in case of a fire, you can quickly put out the fire.
The advantage of using smokehouses for hot smoking is that cooking in this way takes little time: you can smoke fish, meat or poultry within an hour. This allows the wooden structure not to be left unattended for a long time, which is good from a fire safety point of view.
Homemade design for cold smoking
The design for cold smoking is also made in the form of a house. If desired, the smokehouse can be decorated in an interesting way. The device involves the arrangement of the main body of the smokehouse and a separate firebox - the connection is made using a pipe placed in a trench.
You need to act according to the following algorithm:
- Make two holes in the ground and connect them with a trench. The firebox should be located below the smokehouse chamber - this factor should be taken into account if the terrain on the site is uneven. The optimal trench length is 2-2.5 m. Deepen the chamber to approximately 40 cm.
- Compact the bottom of the pit for the smokehouse chamber, make a sand cushion (5-7 cm), add a layer of crushed stone and pour concrete mortar.
- Compact the bottom of the trench and lay a pipe with a smaller diameter - the trench should be 20 cm higher. The pipe should extend approximately 15 cm into the recess for the firebox.
- Apply the solution along the length of the pipe and apply a piece of pipe with a larger diameter. Fill the remaining space with solution.
- In the recess for the firebox, line the walls with bricks and install a door. The walls should also cover part of the pipe.
- Cover the top of the firebox with a ceramic plate or metal sheet, it should cover both the walls of the firebox and fit on top of the door.
- Make for a smokehouse concrete base and lay the base out of brick - the pipe coming out of the trench must be built into it. The base is laid out in 10 rows of bricks, half of them should be located above the ground. External dimensions the base must strictly correspond to the dimensions of the smokehouse chamber.
- At this stage, you should check the operation of the structure - light a fire in the firebox and check whether smoke flows through the pipe into the base of the future smokehouse.
- Make a smokehouse frame. They use bars 80 cm long in height, connecting them at the bottom and top with bars 35 mm long. The result should be the skeleton of a parallelepiped.

- Make a U-shaped stand and attach it on top of the main frame. This rack is necessary for the roof. Attach bars protruding beyond the frame to the upper sides of the frame. The lower parts of the roofing boards will be attached to them.
- Cover the smokehouse body and roof with the wood of your choice. The front wall is partially sheathed, since the door will be made in it. Cover the roof with the selected roofing material.
- Mount the door and secure it on the hinges. Make a latch or lock.
- Make a hole in the roof with a diameter of 5-7 cm and remove the ventilation pipe. A “mushroom” should be made over it to protect it from precipitation.
- Mount the crossbars inside the body, making small recesses on top - fasten the rods from the fittings into them. They will be used for hanging products. If desired, you can make additional crossbars where you can install gratings for horizontal display of products.
- Place the smokehouse chamber on the prepared base and fasten them with metal staples or metal strips.
- The thermometer can be mounted in the smokehouse door or one of the side walls.

One side of the roof can be extended towards the trench and supported under the lower edge. Install on the trench wooden pallet– it can be used to store a supply of firewood – the roof on top will protect them from rain.
The design can be simplified and a firebox can be built from metal barrel. It is located next to the wood smokehouse, and the connecting pipe is located above the ground.
Instead of making wooden frame can be used wooden barrel. The disadvantage of this option is the smaller size of the structure.
Cold smoking technology requires maintaining a low temperature in the smokehouse - no more than 35-40°C degrees. It is to comply with this condition that the firebox is installed at this distance from the main body of the smokehouse.
The attractiveness of the unit for cold smoking is that the firebox is located separately, so there is a risk of fire wooden structure because of it, it is minimal: fire sparks at such a distance simply do not reach the main structure, so only smoke gets there.

Wooden smokehouses have a number of advantages, and if the manufacturing technology and fire safety rules are followed, they are practically free of disadvantages. It is possible to make a design for both hot and cold smoking. The main difference is the distance at which the firebox is placed.
One has only to look at the image of smoked delicacies, and the desire to eat it all immediately appears, which is quite natural for a person. Has your appetite also increased? What to do now? The first reaction is to go to the supermarket and buy everything your heart desires (and your wallet allows). But, alas, store-bought products are only called smoked because they are processed with liquid smoke. Opinions differ about the benefits of such nutrition, but if there is a small land plot, you can set up your production. In this article we will tell you how a cold smoked smokehouse can be made with your own hands from various materials.
Working principle of a cold smokehouse
Since we are talking about cold smoking, it is important to realize that it is not the heat treatment of the product that is carried out, but its saturation with smoke, therefore smoking should take place at a temperature of 30–50˚C. It is necessary to ensure that the fumigation and heating are uniform - only in this case the smoked meats will turn out appetizing (meaning appearance) and delicious.
Many have heard the expression “light smoke”, but did not understand what they were talking about, or thought that it meant light smoke, but in our case we're talking about about smoke in which there is no carbon monoxide. It is quite possible to achieve this by making the chimney in such a way that this gas (along with other substances harmful to human health) precipitates before reaching the smoking chamber. After mixing with air and passing a long way through the pipeline, the output is smoke that is suitable in composition for proper smoking. Once in the smoking chamber, the smoke must linger in it for some time and nourish the food, otherwise it will be of little use.
Another important factor is proper preparation products. If anyone thinks that it is enough to place meat or fish in the chamber, and then light the oven and wait a little, then we will hasten to disappoint you. The procedure will be as follows:
- We will need a saturated salt solution, popularly called brine. It’s not difficult to prepare: salt is poured into a container and stirred until it stops dissolving. Salt is about 38–40 g per 1 liter of water. We don't need the salt that remains at the bottom - you can use it at your discretion.
- Now let's start salting the food. Small fish will need to be kept in the solution for 3 days. More big fish or young pork - up to 4 days. Tougher beef meat (as well as wild boar or bear meat) must be salted for 5 days.
- After the salting process, we begin to soak the meat. The duration of soaking can be up to 24 hours, but here again it is necessary to take into account the type and volume of the product being prepared for smoking. For example, it will take about 6 hours to soak a medium-sized fish, while a pork ham will take 2 times longer to soak. But this time is approximate, and in order not to soak the meat more than necessary, it needs to be checked. The method is very simple: press the soaked product with your finger, and as soon as it begins to be easily pressed into the pulp, the soaking process must be stopped immediately.
- Now the product needs to be dried. To do this, you need to let the water drain from the meat, and if you don’t have time to wait, you can wipe all the pieces with a waffle towel. Paper towels It is better not to use it for this purpose.
- Products should be placed in a ventilated cage (or box) and protected from flies by wrapping them in fine mesh gauze. It is important to remember that there will be no heat treatment of the product, and a smokehouse for maggots is like a steam room for a person - in general, this nasty thing is not destroyed during the processing process.
- It will take several days for the meat to dry out. Many people know very well what dried fish is (especially with beer), so it will not be difficult to determine when the product becomes suitable for further processing.
- Now all the workpieces are hung on hangers inside the smoking chamber. Products are ready for smoking.
What kind of firewood can you use?

Not all firewood can be used. Firewood from the following trees is best suited:
- plum;
- cherry (without bark);
- pear;
- Apple tree;
- dogwood;
- apricot.
If you need to give smoked meats a tart taste, then the following are suitable:
- nut;
For smoking fish caught in heavily polluted waters, it is recommended to use the following wood:
- willow;
- broom;
If there is no firewood from fruit trees or if the smokehouse is made in hiking conditions, the following trees can be used:
- Linden;
- poplar;
- alder;
- aspen.
Trees coniferous species and those that are affected by fungus are unsuitable for smoking. In addition, since the pores of the fungus are easily carried by the wind, all trees located within a radius of 50 m around the infected tree automatically become unusable.
Stationary smokehouse
Very good news is the fact that special costs is not expected, but if in the household of a zealous owner there are necessary materials, then you just need to make an effort.

The diagram shows the structure of a classic smokehouse, where:
- Smoke generator (furnace).
- Chimney channel.
- Smokehouse.
Now let's start manufacturing, using ready-made drawings or developing your own diagram according to our recommendations.

|
To build such a brick smokehouse, we will use a small plot of land with a length of 4 m. It is very good if it is possible to install the smokehouse on a small slope, since in this case it will be easier to install the chimney at the desired angle. |
| |
So, the site has been selected (in our case, on a slope), and now earthworks can begin. Let's start with the fact that to create a chimney you will need a pipe with a total length of about 3 m and Ø150-200 mm. If there is one, what is its length? If it’s 2.9 m, then it’s okay. You just need to make the distance between the holes so that the edge of the pipe does not reach brickwork, but ended up inside her. Simply put, make the distance between the holes 25–30 centimeters less than the length of the existing pipe. The stove should be at the bottom, so a pit is made under it in such a way that its width will be 50 cm, length 70 cm, and depth - a couple of spade bayonets. |

|
On a higher part of the slope (it’s good if the difference in the location of the pipe is at least 50 cm), dig a 60x60 cm hole to make a foundation for the smokehouse. Depth – a couple of bayonets below the pipe location. (It may be less - it all depends on the type and density of the soil that was dug up, but there is no need to make a foundation on black soil). By the way, we will still need clay, so it needs to be placed separately from the ground. |

|
After digging the hole, we’ll check how the pipe fits and whether we made a mistake with its length. If everything is in order, then you can continue working. |

|
Now let's fill the dug holes with concrete. Under the smokehouse - level with the pipe (or slightly lower). And for the firebox - 10 cm below the pipe level. |

|
After the concrete has set, we will begin making the firebox. Having mixed a low-fat clay solution, we lay it on the foundation. On top, along the entire length of the firebox, we will lay refractory bricks, laying them flat on the clay mortar so that the base is under the pipe. This pillow will be the base of the firebox, so we will build the firebox on it, as shown in the photo. Some people prefer to use cement-sand mortar for masonry, but this is not the best option, since with high heat the bond between the bricks will be broken. |

|
Having laid out the walls, we will ensure good heat transfer from the pipe to the ground by sprinkling it with clay. By the way, if there is no suitable pipe, then the chimney can be made of red brick. |

|
It’s good if you have a cast-iron door in advance, then the size of the firebox is adjusted to fit it. After installing the door, we will cover the oven. We had a stove suitable size, but if there is none, then you can lay reinforcement and make a cover from refractory bricks. |

|
Now let's start making a pipe-shaped base for the smokehouse. Its size is 50x50 cm, and we will do the masonry with simple red bricks on cement-sand mortar. |

|
Such a structure should work out. The height of the base is made slightly above ground level. |

|
Let's do a test fire - everything works great! |

|
Now let's start making a smokehouse, the dimensions of which will be 60x60 cm. |

|
To make the frame we will use 4×4 cm bars. On the finished frame in vertical position Let's nail the first layer of boards. We will install it on the roof metal chimney. In this case, the tree does not need protection from fire, since the smoke temperature is very low. |

|
Since we planned that the products will be hung, we will need to attach boards with cut grooves for metal rods on the sides. |

|
The second layer will be a lining made of coniferous wood; we nail it in a horizontal position. The same applies to the door. Such a device will help minimize smoke loss. |

|
Also, in the previous photo you saw a pin sticking out of the door - this is part of the thermometer. Its dial is located outside, so you can control the smoking process. |

|
The time has come to put everything together, for which you need to secure the smokehouse cabinet to the brick well. We remember that the base was made 50x50 cm, and the cabinet 60x60 cm. This was done specifically so that water would not get inside the base. To fasten it, we will use metal dowels, fastening it through the lower block to the brick base. There are also Alternative option– attach metal corners to the base, and a cabinet to them. All existing cracks are covered with solution. |

|
To complete the work, all that remains is to open the wood with a protective agent and cover the roof with corrugated sheets or metal tiles. All that remains is to carry out the tests. |

|
Cases are different, so it is better to play it safe by placing a metal grate on the base - even if some product falls off the hook, it will not fall to the bottom, and its smoking will continue on this protective device. |

|
We have already talked about what kind of wood can be used for smoking. Do not ignore the advice of people who have been preparing food this way for many years. We light the stove. |

|
The smoke flows well, so you can close the door, remembering to control the temperature inside the smokehouse. |

|
Don't forget to check the firebox and add firewood. |

|
And now, the smoking process is completed - the products are ready for consumption. |

|
The space around the smokehouse can be improved by making a path. |
Video: simple smokehouse in the ground
Video: design for cold smoking
Smokehouse from a barrel
Of course, you can use any barrel for our design, instead of a wooden smoking chamber, but this would not simplify the design much. You can make a smokehouse from a barrel more compact, even portable, only in this case you will have to make a smoke generator.
Making a simple smoke generator working with a compressor
The described design will be assembled from what is on the farm, but if the necessary parts are not available, they can be purchased inexpensively.

|
To assemble the smoke generator we used 4 cans tin cans from pineapples and a piece copper tube. We also purchased 2 quarter-inch clamps with nuts and 4 metal clamps to fit the cans. |

|
In the bottom jar we will make one hole for the drive. |

|
The second hole of a smaller diameter will serve as an igniter. |

|
The third hole is made to fit the small diameter copper tube opposite the first hole. A little later we will look at how this design can be improved. If you choose the second option, then this hole (and the copper tube itself) will not be needed. |

|
One of the bends will be inside the jar, reaching its edge. |

|
Using a grinder, we cut out a groove 4 cm long and about 8 mm wide, as shown in the photo. |

|
The copper tube should not fit tightly into the fitting. |

|
And it shouldn't be short. |

|
Having secured the first bracket, screw the second one to it and insert the tube. |

|
To prevent the groove from becoming clogged with sawdust, we will install a metal shield made of thick metal on top (possibly from a pipe). This protection should be above the squeegee, so its fixation can be ensured by screwing support bolts to the can in the right places. |

|
|

|
The generator itself will consist of three cans, and we will cut the fourth into strips, wrap them around the joints of the cans and secure them with clamps. |

|
If such a need arises, the tube can always be extended, but we recommend using a coupling rather than a nut for the connection. |

|
For our design we will use an aquarium compressor with adjustable air supply. |

|
Now let's pour wood chips inside. |

|
Turn on the compressor and set fire to the wood chips. |

|
By adjusting the seating depth of the copper tube, we make adjustments to ensure that there is as much smoke as possible. |

|
Now let's look at how this model can be improved, since this modification will help reduce the temperature of the smoke. |

|
You can also make sure that the ash spills out of the generator and does not accumulate in it. In this design there will be no inner tube - the squeegee is screwed to the edge of the can, and to prevent sawdust from getting into it, we will make a petal from tin from the inside, making many small holes in it. |

|
At the bottom of the jar we will screw a screw cap from a glass jar with two bolts, and then we will drill a lot of holes. |

|
It will be enough to insert the jar, turning it slightly, and the sealed ash container is ready. |

|
As we have already warned, in this design there will be no copper tube; air will be supplied through an external exhaust. |

|
To do this, we use a purchased (or used) fitting to bleed air from the brake system (preferably from a domestic car, since it is cheap). To do this, you need to drill a hole in the drive, and, having selected a suitable tap, cut the thread. There is a side hole at the top of the valve; if it is small, it needs to be drilled out to Ø2 mm. After screwing it in, the hole should be directed towards the smokehouse. |

|
This fitting is specially made so that a rubber tube can be pulled over it while bleeding the brakes, so there will be no problems connecting the hose from the compressor. |

|
Now you can add wood chips and set it on fire. |

|
Tests have shown that the system operates smoothly, producing the required amount of smoke. |
Smoking process
And now, the generator is assembled, all that remains is to connect it to a barrel (or other container), and you can smoke food.

|
The fish is soaked and ready for smoking. In order for the salting and soaking process to occur evenly, the products must be completely immersed in liquid. In our case, we achieved this by crushing the fish with a plate. |

|
The gas generator is connected to our small barrel (or large pan) and is ready to start. |

|
Although cold smoking produces little fat, it is still better to place a suitable container at the bottom to collect it. In order to be able to hang food, we drilled 4 holes in our container and inserted thin fittings into them. |

|
If it is cool outside, then the container can be slightly heated with an electric stove so that the temperature inside the smokehouse becomes acceptable. |

|
A thermometer installed in the container will help control the smoking process by adjusting the temperature inside it. |

|
The fish was put on old skewers from which the plastic handles had been removed. |

|
Now let's pour wood chips into our gas generator. |

|
Cover with a lid, turn on the compressor and set fire to the wood chips. |

|
Thick smoke appeared from under the leaky lid. |

|
Through the window intended for ignition, you can clearly see that there is good heat in the gas generator. |

|
Now all you have to do is wait, periodically adding wood chips and monitoring the temperature inside the container. |

|
Smoking is completed and the fish is now ready to eat. |
Depending on the volume of products that you plan to smoke regularly, select a suitable container - a saucepan or a 100-200 liter barrel.
Smoke generator operating without a compressor
The design of this smoke generator will only work in conjunction with a smoking chamber equipped with an exhaust pipe.

|
As a smoking chamber we will use an ordinary chainsaw packaging box, carefully wrapped with tape. |

|
We will fix a frame of bars inside, and string rows of wire onto it so that we can hang the fish. |

|
This is what a gas generator looks like. |

|
Wood chips are loaded into it and set on fire. |

|
Instead of a lid, we use a trimmed disc from a grinder, and close the hole in it with a metal ball, which will also act as a weight. To prevent smoke from entering the room through such a cover, the edge of the pipe must be cut very evenly. |

|
To check whether there are wood chips and smoke in the gas generator, just remove the ball and look inside. |

|
Well, if you move the lid, you can see that there is plenty of smoke. |

|
|

|
The idea turned out to be empty, since due to the thick smoke inside the box it is impossible to see anything, even with a flashlight. |

|
A pipe from a vacuum cleaner was used as a chimney. |

|
The chimney turned out to be long and curved, but this did not affect the operation of the gas generator. |

|
The second end of the pipe is inserted into the furnace. |

|
It is necessary to check that all oven doors are tightly closed and there is no air leakage, otherwise the gas generator will not work. |

|
The draft is ensured by the fact that the stove chimney rises significantly above the room. |

|
Upon completion of the smoking process, the tape is cut and the box doors are opened. |

|
Minimum costs, and we have delicious food. |
Video: cold smoked smokehouse from a barrel
Smokehouse from the refrigerator
If available old refrigerator with a whole body, then it can also be used by connecting a smoke generator to it or providing smoke from a homemade stove.

|
An old household liquefied gas cylinder was used to make the firebox. |

|
An old refrigerator was also found. We turned it upside down, removed the compressor and got to work. |

|
In the day refrigeration chamber it is necessary to make a hole to connect the chimney pipe. To do this, draw a circle required diameter and drilled many holes along the line with a Ø4 mm drill. |

|
Then we will make a hole in the inner lining. |

|
If the draft is weak (and this can also happen because the chamber is leaky), you can insert a fan into the bottom, which will draw smoke from the firebox, feeding it into the smokehouse. |

|
In order to be able to regulate the traction force and the temperature inside the chamber, you can connect the fan through a voltage regulator. |

|
In the upper part (in the photo it is below) we will drill many holes so that smoke can escape through them. |

|
We will also make a hole outside for mounting the exhaust pipe. |

|
Let's fix the pipe. |

|
This is how the smokehouse turned out. Now you need to install the structure higher and connect it to the firebox. |

|
The length of the pipe was considerable. |

|
Now let's add firewood and light the firebox. |

|
The smoke flows well, so you can start smoking. |

|
After hanging the food, set up a tray or bowl into which the fat will drain. We close the door and wait for the allotted time. |
Video: cold smoking in the refrigerator using a smoke generator
Video: cold smoking in a smokehouse from the refrigerator
Smokehouse from a gas cylinder
First of all, let's talk about safety precautions, since cutting a gas cylinder without first preparing it is very dangerous. Watch an educational video on this topic.
Video: how to safely cut a gas cylinder

|
As already mentioned, the cylinder must be prepared properly. |

|
Now you can start applying markings. |

|
It is convenient to mark round parts using a metal meter. |

|
Now you can start cutting out the hatch in the cylinder using a grinder. |

|
It is advisable not to go beyond the markings, but in this case you will have to pry the cut out part with a crowbar to remove it. |

|
This is what should happen. As you can see in the photo, the cut was made close to the welding seams - where the metal is thinner. |

|
A “sole” is welded at the bottom of the cylinder, thanks to which it becomes stable. Since we don't need it, we'll cut off this part. |

|
As a smoke generator we will use a receiver from truck. There are no explosive vapors in it, so you can cut out the door without preparation. |

|
On the same side where the door is cut, we cut holes on both cylinders, the radius of which should be as close as possible to the diameter of the other cylinder. |

|
We check how tightly they fit together and adjust if necessary. |

|
Now all seams need to be thoroughly welded. |

|
The hinges are welded. |

|
The doors should open without jamming, and when closing, fit tightly into the opening. By the way, you can weld a stopper from the inside if the door falls inward. |

|
At the end of the receiver we will make a hole for the damper. |
| |
It will be small, as it will be needed to regulate the air flow inside the smoke generator. |

|
Then we take larger piece metal and make a damper from it, securing it in the upper part with a bolt and nut. There is no need to tighten the fasteners, since the damper will need to be moved from time to time, changing its position, so screw the locknut over the first nut. |

|
The damper should move to the side with some effort. As you can see, it is screwed to it plastic handle, but practice shows that it also gets very hot, so you can weld a piece of rod. |

|
Let's start making a chimney by welding it at an angle from two pipes. As for the angle, it does not need to be 90˚ - it must be turned out. |

|
Let's mark the cylinder by outlining the pipe with a scriber or marker. |

|
Drilling such a hole is very tedious and expensive, so it is better to do it with a cutter. If there is none, then many people cut a hole with an electrode, installing welding machine for maximum current. |

|
Once the pipe is inserted, its position must be adjusted and then welded. |

|
It is very convenient if the lids have handles on a wooden base, since you won’t get burned when touching them. |

|
Legs and a table were welded to the smokehouse, on which it would be possible to place dishes with products prepared for smoking. Inside we will install a grill from an old refrigerator, bending it to the size of the cylinder. |

|
All that remains is to charge the smoke generator, place the food on the grid, and you can smoke. At the same time, it is important to monitor the smoke generator - firewood or chips should smolder and not burn. |
The considered methods of smoking products allow you to prepare high-quality food that is not harmful to the body. We do not claim that smoked meats are beneficial for the human body. However, products prepared in some ways are such that experts in this matter will not even touch them. Watch a video on this topic.
Video: how to make a smokehouse incorrectly
A wooden smokehouse is a useful household item that will help diversify your diet with tasty food.
Making such a device is not difficult.
By wooden smokehouse we mean complex of specialized equipment and wooden camera which will fill with smoke.
Advantages and disadvantages of cold and hot smoked wood smokehouses
Wooden smokehouses a lot of advantages. These structures are made of easily processable material, so the smoke chamber body can be of any shape and size. It can be decorated with carvings and tinted with impregnations.

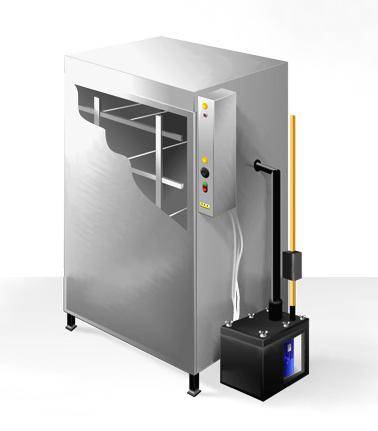
Photo 1. Hot-smoked wooden smokehouse during cooking. Equipped with retractable slats on which you can hang food.
Another advantage of the designs is availability and wide selection of materials for the manufacture of. In the process of work, you will need tools that are available in every home: a hammer, a screwdriver, a hacksaw, and screwdrivers.
Unlike smokehouses made of metal, devices made of wood can be insulated. This will ensure stable temperature inside the smoke chamber. As a heat insulator, materials are chosen that do not emit harmful substances when heated. These are ecowool, mineral wool, sawdust and shavings, felt, expanded clay, pine needles.
Standard diagram of a wooden smokehouse with a smoke cabinet
Standard wooden cold smoker consists of the following elements:
- smoke chamber (cabinet) 90x60x120 cm;
- metal pan 55x85 cm;
- 2 grilles made of wood or metal 90x60 cm;
- wooden legs high from 15 cm;
- plastic or metal chimney pipe with a cross-section 50 mm;
- chimney pipe cross-section 100 mm, length 3m;
- roofing materials to protect the roof (slate, corrugated sheets, metal tiles, roofing felt);
- firebox (furnace) made of metal or brick, which is located at a distance at least 3 meters from the smoke cabinet.

Photo 2. Smokehouse made of cold smoked wood. The firebox is made of brick and located underground, connected to the smoke cabinet by a chimney.
Products are placed on grates installed in the smoke chamber. The tray is designed to collect fat. Legs are necessary to give the structure stability. Can be mounted into the wall of the smoking chamber thermometer to control temperature conditions.
The smoke cabinet and the firebox are connected by a chimney pipe. A chimney pipe is cut into the roof of the smokehouse. It is closed with a gate (rotating valve). The function of this element is adjusting the traction force.
Materials for production: timber, planed boards, plywood and others
Non-resinous wood species are suitable for making a wooden smokehouse. Among them:
- cedar;
- alder;
- Linden;
- birch;
- aspen;
You can use the following materials:

- plywood thickness from 8 mm;
- planed boards;
- lining;
- bars of any section;
- wooden block house.
Layered, impregnated products are not recommended for use. adhesives, plates: OSB, chipboard, MDF. When heated, these materials will release substances harmful to human health. In addition, under the influence of temperature and moisture, these fabrics can delaminate.
Before using boards to build a smoking chamber, they must be treated with an antiseptic. Will fit Pinotex, Pirilax, Senezh ECOBIO.
Attention! When choosing a tree, pay attention to number and size of knots. As the boards heat up, these knots will become deformed and fall out. This will compromise the integrity of the smoke chamber, which is unacceptable. Therefore, it is recommended to purchase high-quality non-resinous wood.
It is advisable for the master to have such power tools as jigsaw, drill or screwdriver. They will greatly facilitate and speed up the work process. You will need a tape measure, ruler, building level, square, simple pencil.
Project selection
The smokehouse project includes: its plan location on the site And drawings of structural elements. Dimensions are indicated for each part.
First of all, the desired dimensions of the smoke chamber body are determined. You can focus on the proposed standard diagram of a wooden smokehouse.

- flat;
- single slope;
- gable (house);
- trapezoidal.
The easiest roof model to make is flat. A slightly more complex single-pitched structure located at an angle 5—20 °C relative to ground level. The smoke exhaust pipe can be placed on any part of the roof: left or right.
The inlet for the chimney pipe can be at the bottom of the wall of the smoke chamber or at its bottom. The choice depends on the method of connecting the smokehouse to the firebox. If it is decided to lay the chimney below ground level, the inlet hole is made in the lower wall (bottom).
You might also be interested in:
Stages of making a device with your own hands
Instructions for making a wooden smokehouse with chamber dimensions are provided. 90x60x120 cm.
Smokehouse base
The main elements of the smokehouse frame are: 4 wooden bars cross section 50x50 cm and length 150 cm. These will be the vertical posts of the smoking chamber. The length of the bars is chosen according to the following calculation: chamber height 120 cm and legs 30 cm.
In addition to the vertical posts, you will need horizontal crossbars made of the same material (bars 50x50 mm). Total required 4 bars length 60 cm And 4 bars length 90 cm. To connect horizontal and vertical posts, metal corners, wood screws, and a screwdriver are used.
Frame

Frame with inside sheathed with the material chosen as the main one.
Boards (plywood, clapboard) are attached to the posts using nails or self-tapping screws. Since the cross-section of the wooden frame bars 50x50 mm, a free space with a width of 50 mm.
Insulation with a thickness of 50 mm.
Optimal choice —slabs mineral wool .
If it is decided to use bulk insulation (sawdust, firewood, pine needles), it is backfilled after completion of the sheathing external walls smoking chamber.
Important! It is advisable to prevent insulation fibers or particles from coming into contact with food. To do this, the inner lining of the smoke chamber (from the insulation side) is closed food foil and only after that the thermal insulation material is laid.
The final stage of work on manufacturing the body of a wooden smokehouse is sheathing of external walls over insulation.
Roof structure
In accordance with the chosen project, a single-pitched or gable roof is erected. You can leave it flat. A hole is made in the upper ceiling (upper wall of the housing) for the smoke exhaust pipe. Install the pipe and seal the gaps in any way: tow, heat-resistant sealant, polyurethane foam.
The outer side of the roof is covered with roofing material, having previously made a sheathing of bars with a section 20/40 mm or 30/40 mm. In this way, the ventilation gap required by the technology is formed, which will prevent waterlogging of the wood with all that it entails: rotting, the formation of fungus and mold.

Photo 3. The process of manufacturing a wooden smokehouse at the stage of installing a gable roof.
Lattices
Smokehouse grates can be made from durable wooden slats cross section 10x15 mm or 10x20 mm. The length of the slats corresponds to the depth of the smoking chamber - 60 cm. All lattice elements are located at a distance 3-4 cm from each other.
Pallet
It is recommended to make a metal tray to collect grease. It is much easier to clean than wood. To make this element of the smokehouse, it is advisable to use food grade stainless steel. A rectangle of size is cut out of metal using a grinder 55x85 cm.
From each side they retreat to the center of the rectangle along 1 cm and draw the corresponding lines. Shallow cuts are made along these lines using a grinder with a thin ( 1—1.5 mm) with a metal disc. According to the cuts made, the stainless steel sheet is bent. The sides of the pallet are received. Its corners are secured by welding or bolted together.
Smokehouse assembly
Made from bricks or sheets of metal make a firebox, which should be at a distance 3 meters from the smoke chamber. A chimney pipe is built into the firebox, the opposite end of which is connected to the smoking chamber.

Rate this article:
Average rating: 3.33 out of 5.
Rated by: 3 readers.
Do with my own hands smokehouse, smoke fish or meat, try it and feel how tasty ordinary food can be after smoking!
Products during the smoking process will receive an amazing aroma and taste, and this taste will not be similar to the taste of smoked products purchased in a store. However, first you need to understand the intricacies, and only then decide how to make a smokehouse with your own hands for hot and cold smoking.
We study the features of the smoking process
The man began to smoke food out of necessity. It was noticed that after smoking they can be stored without spoiling for a longer time. To ancient man this made it possible to take some of the food with you in smoked form, rather than relying on luck while hunting or fishing during long trips.
We smoke products at home mainly to give them a different, unique taste. To do this, you can use hot or cold smoking. And the smokehouses themselves come in two types. Their design is almost no different. It is necessary to equip a fireplace, a chamber with hooks where the products will be hung and smoked, and a device for collecting fat that will be released during the smoking process. The smoking chamber must be located in a hermetically sealed housing.

What is the difference between hot and cold smoking? After all, both processes involve the presence of products in limited space, in the smoke from smoldering sawdust or shavings. The main difference is the distance separating the chamber in which the food is smoked from the hearth. For hot smoking, the smoke temperature should be high enough, for cold smoking - 35°C. A mandatory requirement is that smoking cannot be carried out over an open fire.
Cold smoking
Cold smoking takes significantly longer than hot smoking. With this method, the products retain their appearance and acquire an amazing taste and aroma. The cold smoking process takes place at a temperature of approximately 30°C and lasts several days. You should not rush, because at this temperature bacteria multiply well and, without completing the process, you risk instead delicious dish get seriously poisoned. Typically, cold smoking lasts 5-7 days, but can last several weeks.
Important ! Special attention you need to pay attention to the sawdust or wood chips that you will use. We forget about softwood sawdust; you should not use aspen sawdust. Best choice will be:
- alder (you must first remove the bark, it produces bitterness);
- juniper;
- bird cherry and birch (should also be cleared of bark);
- maple;
- shavings and sawdust of fruit trees (cherry, apple, sea buckthorn).

DIY cold smoked smokehouse
It should be remembered that the hearth must be located away from the cold smoking chamber. A good option There will be a dug hole in the far corner of the site; there is no natural difference in heights. A fireplace is installed in the pit, which should be connected to the chamber with a chimney. There is no need to line the fireplace with bricks; it is enough to line the walls of the fireplace.
Very important ! The length of the chimney is usually 2.5-3.0 meters. To do this, it is enough to dig a trench no more than 0.5 meters wide and 0.25-0.3 meters deep, line the walls and bottom with bricks held together with clay mortar, cover the top with a sheet of metal or slate, and sprinkle with earth. Instead of a brick chimney, you can lay a chimney in the trench. Provide a damper at the top of the fireplace to regulate the flow of air, the intensity of combustion and the removal of excess smoke. The flap can be cut from sheet metal. Make the junction of the chimney and the chamber (diameter 200 mm required) airtight using available means. You can use the same clay solution. The chimney has been built.

Another solution could be to install a “potbelly stove”, a chimney made of chimney and installing a smoking chamber above the level of the chimney.
We make a chamber for cold smoking from a barrel
The easiest way to make a simple smokehouse with your own hands is from a barrel. You need a barrel of 100-200 liters. The top cover is cut off, the barrel must be cleaned and washed before use. A hole for the chimney is cut in the bottom of the barrel. The barrel will be mounted on bricks or blocks, so there will be no problems with their articulation. A tray is made from a cut-off lid or other available material to collect fat that will flow out of the product during smoking. The diameter of the pan must be smaller than the diameter of the barrel to ensure the passage of smoke.
We need to make at least one grate on which the food will be smoked. This is one of the options for placing products when smoking. Or secure scraps of reinforcement to the top of the barrel. We will attach hooks to the reinforcement, and products to the hooks.

We make the grate from scrap materials. It can be willow twigs that are woven into shape the right size. It is advisable to secure the cells with thin wire. You can use thin wire and weave it into a lattice, and make the rim from thicker wire. To do this, a thick wire is wrapped around the barrel to determine the desired size, slightly compressed and the rim is secured.
The grille is used alone or several grilles are installed on different levels. In this case, the distance between the gratings should be about 15 cm.
To install the pallet, pieces of reinforcement are welded to the walls of the barrel, which form a cross in the center of the barrel. Tip: Provide a loop on the tray so that it can be easily removed for cleaning.
To attach the grates, you can make loops and weld them to the walls of the barrel. Or screw self-tapping screws into the walls of the barrel.
The chamber cover is made from hardwood trees. It should not be massive and several small holes should be provided in it for moisture to escape. You can limit yourself to a jute bag, which is simply thrown over the barrel during smoking. Remember that the bag must be moistened with water.


We make a chamber for cold smoking from brick
The smoking chamber can be made of brick. It will be the best solution, but it makes sense to build such a chamber only when you are constantly engaged in smoking products and have achieved the necessary skill in this matter. Otherwise, a rarely used structure of unknown purpose will appear on your site.
A brick smoking chamber is equipped in the same way as a barrel. The bottom of the brick chamber can be made from the lid of a barrel or from scrap materials. Sand-clay mortar is used for laying bricks.

We make a chamber for cold smoking from sheet iron
To make a chamber, a sheet of iron is cut, bent into the shape of a cube without one side (the top), and the seams are welded.


The smoking chamber can be built from a variety of materials and items: a bucket (this is a small barrel), an old pressure cooker or a refrigerator.

Craftsmen even make it to speed up cold smoking. In such a smokehouse, the thermal effect of the electric heater on the wood chips produces smoke. The heating element is periodically switched off, thereby achieving the desired temperature of the smoke upon entering the smoking chamber. The smoke rises through the holes, passes through the mesh of the explosive block and becomes positively charged. When smoke enters the chamber, it interacts with the products that are suspended on hooks. The hooks are connected to the negative pole of the BB block. Products attract positively charged smoke particles and these particles settle on them.


DIY hot smoked smokehouse
Hot smoking takes significantly less time because the process takes place at smoke temperatures ranging from 50°C for meat to 120°C for fish. Reduce the temperature - increase the smoking time.
Schematically, such a smokehouse looks like this: a container with sawdust or shavings is placed over an open fire or on a high temperature source (heated oven). The temperature at which the sawdust will slowly smolder is important, not the fire source itself. Smoke from sawdust penetrates into the smoking chamber where the products are placed. A tray is installed under the products to collect the fat released during smoking. Excess smoke is discharged through the chimney or holes in the chamber lid.

We make a smokehouse for hot smoking from a barrel
The difference from a cold smoking chamber will be the need to equip a firebox. The firebox can be placed directly in the barrel:
- Several holes are cut in the bottom of the barrel through which ash will be removed and which will serve as an ash pit for the firebox.
- A piece of the wall is cut out from the bottom of the barrel, from which the firebox door is made. A piece measuring 200x300 mm will be enough. Hinges and a latch handle are welded to the door.
- About a third of the barrel's volume is allocated for the firebox, the rest will be the smoking chamber. The firebox and chamber are separated by a sheet of metal 4 mm thick. This sheet will serve as the bottom of the chamber. It is welded to the walls.
- A hole is cut in the bottom of the chamber for the chimney. The diameter of this pipe must match the diameter of the chimney at the top of the chamber. Do not get carried away by the length of the chimney; excessive draft in the firebox is not needed. Chimney welded to the wall of the barrel.
To make more efficient use of the volume of the barrel, the firebox can be placed directly under it. In this case, it is better to make the firebox out of refractory bricks, with holes for inserting sawdust and removing excess smoke. The barrel is installed on the firebox, and the freed volume is used to place additional grates.

Advice . To control, attach a mechanical thermometer with a remote sensor to the wall of the barrel. Such a thermometer can save you from many mistakes while you gain experience. You can use the old-fashioned method and splash a few drops of water on the surface. If it doesn't hiss, there's nothing to worry about.
A mini-smokehouse can be easily equipped in an ordinary metal bucket. Sawdust and shavings are poured into the bottom of the bucket, and a grate is installed on top. At the very top of the bucket, holes are made in the walls for the rods. Hooks are hung on the rods. We get two options for placing products in a small volume. In the lid of such a “smoking chamber” it is necessary to provide holes for the smoke to escape. The bucket is placed on the fire. A big fire is not needed, the sawdust should only smolder. As soon as the smoldering process begins, you can lay out and hang the products for smoking and close the lid. Smoking will take from 30 minutes to an hour.
Another option for a mini-smokehouse is a metal box with a perforated lid, which can be installed on the grate over burnt coals in the grill. We fried kebabs, sat down at the table and put the smokehouse on the grill. Good option for hiking or fishing.


Having understood the principle of operation of a hot smoker and after a series of experiments with a barrel, you can think about a more presentable design. You can weld a beautiful smokehouse from stainless steel or lay it out of brick.

An excellent option for a summer residence would be to combine a smokehouse and a barbecue on one site and in one volume.
DIY smokehouse and barbecue made of brick
The work will require time and effort, but it is worth it - the result will delight you for many years.
First select appropriate place on the site, remember about fire safety. For convenience, you can bring water and sewerage to this place. Develop a sketch of your structure and be sure to draw up a drawing for laying each row of bricks. You will see, such a drawing will make your work much easier.

You can do without a concrete mixer and mix the solution manually, but a little mechanization will speed up the work several times. Prepare everything necessary materials and tools.
The work begins with clearing and planning the selected site and making a foundation. A brick smokehouse with a barbecue is already considered a permanent structure and strip foundation not enough. Installed in a dug pit wooden formwork, which must be upholstered with roofing felt. A layer of rubble stone is laid, filled with crushed stone and filled with mortar.

Important ! A day later, after the first layer has dried, the next one is done and so on. The number of layers depends on the size and weight of the structure.
The last layer is checked by level, leveled, waterproofed and left for several days until completely dry.
Instead of a rubble foundation, you can build a concrete one. Such a foundation needs to be reinforced.

For masonry, use red stove brick. Start by laying out the first row of bricks without using mortar. This will help you make markings and determine where to install the grilles.

Start laying by kneading sand-cement mortar with the addition of lime. The usual ratio is 3:1:1. Water is added in volume so that the solution looks like thick sour cream. The second and subsequent rows are laid staggered, laying bricks starting from the corners. Constantly check the horizontality of the laid out rows. The corners must be reinforced with wire.
To install the brazier, corners and fittings are installed between the walls of the oven. The firebox must be made of heat-resistant metal or cast iron.
It is easier to install the lattice if several bricks are laid protruding into the structure.
Space for firewood and various household appliances can be provided in the overall volume of the structure.
The smokehouse is made of two volumes located one above the other. This will give you a hot smoker. It can be easily converted into a smokehouse for cold smoking by placing a portable stove or hearth at the required distance and connecting it to the chamber with a chimney. So you can make a smokehouse with your own hands for hot and cold smoking.
You choose the design style of the building and its decoration according to your taste.


These are not all the ways to make a smokehouse with your own hands for hot and cold smoking. Among them there are very cheap (option with a bucket) and quite expensive (grill-smokehouse made of bricks). It's up to you to decide, but in any case, there will now always be a place for delicious smoked products on your table.


