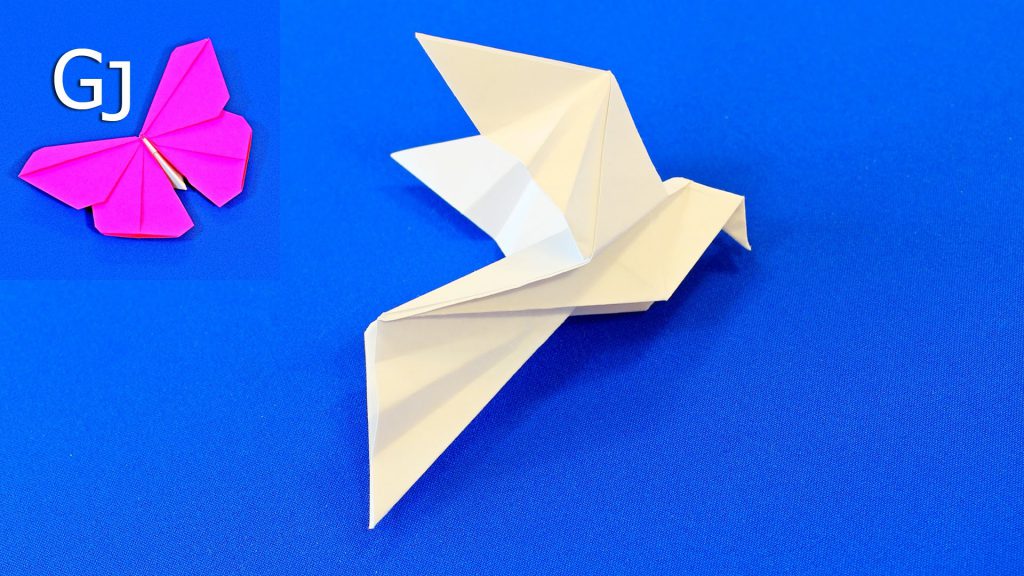
Volumetric dove pattern. An original do-it-yourself souvenir: how to make a dove out of paper. We make paper doves with our own hands using different techniques
Hello! Today I want to show you how to make a dove of peace from paper.
We have been actively preparing since May 9th. Yesterday I told you how we did it, and today there’s another craft coming up.
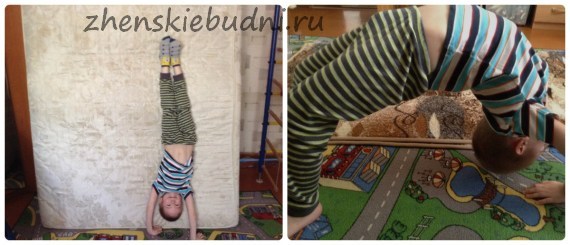
I'll be honest in Lately We started creating less often. Everyone is more focused on training. The youngest is studying wushu and in just two weeks we have our first test. Therefore, now our priority is stretching, bridges, wheels, abs, etc. Of course, I understand that you can’t focus on just one thing. But since the child now has the desire to pass everything well, I support him in this matter. By the way, here is a photo from our home workout.
Well, now we will make a dove.
Cocktail straw
And of course glue.
Well now detailed master Class.
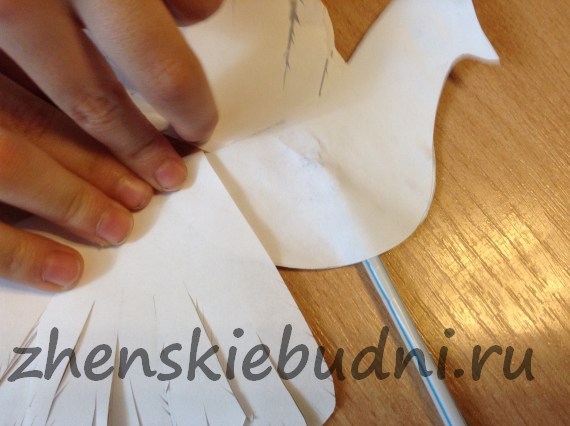
Cut out the details.
![]()
To make the dove look more interesting, I suggest making the wings and tail more fluffy. So we make these cuts. I showed Max how to do it, and then he did it himself.
![]()
Then we collect the parts. First, fold the body in half. We need to glue the wings inside.

Then put in a cocktail tube.

And of course we glue the tail. To do this, simply fold the piece in half and glue it to the body.
We draw the eyes and our craft is ready.

As an option, you can supplement the craft with a St. George’s ribbon.
Tell us what kind of crafts you like to do with your children. What do your children like to do more: glue or cut out?
I’m also interested to know what you tell children about the Great Patriotic War. I myself faced the same problem, what can I tell you? I found this video presentation. Take a look, maybe it will be useful to you too.
The word origami came to us from Japan, it consists of 2 words: “ori” (folded) and “kami” (paper). Origami classes are the construction of crafts and toys for children and adults from a paper square. Work in this technique varies in complexity, today we have simple craft- paper dove of peace. The dove is a symbolic bird. We know that his image, that is, Pablo Picasso’s drawing, has become a symbol of peace, the struggle for world peace, since the last century. The dove of peace is usually depicted as a white bird clutching a palm branch in its beak. Here's the first stencil:

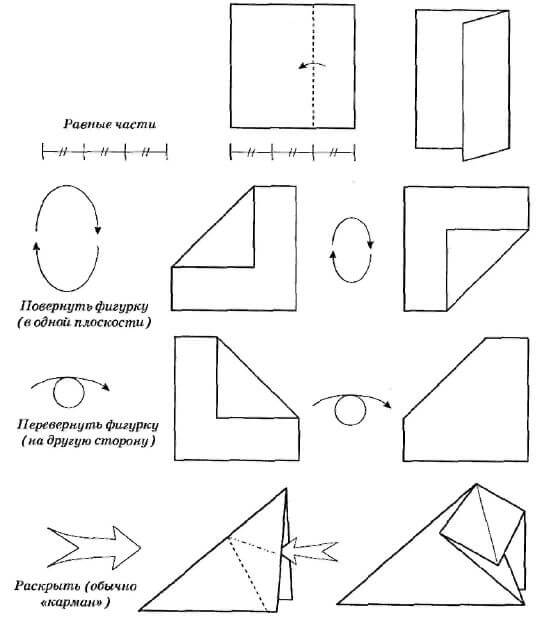
Even if we are making such a simple figure as an origami dove, we need to know the basic symbols and techniques of this technique. This will make it easier to understand a drawing like a diagram. It should be added that in such a simple origami as ours, simple patterns are used, the number of folds is small, it is permissible not to strictly observe symmetry and it is not necessary to have too smooth edges. But if there is more than one paper dove, your origami figures will all be different, unlike one another. So, here are the basic notations and techniques of origami technique:
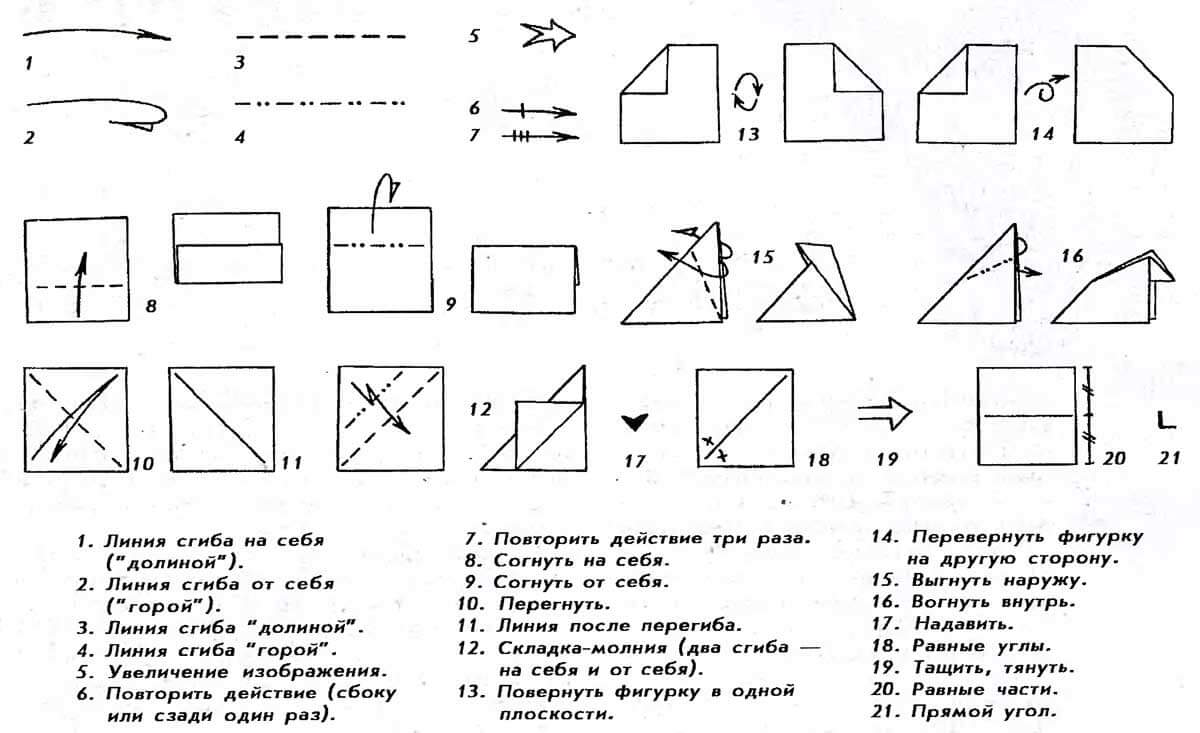
More origami techniques: this will help you understand how origami folds and opens:

Origami rules
Since we are making a dove with our own hands in classic origami, it must be said that the classic option is to use only square sheets of paper. The paper does not have to be white, it can be any color, but only plain. In the classics, gluing and cutting during work is not allowed. Origami is a very ancient creativity, and over time, new techniques began to appear, such as wet folding, modular origami, and folding. Basic rules for simple DIY origami:
- Prepare several square sheets of paper at once so you don’t get distracted in case you ruin the first sheet.
- Learn the ABCs symbols, it is important when reading diagrams.
- The most convenient way to do origami with your own hands is on a smooth and stable table surface.
- Fix the folds with your fingernail - then all subsequent work will be neater and more beautiful.
- Stick to the plan strictly.
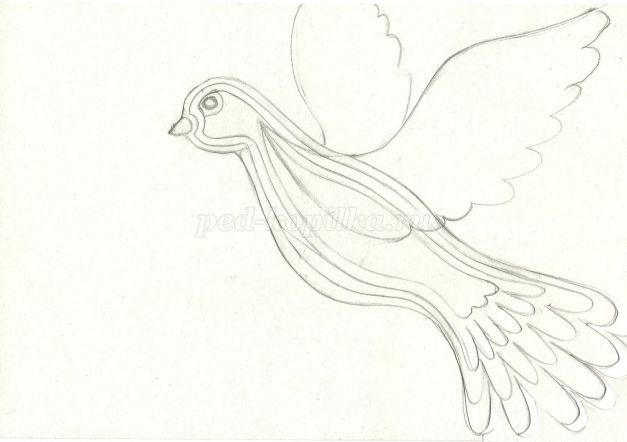
This is the kind of beautiful dove we should make, made with our own hands. We hope that our master class will be useful not only for children, but also for adults.
We will make origami according to this scheme. Unfortunately, we did not find exactly the diagram we needed, so it corresponds to the master class only starting with picture number 3:

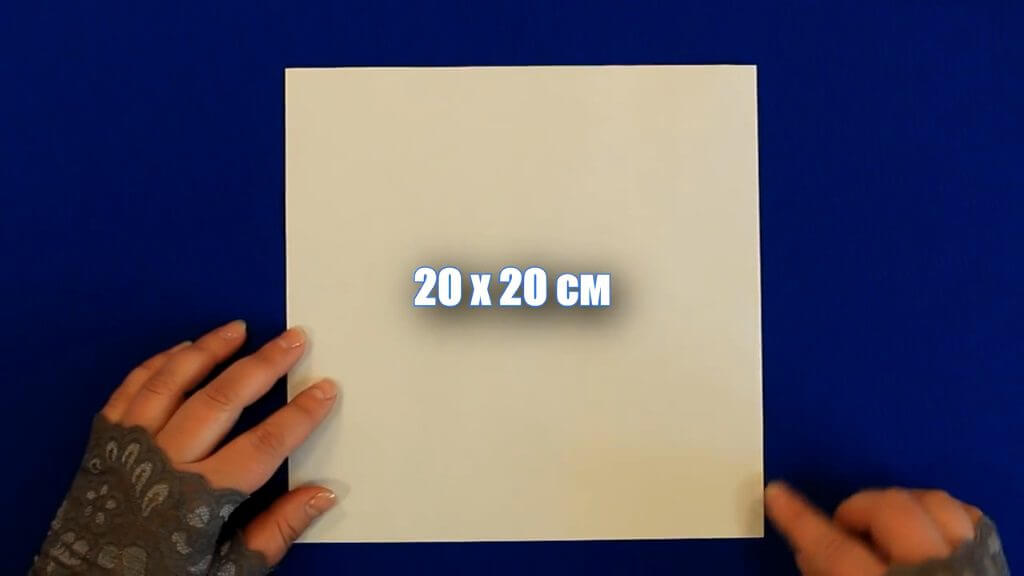
Use it for crafts square sheet plain paper, size 20/20 centimeters.
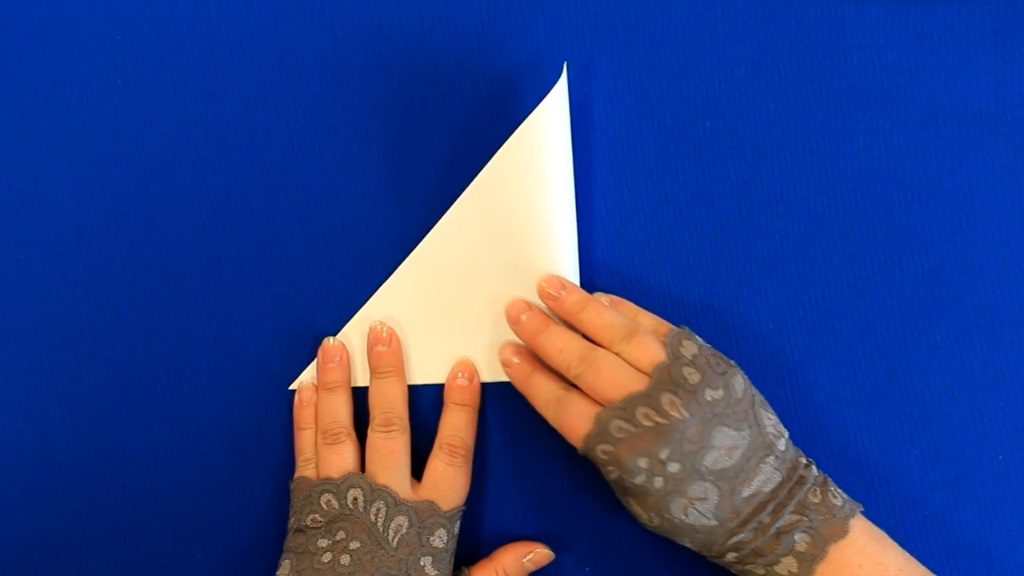
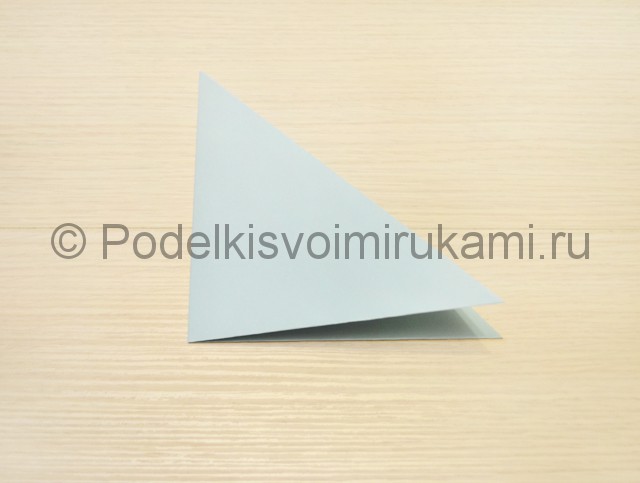
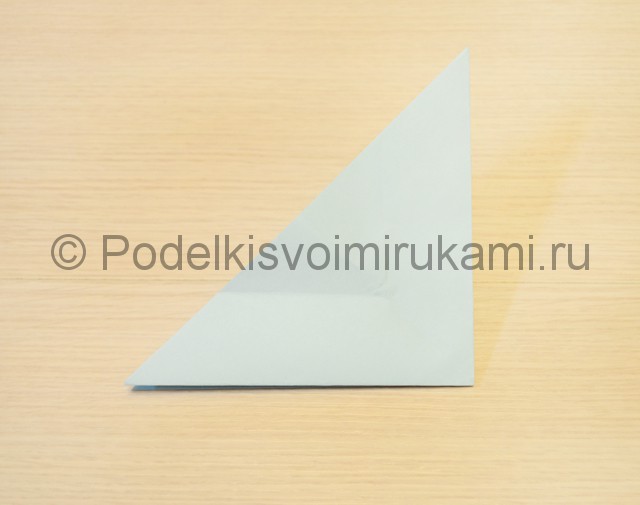
We bend the square diagonally, we get a triangle.

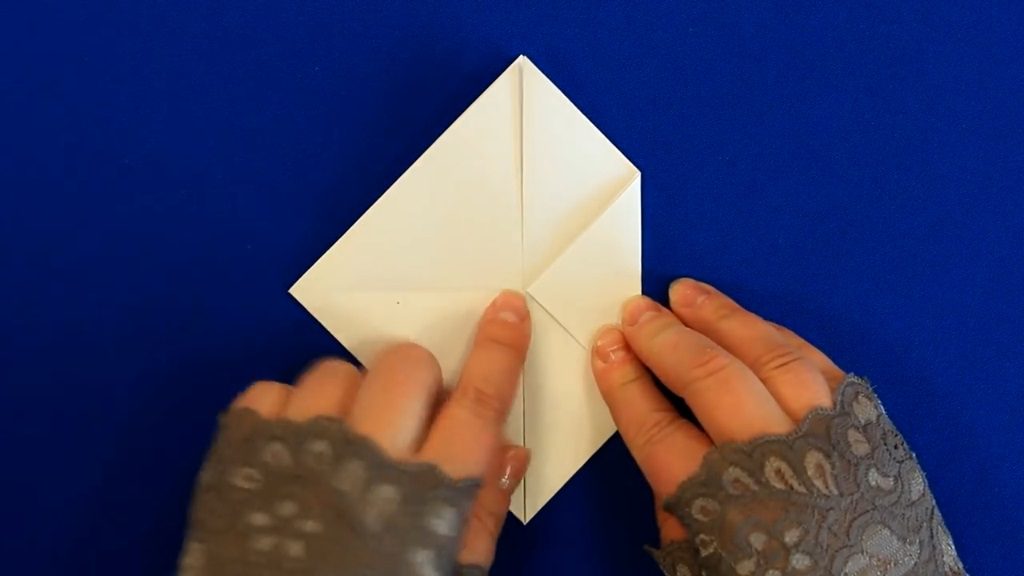
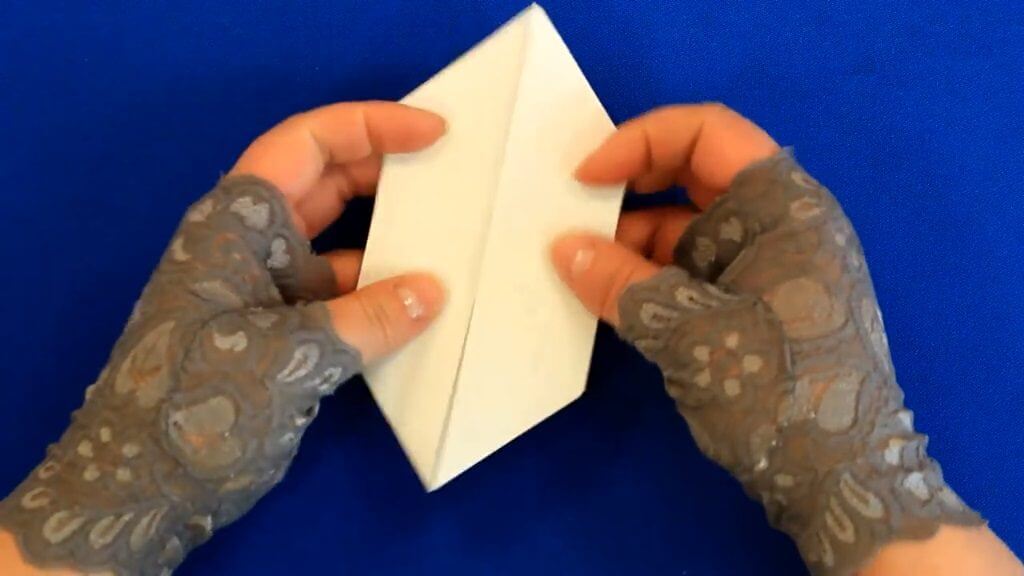
And fold it in half again and press the cut with your fingernail. We combine all the corners clearly.
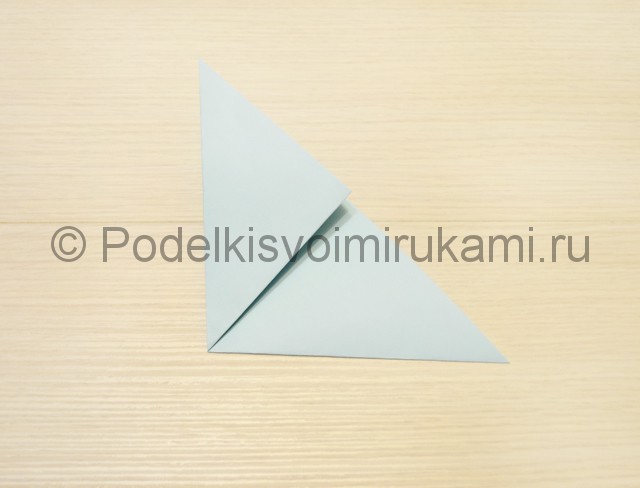
We open the last addition of the triangle back - we only need the line. We take our large triangle again, apply the lower side (base) of the triangle to the top point of the triangle. Smooth it with your fingernail.

We do the same on the left: we wrap the bottom side to the top point.

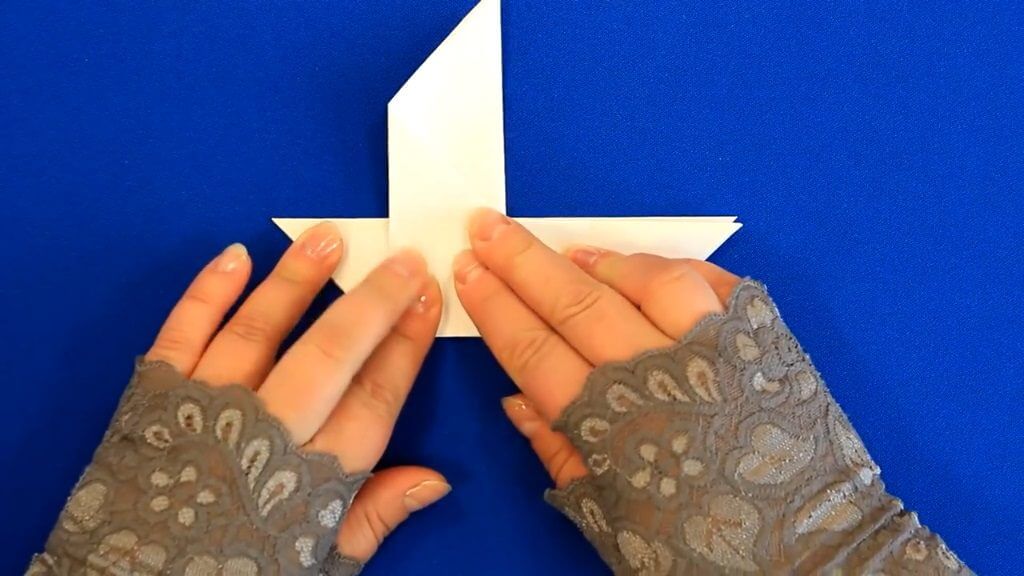
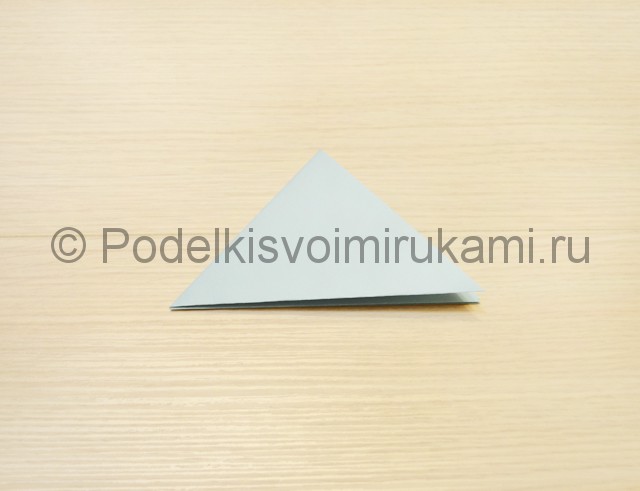
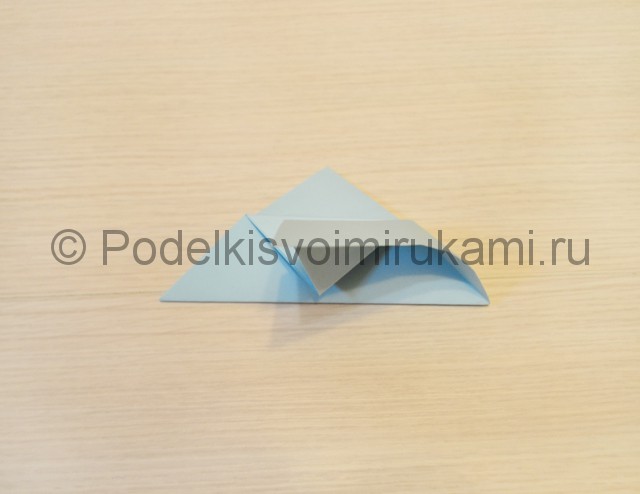
The result is this figure. Right hand take the top corner and bend it down. We run it with our fingernail and return it to its place. We need a fold.

We do the same with the left side: we bend it, fix the fold and return it to its place. Bend the right corner towards the center of the figure.
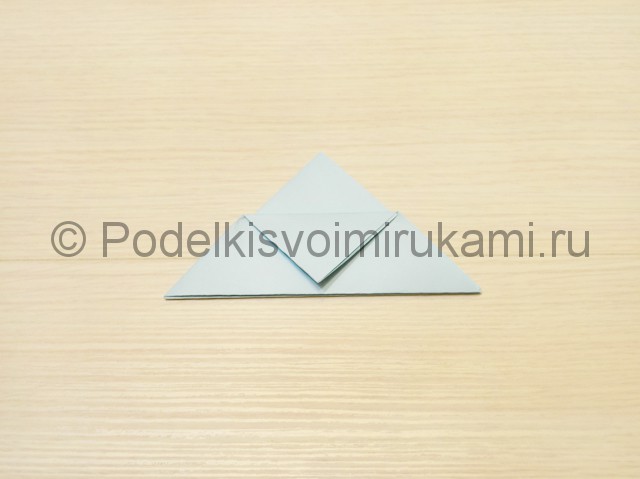
Next, bend the workpiece in half, as in picture number 6. Take it by the tail and bend it upward, as in picture number 7. Turn it over to the other side, and do the same on the other side. These will be the wings of our origami dove.
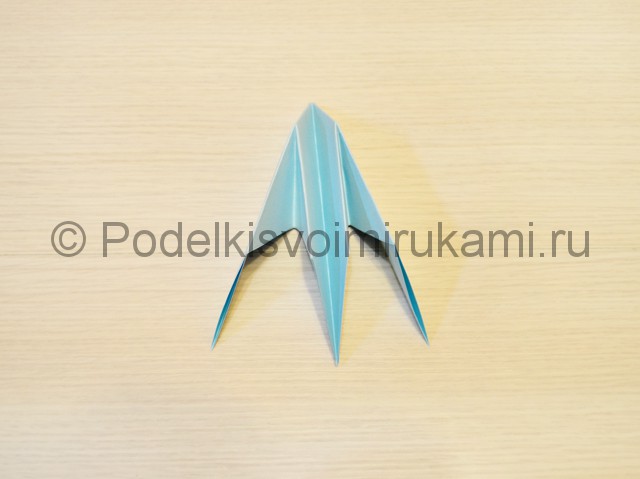
We turn the workpiece over with its wings down, bend the tail, as in Figure 8. Then bend the wings up again, as in Figure 9.
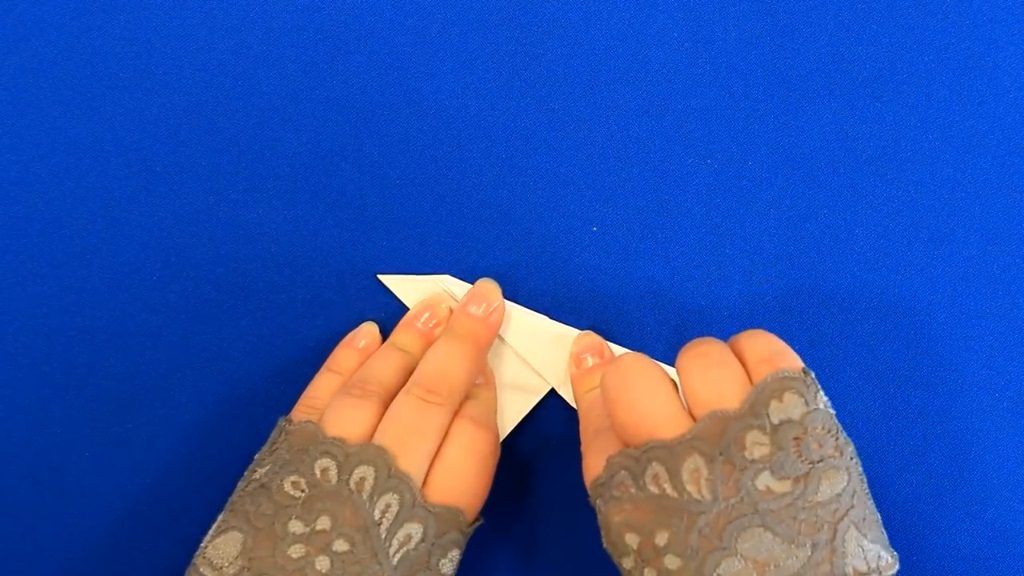
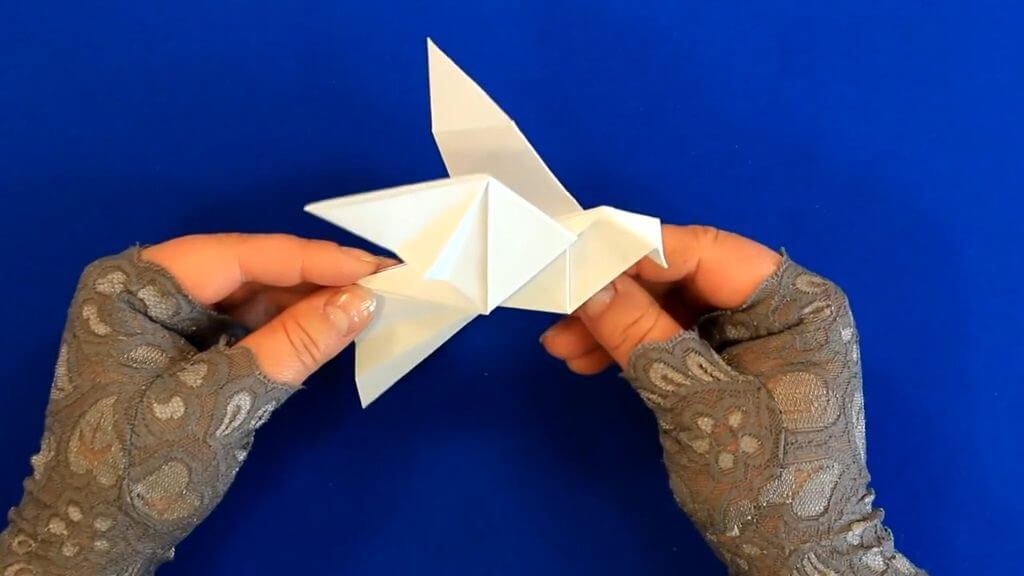
We make folds on the tail and wings with our own hands for beauty. So our pigeon is ready.

The video shows the design of the tail in detail:
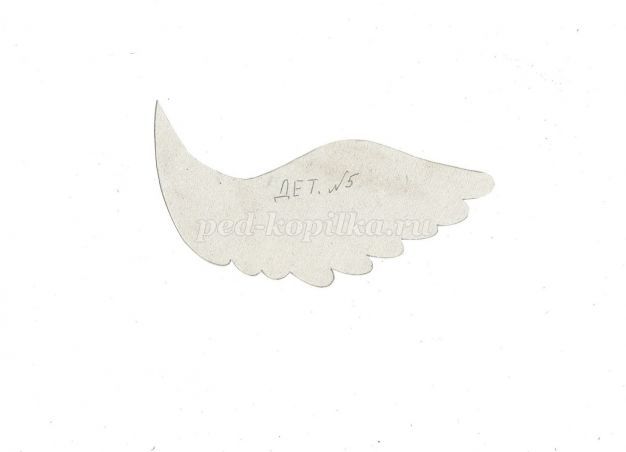
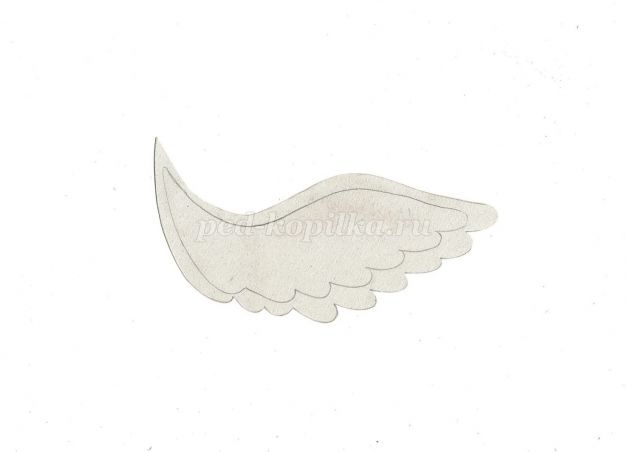
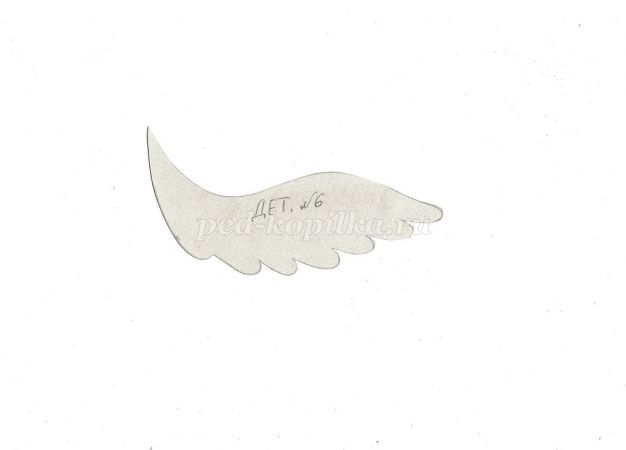
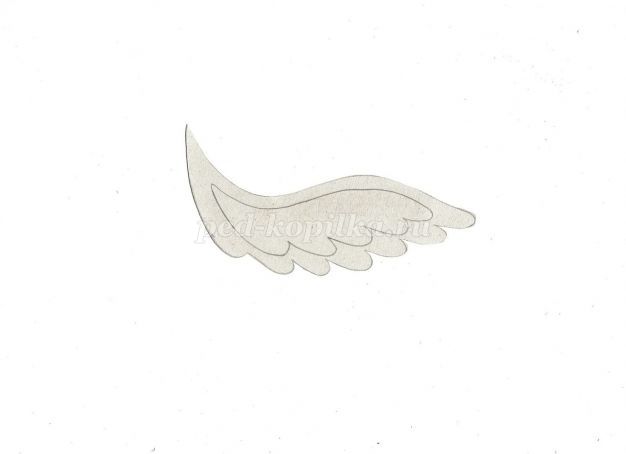
Stencils and templates
Such stencils and templates with the image of a dove will be useful to you for cards, crafts, decorations festive table, and so on. Many homemade templates and stencils are suitable for cutting out and then painting with paints. It is better to make stencils and templates not on thin paper, but on cardboard - this way it is more convenient to work with them.
DIY dove of peace. Scheme. Master class with photos
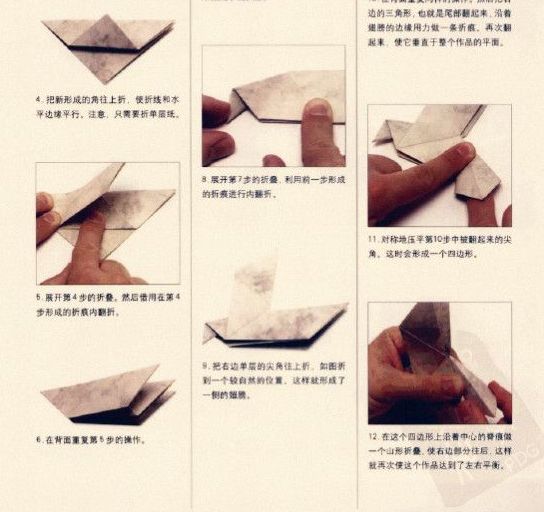
Master class on making a three-dimensional figure “Dove of Peace”.
Vera Grigorievna Koroleva, teacher at MKDOU kindergarten No. 19-TsRR Rossosh city, Voronezh region.Description: The master class will be of interest to educators, parents, teachers, additional education teachers, creative and active people who love to create beauty around themselves. A voluminous figure, made using multilayer gluing, looks impressive and original, it can be used as an interior decoration for the holidays, as an attribute for theatrical activities, as a craft for an exhibition. This craft can be done even with children. preschool age, if you take a simple figure, reduce the number of layers, do the work from paper, gluing the layers with double-sided foam tape, i.e. use more safe materials and tools. But that's another story... This master class with illustrations will help you master the technique of multi-layer or overlay applique. This work is labor-intensive, requires a certain skill, and is intended mainly for adults, but there is also room for creativity and independence for the child. Creating these types of crafts with your own hands can be a fun activity for the whole family. I hope that the knowledge you have acquired will help you solve creative problems not only in your work, but in life in general.
Target: Development of pedagogical skills of teachers.
Tasks: Teach to do three-dimensional figure. Develop design and logical skills, spatial thinking and imagination, creativity, and general skill. Develop the ability to plan work to implement a plan, anticipate the result and achieve it, if necessary, making adjustments to the original plan. Improve attention, perseverance, and hard work. Cultivate accuracy in performing work and caution in using tools.
Dear colleagues, today I would like to present to you a master class on making a three-dimensional applique “Dove of Peace”.
People on the street raised their heads:
Pigeons, pigeons, white pigeons.
The city is filled with the noise of their wings.
The dove reminded people of peace.
Lindstrom T.
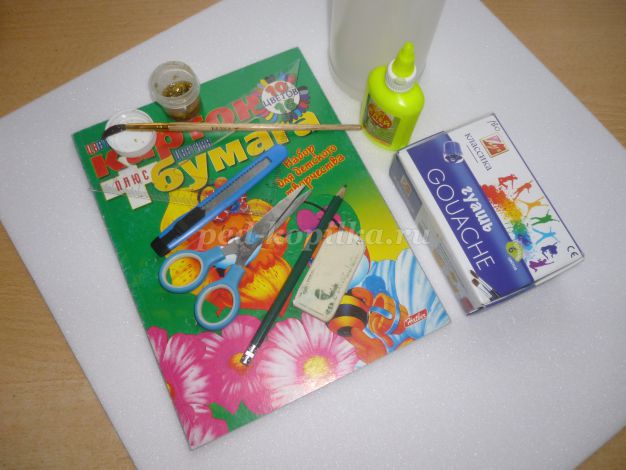
1.To make a volumetric applique we will need:
- ceiling tiles (smooth);
- colored paper (brown and yellow);
- cardboard;
- Titan glue, PVA glue;
- pencil;
- ruler;
- eraser;
- brush;
- gouache (black and gold with glitter);
- scissors;
- stationery knife;
- tape (if you make stencils of the parts yourself).
2.At the very beginning I would like to draw attention to some features:
Cutting with a stationery knife.
You need to cut out parts from ceiling tiles in a continuous motion, first placing them on a special mat or thick cardboard at an angle of 45', observing all safety measures. This work is carried out exclusively by adults.
Shaping.
Imagine what it looks like real life the object that you want to depict, consider it layer by layer. This will help to correctly recreate the volume.
Installation and gluing.
This stage is performed exclusively by adults in a ventilated area, because you have to deal with Titan glue; we follow the instructions for use.
Cutting with scissors.
Preparing the stencil parts and The final stage You can also entrust the work to a child, because he will not want to remain only a witness to the production of such beauty. Remind him in a timely manner about the rules for working with scissors.
2.Draw a sketch on cardboard.
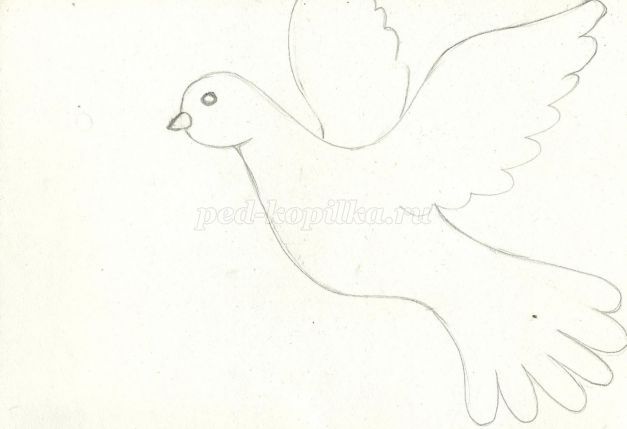
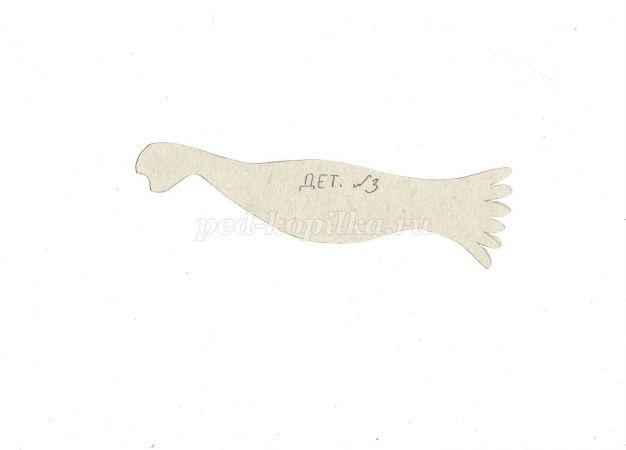
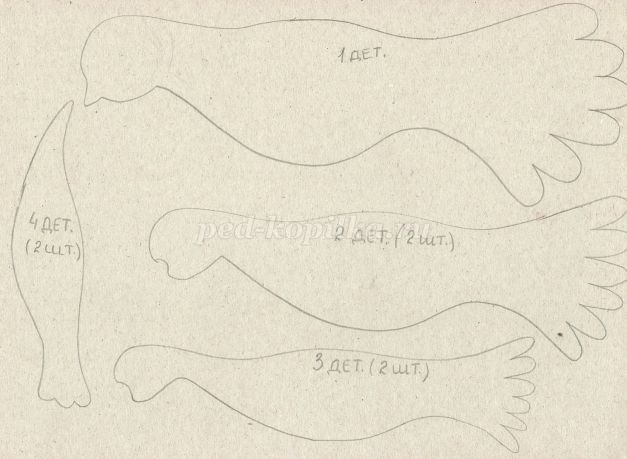
3. Select the body, head and tail into one common part.
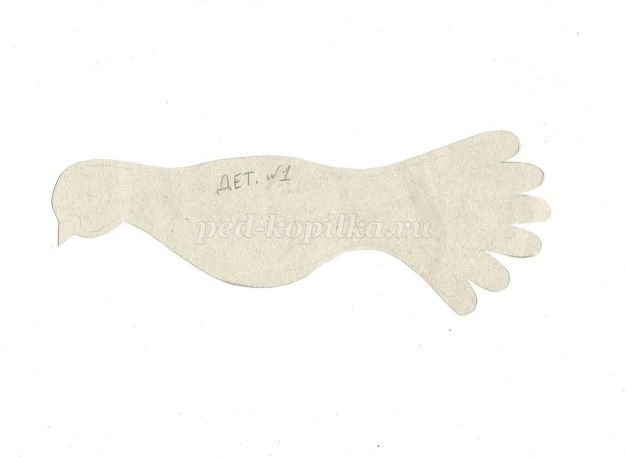
We cut out a stencil of the general part (draft version No. 1) and trace it on thick cardboard. This will be item #1.
4. On draft No. 1, we retreat from the edge of the part approximately 0.5 cm, leave space for the eyes, and trace along the contour, observing the indentation.

We cut it out (draft version No. 2) and trace the finished part on thick cardboard. This will be item #2.

5. On draft No. 2, we retreat from the edge of the part approximately 0.5 cm, leaving space for the eyes, and trace along the contour, observing the indentation.
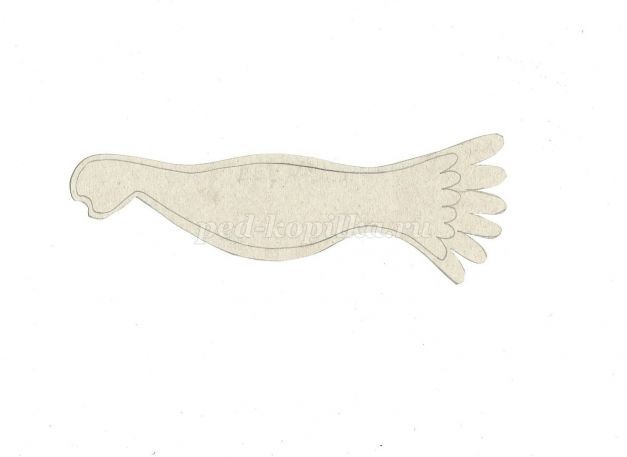
We cut it out (draft version No. 3) and trace the finished part on thick cardboard. This will be item #3.
6. On draft version No. 3, we retreat approximately 0.5 cm from the edge of the part, trace along the contour, observing the indentation, but do not include the place where the head is located in the part.

We cut it out (draft version No. 4) and trace the finished part on thick cardboard. This will be part #4.
7. We collect all the cut out parts from the draft version and carefully glue them together with tape as much as possible.

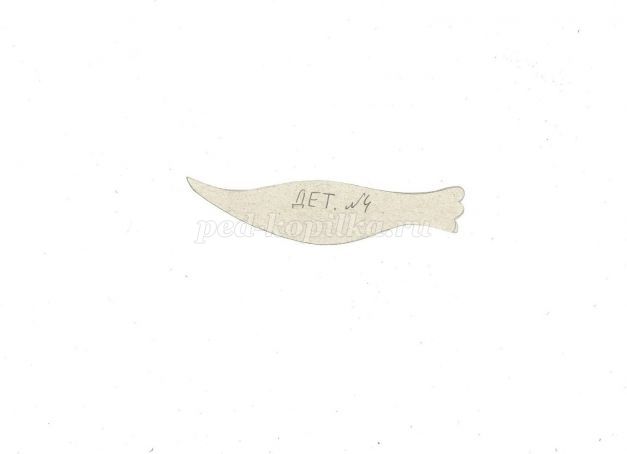
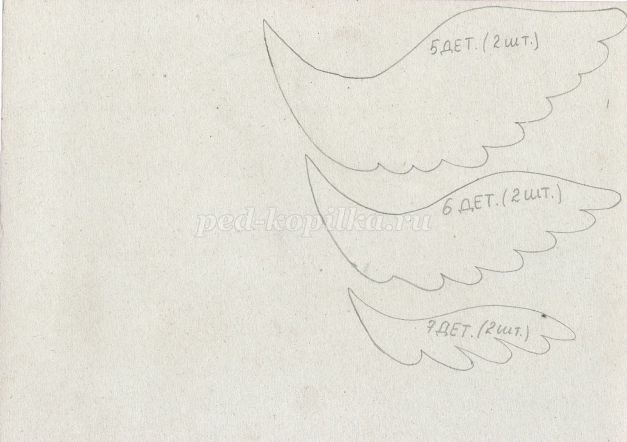
8. Observing the physiological features of the structure of a bird’s wing, highlight the whole wing in the sketch
cut out the part (draft version No. 5) and trace this part on thick cardboard. This will be item #5.
9. On draft No. 5, we retreat from the edge approximately 0.5 cm, trace along the contour, observing the indentation.
We cut it out (draft version No. 6) and trace the finished part on thick cardboard. This will be part number 6.
10. On draft No. 6, we retreat from the edge approximately 0.5 cm, trace along the contour, observing the indentation.
We cut it out (draft version No. 7) and trace the finished part on thick cardboard. This will be part number 7.

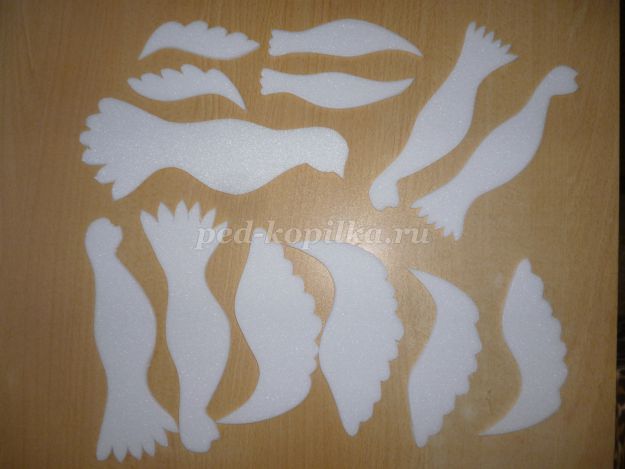
11. You should get the following blanks.
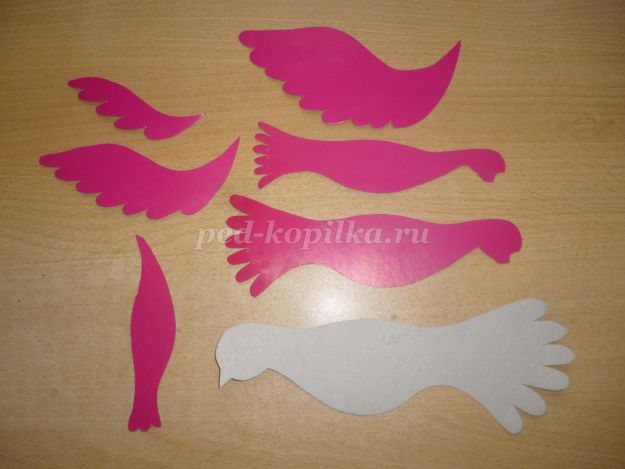
12. We outline the finished parts on ceiling tiles:

part No. 1 - 1 pc., part No. 2-9 - 2 pcs. (in direct and mirror position), i.e. you should get 13 separate parts.
13. Let's start assembly. To part No. 1 we glue part No. 2 using Titan glue, retreating 0.5 cm from the edge.
Origami is translated from Japanese as “folded paper”. Initially, the art of folding origami was common among representatives of the upper classes. Mastery of the technique of folding paper figures was considered a sign of good form. This art expanded beyond the East after World War II. Now the whole world is engaged in folding paper figures.
From light-colored paper you can make a dove, which, as you know, is a symbol of peace. As you probably guessed, today we will show you how to make a paper dove with your own hands step by step. Folding it is not difficult, and this master class describes the most convenient way. It is best to fold the dove from blue paper or regular paper. white sheet. Nowadays you can find special square paper for origami on sale.
First, the square must be folded diagonally to form a triangle.
![]()
This triangle is then folded in half.
Now you need to fold the triangle in half again, but wrap its top layer in one direction.
And wrap the bottom layer in another one.
Then do the same on the other side.

The triangle needs to be unfolded so that there are folds inside.
Now the triangle is folded in half, at the same time its top is folded inward along the folds.
This is what you should get - top view.

The same manipulations need to be done on the other side, you will get this dove preparation - top view.
Now you can bend the wings of the dove upward.

There are many paper crafts that can be used as room decoration, events or children's toys. Some of them are paper pigeons. These birds of the world look quite unusual and graceful. You don’t need to spend a lot of time to make such a craft. Just 15-20 minutes is enough.
How to make a paper dove: materials
You can use several techniques at once. Most often, such doves are cut out according to a template. You can also try making birds using origami or another method. You may need the following equipment and supplies.
Paper - it is better to choose a special one for creativity. For example, if you decide to decorate a bird made from ordinary office paper with paint, the material may get too wet and ripple. It's a spoiler appearance crafts. Office paper can be replaced with white cardboard for creativity. It is better to choose matte rather than glossy, since the plumage of white doves is not very shiny. Watercolor paper will also work. It is usually sold in small folders of 10-12 sheets.
Many craftswomen use various craft materials as decoration. This could be, for example, corrugated paper. Remember that the density of the material must be sufficient, because... Some parts are bent to add volume.
Decoration materials - paper doves can be decorated transparent glue with glitter. Also applied to the wings of birds various patterns. This can be done using markers or paint. It is better to choose acrylic or gouache, as they form an even, durable layer on paper.
Additional devices - birds are also sometimes used to create garlands. Therefore, it is worth choosing ropes for them. Interesting option in style is the use of jute rope or twine. Also, pigeons are sometimes hung in the room. Interesting craft This can happen if you attach the birds to a round metal base. You can use a regular embroidery hoop as it.
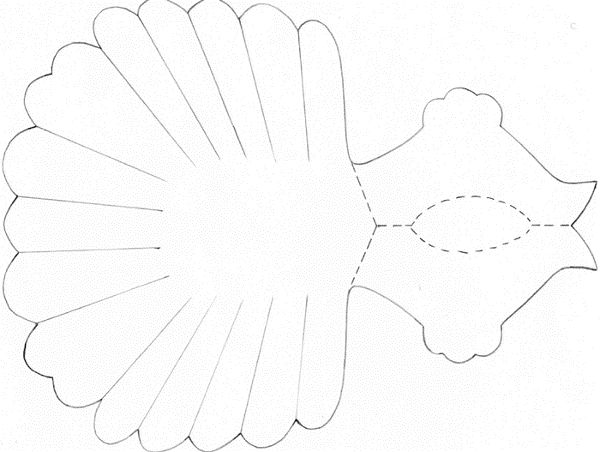
Paper dove template: features of work

Making a dove using the template is quite simple. Prepare thick paper. If you have a printer at home, you can immediately print the template. In this case, you should first stretch the image so that you get the required size.
You should cut out 3 parts - the body, wings and crest. This should be done along solid lines. Dotted lines indicate fold locations. There should be no cut holes in the center of the body template!
Let's move on to forming the volume of the bird's head. To do this, bend the back template along the dotted lines. The beak should point down. Next, cut the feathers on the tail. To make the bird more realistic, it is worth creating plumage. To do this, we make oblique cuts in all places except the head and beak. This also applies to other details. The crest should be especially lush.
We form the wings. To do this, we also bend the middle part along the dotted lines. You should get a small triangle that goes down. Don't forget to feather the edges using oblique cuts. Coat the triangle of the central part with glue. Then we glue it to the body in the middle.
The final stage is the crest. We also bend it a little (you should get a small “tongue”), and then glue it to the bird’s head.
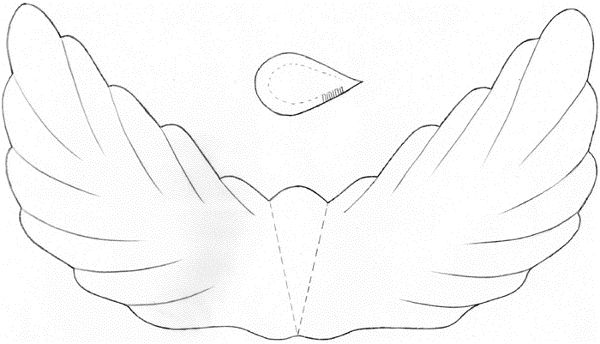
Paper dove of peace: bird made using origami technique
Take a square piece of paper and fold it diagonally. Then repeat this action for the other side. Leave it in the shape of a triangle. Turn the workpiece so that the split top is facing left. Then bend it into right side. In this case, the fold should be located from the wide right side at a distance of 2-3 cm. Repeat the same action in the opposite direction.
Then we lift the resulting protruding part up again, capturing part of the future body of the bird (about 1 cm near the triangle, which is located behind the part). We practically have a bird. All that remains is to wrap the dove's beak. To do this, bend the part of the triangle closest to us on the left side of the craft downwards.
A dove of peace made from paper using the origami technique can be not only white, but also any other color. It is best to use thin paper. It will be easier to roll it up. You can decorate the craft by coloring the bird with felt-tip pens. You can also glue paper eyes and beak on it. This kind of craft looks very nice. If you hang it with thin ropes or fishing line in the form of a garland. Pigeons are placed at the base of the chandelier.
Interesting pigeons can be created using alternative techniques. One of them involves using wet paper. The resulting birds can be used as figurines for garlands or used to create various applications.

You will need:
- Multi-colored paper napkins
- Hive PVA
- Drawing template
- Plastic bag or film
Manufacturing instructions:
- Print out the template for making doves. It is better to choose drawings in which birds are depicted in profile. Place plastic film on top of the printed sheet of paper.
- Let's move on to rationing paper to create crafts. To do this, prepare several bowls. We take multi-colored napkins and tear them finely with our fingers. paper different colors sort into different bowls. Add a little water and glue to them. Stir the resulting mass with any in a convenient way. As a result, the paper should get thoroughly wet. The resulting mass is very plastic and molds well.
- We take wet shredded paper and lay it on film in accordance with the contours of the drawing. After you have filled the entire body of the pigeon, leave the mass to dry. This takes a maximum of 1 hour to 2 hours.
- The dried workpiece can be used in any way. For example, they can be hung on strings on a Christmas tree. Also, with the help of such pigeon blanks, interesting applications are made. For example, birds, flowers and children’s hands made using the wet paper technique are placed on a thick sheet of cardboard. The method is interesting because such birds can also be used to decorate scrapbooks and postcards.
Dove of peace made of corrugated paper
You will need:
- Thick cardboard
- Scissors
- Dove patterns
- Corrugated paper
Manufacturing instructions:
- Using the template, cut out dove figures from cardboard. Slice corrugated paper into square strips of medium length (about 3 cm).
- Roll the stripes into small “roses”. The easiest way is to place a pen in the center of any piece of paper.
- Then you need to fold the free edges of the paper up. The part is fixed with your fingers. Then it is coated with glue from the inside out. This needs to be done in the middle.
- Then the corrugated paper piece is glued to the cardboard dove template.
- Other parts are formed in this way. They are glued over the entire area. As a result, we get a dove figurine filled with paper.
Paper dove: photo

Origami is ancient art folding figures from a simple sheet of paper, which came to us from Ancient China. Anyone can master this fascinating type of creativity - just follow the diagram, stock up on paper and patience. In origami...
A hat is a headdress that can instantly transform a person and protect his head from the sun and wind. A DIY paper hat is one of the main attributes of a fancy dress costume. It will help complete any look. TO…
Papier-mâché is one of the most interesting techniques for creativity. The material is made from improvised materials available in every home. Papier-mâché is used to create masks, home decor and, of course, toys. Particularly popular is the making of dolls, in which…
Flowers made from candies and corrugated paper - unusual gift with your own hands. It can be given to anyone: a man or a woman, a friend, family and friends. If you use corrugated paper for decoration, the appearance of the gift will correspond to the most…
Paper - universal and available material, from which you can make various decorations with your own hands. This exciting activity, bringing mass positive emotions. You can make flowers, butterflies, animals and more from paper. etc. Decorations,…


