What to do if linoleum tears. How to repair linoleum with various damages
Today on construction market many presented various options floor coverings. Nevertheless, linoleum still remains just as popular. It attracts with its low cost and practicality. Even the fact that the material is not sufficiently resistant to mechanical stress does not play a special role, since repairing such flooring It’s not that difficult to do on your own.
Buying linoleum these days is very easy. The store will offer you all kinds of options for this flooring, differing in different characteristics: household linoleum, semi-commercial and commercial, and even 3D linoleum.
What is the reason for the appearance of defects
Even a novice master can handle laying a linoleum floor if he follows the manufacturer’s recommendations. The main requirement is the presence of a flat and dry base. The conditions are simple, but very important.
- Many people believe that due to its elasticity it will lie flat even on an insufficiently leveled base. Perhaps, but only if these are not holes in the floor. The material, of course, will hide them, but will not fill them. This means that a sharp heel will make a hole in the coating in this place.
- If the base is wet, the linoleum may swell. A similar defect can be encountered if installation is carried out on an overly thin mastic layer or poorly prepared glue. After drying, the coating begins to peel off from the floor.
If the installation technology is violated or handled carelessly, various mechanical damage may occur on the floor surface, for example, tears or cuts may form, seams will begin to delaminate, etc.
Any defect will primarily affect the appearance of the floor. Replacing it entirely is a big additional expense. That's why do-it-yourself repair linoleum can become great solution Problems.
How to remove stains from linoleum

Let us immediately note that it is not advisable to use sandpaper or abrasive powders to clean linoleum. They can damage the polyurethane layer, which is responsible for its wear resistance, and it will be hopelessly damaged. Also, solvents and chlorine-containing compounds should not be used for these purposes.
There is an opinion, for example, that gasoline and turpentine have exceptional cleaning properties. However, they can easily ruin the coating pattern. If they are used, then only as minimal additives to water. So, first think carefully about how to wash the linoleum after repair and how.
Usage special means, produced by FORBO, INTERCHEM or others, are much more effective and safer. They offer customers various means, intended for the care of linoleum, for example, various
- polishes;
- emulsions containing modified polyurethane, with the help of which wear-resistant layers of the material can be restored;
- mastics for restoration and repair of linoleum;
- concentrates used to remove oil and grease stains. They also help remove paint, graphite, ink, and traces of rubber from the floor surface.
How to deal with linoleum swelling

Such a defect is most often due to the fact that the material did not have time to “rest” and was immediately fixed around the perimeter using skirting boards. They will prevent thermal expansion of the coating. This will cause "waves" to form over a large area. In such cases, linoleum repair is carried out in the following order:
- Furniture is completely removed from the premises;
- remove baseboards;
- the coating may rest against the walls, then the edges are trimmed by 20–25 mm;
- the linoleum is left in this state for a day, then rolled using a roller or a heavy bag;
- if after rolling there are swellings left, these areas are glued to the base.
If we're talking about If only small bubbles or streaks are repaired, there is no need to re-floor. It is enough just to cut these sections in the center, straighten the edges and press with a weight. After some time, place the required amount of glue under the straightened sheets and press until it sets completely.
On a note
The material may stretch, causing a crease. In this case, you first need to cut off the excess so that the parts can be joined.
Repairing a small hole
To restore a pinpoint area - up to 1 sq.cm is used glue mixture. There is an opportunity to buy ready set for repair, containing solvent, color, repair composition and spatula, or use special PVC glue.
- the damaged area must be cleaned;
- select a suitable shade of color;
- add it to the repair composition and mix until the desired shade is obtained;
- The resulting mixture is used to fill the hole in the linoleum, level it and remove the excess.
How to apply a patch
If the damaged area is large enough, it will have to be replaced. You just need to choose a piece of the same color so that you can match the pattern as much as possible.
On a note
It is advisable to save the remains of the material after installing the floor; they may be useful in the future for repair work. The waste patch will be almost invisible.
Sequence of repair work:
- approximately determine the size of the patch;
- a new piece of canvas is placed on the repaired area and the pattern is adjusted;
- then use a sharp knife to cut through both sheets around the perimeter. It is better to do this by laying a metal ruler along it;
- the damaged material is removed and the exposed area of the base is cleaned with emery cloth;
Fighting punctures and dents
Water can seep through a hole in the coating, causing it to swell. Therefore, it is better to remove them immediately upon appearance. For repairs, polyvinyl chloride glue is used.
If the puncture is small - up to 1.5 millimeters in diameter:
- stick masking tape on it:
- A thin hole is made exactly above the puncture. Its size is selected so that the tape at the edges does not go into the puncture;
- pour a small amount of liquid A-type glue through the hole;
- after waiting for crystallization, the tape is removed;
- cut off the tubercles of hardened glue from the surface of the coating.
For repairing punctures of larger diameter (up to the size of a large coin). Filling is performed using the same technology only without the use of adhesive tape.

Dents are repaired with putty. Prepare it in one of the following ways:
- Prepare a mixture of alcohol, rosin, castor oil, taken in a ratio of 5:25:4, add dry paint to match the shade of the coating and mix thoroughly.
- The mixture is prepared from thick turpentine and rosin (4:1), to which a tint of the appropriate color is added.
Having finished filling the dent, the putty is smoothed with a spatula and left to dry. The surface is then sanded using sandpaper.
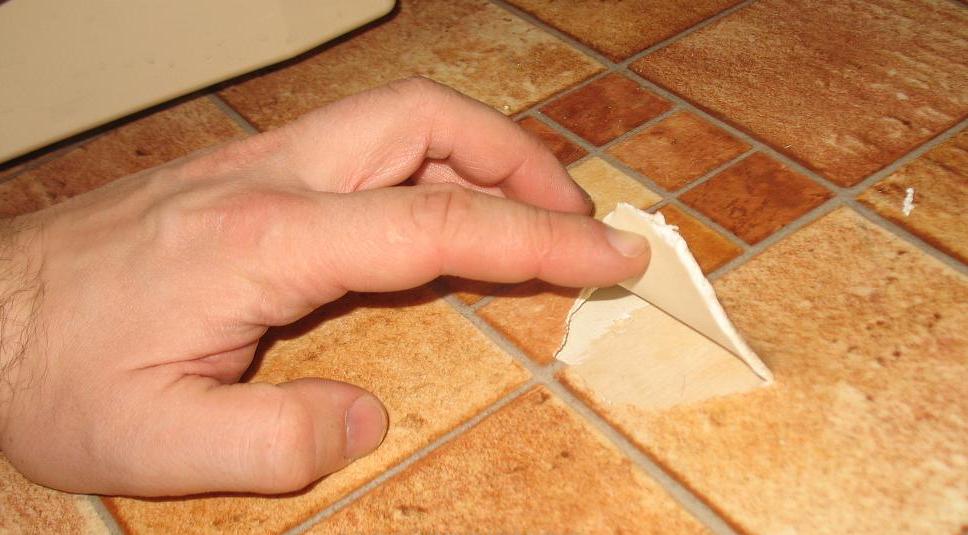
Linoleum is torn: what to do
In this case, C-type PVC glue, the so-called cold welding, will come to the rescue. It has a thick consistency and is close in composition to the polymers used in the production of linoleum. That is why various coating defects can be eliminated in this way.
Repair work begins with preparing the coating:
- clean the area to be repaired;
- pass along the edges of the tears (cuts) with sandpaper to remove burrs. If the break is uneven, a fringe forms along the edges, which is removed with a paint knife;
- The coating at the tear site is carefully lifted, glue is squeezed into the opened space and distributed along the tear. The adhesive composition is thick and will not spread.
- Having pulled it tightly, the treated edges of the linoleum are carefully connected and left to dry;
- It is advisable to additionally fix the damaged area around the edges. For wooden floors, small nails are used, and for concrete floors, thin tape is used;
- after a couple of days, the tape and nails are carefully removed and the surface is cleaned of traces of tape and glue;
- the repaired area is masked with mastic of the appropriate color.
It will be useful

- A small defect, as an option, can be hidden under the original applications in the form of contrasting patches that create some kind of pattern: a rose, a butterfly, etc. Then a special linoleum varnish is applied to these places.
- Small cracks formed at the joints of the coating are filled with hot paraffin. It should be enough to form a convex seam. The frozen seam is carefully cleaned with a dull knife (so as not to accidentally damage the linoleum) and polished with a dry woolen cloth.
- You can try removing stubborn stains with fine sandpaper. In any case, you won’t be able to get the full effect, but the stain will become lighter. It will need to be rubbed with a piece of cloth soaked in vegetable oil, or shoe polish for shoes of the appropriate shade after each wet cleaning floor covering.
- Loose corners can be fixed using polystyrene foam and acetone. Under the detached area, place a small piece of packaging foam, approximately 20x20x20 mm, and apply acetone to it with a pipette - 9-10 drops. When the foam is completely melted, the corner is quickly returned to its place and pressed firmly. It is advisable to press it down with a weight.
If for one reason or another you do not undertake to restore the floor yourself, you can always find a linoleum repair specialist who will solve your problem.
How to repair a hole in linoleum? - a pressing question at all times. Despite the large number of advantages of this floor covering, its strength limit is not unlimited. During installation or use, abrasions and holes may occur. Let's take a closer look at how to deal with this.
The following tools and materials are used for the work:
- A piece of linoleum. Needed to make a patch.
- Metal or wooden plank. For even cutting of material.
- Knife. The blade must be sharp enough and durable. A large utility knife or paint knife are the best options.
- Spatula (rubber), masking tape, brush.
- Glue syringe.
- Consumables for surface preparation and gluing: primer, glue, rosin, mastic, etc.
- Construction hairdryer.
The presented list is intended for different types restoration of linoleum.
Ways to solve the problem
Depending on the damage, the following recovery methods are distinguished:
- Sealing with mastic, cold welding. Suitable for cuts and split seams.
- Installing the patch. Restoration of large torn holes is carried out.
- Elimination of minor scratches and abrasions using mastic and sealants.
For a specific case, a specific operating technology and tool are used. Let's look separately at ways to patch holes.

How to fix a hole in linoleum without a patch
You can get rid of dents and small-diameter holes using special adhesives for linoleum:
PVC glue A-type.

The consistency of the composition is quite liquid, suitable for sealing deep scratches and holes with a diameter of up to 1.5 mm. To avoid staining the adjacent surface, apply masking tape to the defect site. A neat cut is made in it above the hole in the floor covering. The adhesive composition is pumped in with a syringe. Preferably flush with the surface. After hardening, remove the tape. If the glue sticks out above the surface, then carefully cut it off with a knife. For a better effect, the area is rubbed with wax. C-type PVC adhesive is suitable for larger holes. It has a thicker composition. The best option
is used in conjunction with a tint to match the color of the coating. Both compositions are mixed and poured into the hole. In this way, you can restore small holes: a hole from a drill, deep scratches, etc. For bigger size
another technology is used.
Features of filling holes
- Restoration of the floor covering has a number of subtleties: Location of the defect.
- If this is the center of the room, you will have to work hard to disguise the repair site. In corners and under furniture, damage to the linoleum will be less noticeable. Defect scale.
- It is more difficult to repair large areas; patches are indispensable. Availability of a drawing.
With such linoleum, you will have to select several colors for small defects, if there is not a piece left from installing the floor covering.
If you do not immediately repair the hole that appears, it will gradually creep away under mechanical influence. Dirt will accumulate in it, which over time will lead to swelling of the coating and the appearance of unpleasant odors.
This section identifies 4 main problems and ways to solve them:
If the defect occurs near the wall, then most likely the technical clearance was not observed during installation. They unscrew the plinth along three walls, trim the fabric, and leave it to rest for several hours or days, depending on the thickness of the material and the surrounding temperature. The floor covering has straightened out and is being installed back.

If the linoleum is swollen with a bubble in the middle of the room, then neat cuts are made along the swelling on both sides, air is released, and glued with masking tape so that excess glue does not stain the adjacent area. Glue is driven into the holes formed with a syringe, the edges are joined, secured with masking tape, and left under the load.
Blistering of the coating often occurs due to stretching of the canvas. You will need to not only cut the canvas, but also remove its excess. Gluing is carried out similarly to the previous methods.
Joining seams
When installed in large rooms and on thresholds, linoleum connections are often made using cold welding. During use, such seams sometimes come apart. Anyone can seal linoleum on their own. The canvas should be stretched with an overlap of 5 mm. Make a cut in the middle of the resulting mound, grabbing two edges. Perform the operation by applying a flat bar. Remove the cut off excess. Degrease the edges and protect the adjacent surface with masking tape. For this work you will need C-type PVC glue. The edges are processed, glued, and left under pressure. The glue has hardened, the excess is carefully trimmed with a knife, the tape is removed, and the welding area can be treated with wax.

Seal the coal hole
Fixed by installing a patch. The damaged area is cut out on the floor. It is better if the hole is prepared in the form of a regular figure: square, circle, rectangle. If there is any scrap left after installing the floor covering, this is perfect option, otherwise you’ll have to go to the store and select a material that matches the color and pattern (if available). After this, a patch is cut out to fit the resulting hole and tried on. The pattern, size (the patch fits into the cut-out space on the floor, fits tightly to the edges), and the direction of the texture must match.

Protect the edges around the hole with masking tape. The floor in the area of the hole is cleared of debris and treated with a primer. Glue is applied to the patch and glued into the prepared hole. PVA and PVC glue are used. At the repair site, oppression is installed for 2 days. You can restore a burnt hole by showing your design skills. For example, make an applique using fabrics of different colors.
Torn holes
This can be solved by using a patch or by gluing the torn surface in place if the edges at the defect site are even.

Even large holes that appear during operation can be repaired thanks to modern adhesives and ingenuity.
Repairing minor damage
How to repair a small hole in linoleum?- a frequently asked question. Modern market offers a wide range of repair compounds:
- Mastic. Sold as a pencil or paste. A wide range of colors allows you to choose the right option.
- PVC glue for linoleum (cold welding). Allows you to eliminate holes with a diameter of up to 2 mm.
- Wood sealant. Such formulations are available in various color scheme, therefore they are often used to repair minor defects in floor coverings.
- Homemade composition. Made from various components. For example, colorless nail polish and shavings from the top layer of linoleum are used.
Before repairs, the surface is prepared: it is cleaned of debris and degreased. After this, the holes are filled with the selected product.
How to remove scuffs?
Minor scratches and surface damage to linoleum can be eliminated using the following means:
- Wax for linoleum. This coating renewal is carried out if the damage is shallow. They are rubbed with the edge of a coin, eliminating uneven edges. Treat with wax to obtain a uniform glossy surface. But this procedure will have to be repeated periodically.
- Mastic. It is important to choose the required color. You can cover shallow damage with mastic.
- Polish.
This product is used to restore the protective layer of the floor covering.
Such materials will allow you to renew the coating and eliminate abrasions that have arisen due to damage to the protective layer of linoleum.
How to seal linoleum is chosen in a specific case. It largely depends on the type, scale of damage, and financial capabilities. Any chosen method requires a patient and careful attitude. Then the repair site will not have to be additionally masked with carpets and furniture.
Linoleum is a universal and relatively inexpensive floor covering; it is what is most often found on floors. various rooms. Even with the most careful and careful use, damage may occur.
Scuffs, cuts, unevenness, cracks and, of course, holes. They appear from mechanical damage. Such a nuisance can be restored without resorting to the help of craftsmen, right at home.
The hole in the linoleum must be repaired immediately as soon as it is noticed, otherwise its size will increase. Also, such damage can become a source of proliferation of microorganisms, mold and terrible fungus. It will be difficult to fix this.
Required Tools
 To restore the damaged area, you should prepare. The following items will be needed:
- the remainder of the damaged linoleum, the piece should be an area that is enough to make a patch;
- a sharp and hard knife, a cutter will also do;
- device for making a right angle. You can take any corner, wooden or metal;
- any adhesive substance. You will have to use glue or “”, putty will also do.;
- , but not ordinary metal, but made of rubber;
- wide adhesive tape or masking tape, they will be needed for the intermediate stage;
- roller, we will use it when working with adhesive;
It is important to know: When renovations are underway, you should not throw away excess pieces of linoleum. They will come in handy for sealing a torn or burned area.
- a syringe is also very useful for convenient work with glue;
- to heat the material, you need a regular electric hair dryer;
- a piece of hard and dense material, with the help of which the surface will need to be leveled;
- something heavy that will serve as a weight to press down the patched piece.
Repairing minor damage
 To remove a small hole or cut on the floor, you need to prepare an adhesive mixture (putty) or simply buy a ready-made one.
- rosin in crumbly form (as powder);
- container in which the mixture will be prepared. It must be made of porcelain;
- alcohol - one hundred and fifty grams;
- castor oil - one hundred grams.
Rosin is placed in a water bath and heated in a porcelain bowl. After complete melting, its temperature must be reduced to fifty degrees. Next it is mixed with castor oil and alcohol, and then the color pigment is added. It will help to better disguise the damage.
Note: After drying, the putty will become lighter. This factor must be taken into account when adding pigment to the mixture.
We apply the finished mixture to the place where the linoleum is torn or a crack has formed. To make the seam completely invisible, the surface is sanded. Glass plaster is perfect for this.
Masking major damage
 Restoration begins with cutting out a patch; it can be done by anyone geometric shape. But a square or rectangular patch will provide smoother seams.
It should be made larger than the hole itself. Apply a patch over the damage. No matter how the piece moves, it can be temporarily glued with masking tape. Next, using a very sharp knife, cut out a piece of linoleum to the size of the patch.
After this, apply adhesive mass to the cut out part and apply it to the prepared place. We put a load on top, it should stand for at least a couple of days.
This technique will help to perfectly glue the desired part. . The stickers will be almost invisible. To thoroughly study the technique, it is better to first watch videos of similar work.
Burning through different layers
 What to do if you burn through linoleum? This phenomenon often occurs among hookah owners, because it is very easy to do this with charcoal.
But even without a hookah, burns are possible. First of all, it is worth determining the nature of the damage - how deep the damage to the linoleum occurred.
Flooring layers:
- upper protective layer, it is called transparent;
- the layer on which the drawing is applied;
- foamed polyvinyl chloride;
- fiberglass;
- foamed polyvinyl chloride.
Repairing damage to the protective layer
 The hookah coals are soft and in very rare cases they make a hole through them. If during the burn only the top layer of linoleum was affected, then first you need to clean the area of the stain from the burnt edges.
Since the drawing was not damaged, this problem will be practically invisible. But at a certain angle of light it will be slightly noticeable.
Therefore, we take a coin and smooth out the edges of the damage with an edge, and then apply a special mastic for linoleum. Such mastic can be found in any hardware store.
Burn through the pattern and the top layer of polyvinyl chloride
 If the colored base and polyvinyl chloride are damaged, even after cleaning there will be a stain that will have darkened edges and a whitish or yellowish light in the middle. Even one such mark will greatly spoil the entire appearance of the floor covering.
The situation will be corrected by using glue, which is used to fasten the edges of linoleum using the “cold welding” type. But when laying new flooring, type A is used, and for old material, type C adhesive is required.
Finding the right color is not difficult; stores offer a wide range of colors. It will need to be applied to the resulting holes. You can prepare such a pigment yourself.
You should take a piece of linoleum of this type. If there are no residues left, you can cut it in an inconspicuous place, for example under the baseboard. Next, using a sharp knife or blade, you need to remove the crumbs from the colored base.
After mixing it with mastic, we also apply it to the burned part. After complete hardening, the excess is cut off to the same level as the coating. Additionally, you can coat it with wax, but this is not necessary.
If the burn turns out to be through, then you need to make a patch using the above method with regular holes. In conclusion, I would like to note that fixing a hole in linoleum with your own hands is not as difficult as it might initially seem.
Such a nuisance should be removed immediately, because the floor covering is a sealant, and any damage can lead to the formation of fungus and damage to the entire sheet. How to glue cut linoleum, see the following video:
In contact with
See inaccuracies, incomplete or incorrect information? Do you know how to make an article better?
Would you like to suggest photos on the topic for publication?
Please help us make the site better! Leave a message and your contacts in the comments - we will contact you and together we will make the publication better!
Many homeowners, when finishing the floor, have a question about how to glue linoleum end-to-end to make the floor even and more durable.
Today there are many types of floor coverings, but linoleum does not give up its position. This material is one of the most practical and inexpensive. It allows you to do smooth coating with a beautiful shine. But of this material there is an important drawback. It is very rarely possible to make a floor from a solid linoleum sheet, without joints and seams that can ruin appearance. The reason is simple: the size of the canvas depends on standard width roll. This parameter must first be taken into account when choosing a material.
Meanwhile, the probability of choosing a roll of linoleum of the required width is low. Even the tightest and narrow room(with the possible exception of the corridor and small bathrooms) is usually much wider. In addition, joining of sheets is always carried out in difficult places in the apartment: in the area of a doorway, when the layer is damaged, as well as when joining linoleum with the finishing coating of another room, for example, tiles or wood.
But all this is not a reason to be upset, since it is possible to fix the matter yourself, without even resorting to the help of a specialist. It is enough to study the question of how to glue linoleum end-to-end at home, choose the most preferable method and strictly follow the instructions.
Existing gluing methods
Important! It is necessary to decide how to glue linoleum end-to-end already at the installation stage.
It is worth deciding which option is more suitable in a particular situation. There are several methods for gluing linoleum and each of them, in addition to obvious advantages, also has significant disadvantages.
The main connection methods are as follows:
- Double-sided tape. This method is good due to its low price. Doing the docking in this way will not be difficult, even if you do not have the relevant experience. At the same time, the work does not take much time. On the other hand, tape is extremely unreliable, and the joint of the linoleum sheets will still be visible and there is no way to disguise it.
- Using a threshold. The method is more suitable for fastening layers of linoleum in the area of a doorway when moving from a room to another. The threshold looks aesthetically pleasing, prevents the edges of the linoleum from bending, and is also inexpensive. Metal thresholds are produced in different colors, so you can choose one that will be less noticeable and almost indistinguishable in color from the main coating.

In addition, the problem often arises of how to glue linoleum onto felt base end-to-end The threshold in this case is the only one possible variant. Otherwise, using glue will not bring the desired result: the bottom layer will stick, but the top layer will begin to delaminate.
The disadvantage of this method is that the threshold will create a small protrusion above the floor level, which can sometimes be dangerous or simply inconvenient. Moreover, among different color options you need to very accurately select a threshold that matches the color of the linoleum.
There are 2 types of welding used when joining linoleum sheets.
Hot welding allows you to tightly glue linoleum end-to-end. The seam turns out to be practically indistinguishable from the main coating. But this method is quite labor-intensive, and you will also need special tools for the job. It will not be possible to cope with such work without special skills. Equipment for “hot welding” is expensive and also requires certain skills.
Cold welding is more suitable for home use. It is used not only for butt gluing, but also for repairing damaged coatings. It is easy to use, so there is no need to involve professionals in the work. One of the disadvantages: the glue used for work is toxic, so safety rules must be followed when working. You must always wear gloves when working, and the room must be constantly ventilated.
Methods for butt gluing linoleum
Important! Before gluing linoleum end-to-end, you must first prepare the surface.

All debris and dust must be removed from the surface with a broom or vacuum cleaner. If the floor is not very level or has potholes or cracks, they can be filled with putty. If necessary, the floor is covered with a layer of primer.
The cut layers of linoleum are laid out on the floor so that the joints of both sheets coincide. You may need to trim the edges. This can be done using a utility knife or scissors.
The adhesive tape is applied to the floor without removing the protective tape. Carefully remove the paper strip from the adhesive layer, gluing the strips to the floor.

The whole procedure does not take much time, and also does not require special knowledge. But the connection will be fragile in any case, since the tape cannot withstand, for example, moisture. If water gets into the connection and flows under the linoleum, it will gradually begin to collapse. With prolonged use, it gradually loses strength. In addition, in this case the joint between the canvases cannot be masked. If the linoleum sheets are not glued, then when the furniture moves, the sheets will move.
In order for the connection to last as long as possible, the seam must be made good quality, since otherwise dirt will accumulate in the joint.

One of complex issues apartment owners, how to butt-glue felt-based linoleum. This material consists of 2 layers. When gluing, the felt layer is well fixed to the surface, but the top coating gradually begins to deteriorate. One of the best ways gluing such linoleum is the installation of thresholds.
As in the previous case, the edges of the canvases are carefully aligned and, if necessary, trimmed with a knife or scissors. Then you need to select the thresholds. The main parameter is the length, it must match the length of the seam. If the threshold is a little longer, it can be adjusted using a metal saw or jigsaw.
The finished part is applied to the joint and secured with self-tapping screws.
Hot or cold welding?
For those who are thinking about how to glue linoleum end-to-end at home, hot or cold welding is recommended. Which method you ultimately choose is determined by several factors:
- type of linoleum;
- what should the seam be like in the end?
- ability to comply with installation requirements.
For example, “hot welding” allows you to make the seam almost invisible. But this gluing method is not suitable for all types of linoleum: when exposed to household linoleum, it will only melt and lose its attractive appearance. Therefore, such linoleum is used extremely rarely in everyday life, while any of these methods is suitable for gluing coatings on industrial facilities.

Another important point is what the seam configuration should be. A simple seam can also be made by hot welding, but for creating complex contours, appliqués or joining linoleum sheets of different colors and patterns, only cold welding is suitable.
Finally, to obtain the best result, it is necessary to follow the gluing technology. Cold welding is easier, since it does not require special knowledge. For hot welding, you need to have tools (a welding gun with different attachments, special knives and cords). All this equipment is quite expensive, and you need to know how to work with it. Therefore, for domestic conditions, this method of joining seams is simply unprofitable.
Hot welding technology
Using hot welding, you can get a durable and almost invisible seam. The gluing itself should be carried out only when both sheets of linoleum are glued. Hot welding technology is complex, so before starting it is better to watch a video on how to glue linoleum end-to-end.
The sheets of material must be laid so that the joint between them is minimal, and then a small groove is cut with a chisel for the construction cord. All debris and dust are removed from the groove.

The cord needs to be tucked into a special hair dryer, and then connect the hair dryer to the network. When exposed to warm air, the cord expands and fills the entire groove. The linoleum also softens and bonds firmly to the cord.

After processing, a small protrusion from the cord remains above the floor surface; it must be carefully cut off. For this you will need a special knife.
The procedure itself does not seem very complicated. But in reality, in order to perform all the work at the proper level, you must have certain skills. If you perform all the steps yourself, there is a chance that the result will not live up to expectations. Therefore, it is recommended that instead of hot welding, find another way to glue linoleum end-to-end.
Cold seam welding
For cold welding, special glue is used. It dries quickly and reliably glues the joints of the canvases. The glue is packaged in tubes with a long pointed tip, thanks to which it gets deep into the seam. Therefore, liquid glue gives very good strength, because gluing occurs almost at the molecular level.

Due to its structure and gluing quality, cold welding is suitable for all types of linoleum (household, semi-commercial, commercial) and different types of base. Thus, liquid welding can even be used to glue a layer of material onto a foam base, while hot welding in this case is strictly prohibited. Cold welding is good not only for gluing linoleum sheets, but also for repairing coatings.
The undeniable advantage of cold welding is its ease of use. Just watch the video on how to glue linoleum end-to-end using cold welding and you can get to work - general principle will be clear.

The only point is the choice of glue. For cold welding, glue A and C are most often used. The latter is thicker, so it is usually used if it is necessary to repair damage to old linoleum. It almost tightly glues the edges of the linoleum and allows you to get a whole canvas. If the coating is “fresh,” then type A glue is more suitable. It is more liquid, so it acts somewhat differently. Glue A “melts” the sheets, gluing them together. The result is a dense and almost invisible seam.
Important! When working with glue, safety must be observed. The room should be well ventilated, and all work should be done wearing protective gloves. The coating must be cleaned of dust and debris.

The advantage of cold welding is its simplicity and reliability
Scotch tape is applied to the edges of the canvases that do not need to be “melted” - it will protect the linoleum from the effects of glue and will not cause liquid glue spread out. The tape needs to be cut above the joint and glue should be applied inside the seam. It is desirable that the glue protrudes slightly above the surface, no more than 5 mm. Then you need to leave the linoleum for 15 minutes and then remove the tape.
Working with glue C follows the same scheme, but you can watch the video on how to glue linoleum end-to-end using cold welding. The only difference is that there is no need to use tape. Since this glue is thicker, it will not spread beyond the seam.
Linoleum does not have sufficient resistance to mechanical damage. It can be damaged by moving furniture or dropping a sharp object, or burned with a match or cigarette butt. There are many ways to seal a hole in linoleum so that it is not visible.
We choose the repair method depending on the size of the damage. In this article we will look at various technologies restoration of floor coverings with cuts, tears and swelling.
Methods for repairing linoleum
 Large tears are patched
 Linoleum can tear due to various reasons, but there is no need to rush to replace the floor covering with a new one. You can carry out repairs yourself without seeking help from specialists. Let's look at ways to seal linoleum with your own hands:
- small gaps are glued together;
- cuts and joining seams can be sealed with cold welding or mastic;
- Fill small scratches with wax, sealant, mastic;
- We rub away abrasions with wax, selecting a suitable shade;
- To repair large damages, we use a linoleum patch of the same color.
If linoleum is torn, you need to choose the most suitable restoration method for each case. There are many compositions on sale that allow you to repair the coating so that the damaged area is invisible.
Minor repairs
 Sealants will help eliminate minor scratches and chips
Let's look at how to seal torn linoleum in case of minor mechanical damage to the surface. You can repair linoleum using the following compounds:
- Sealants for woodworking. They are able to eliminate minor damage and abrasions.
- Mastics of various shades, we select the most suitable color, repairing the damage on the linoleum.
- Cold welding for linoleum is available in the form of polyvinyl chloride-based adhesive, which is capable of sealing gaps up to 2 mm thick.
- To eliminate small cuts, nail polish, thin layer finishing coating the same structure.
Before starting restoration work, we remove debris and dust from under the covering, and degrease the area on the flooring that will be repaired.
Restoring scuffs
 Damage to the top layer of linoleum, its abrasions and minor scratches can be eliminated using:
- polishes to match the color of the coating, rub the damaged areas;
- rub out small abrasions furniture wax, accurately selecting the shade.
If the work is carried out carefully and the color of the grout is precisely selected, the repaired area will not differ from the main area of the coating.
Cover the burned area
 Burnt areas can only be masked with a patch
We repair linoleum with a hole burned through careless handling of fire. To do this, seal the hole using a patch made of the same material.
Repair sequence:
- We design the damaged area in the form of a geometric figure of the correct shape (circle, square).
- We clean the edges, degrease, and remove dust from under the coating with a vacuum cleaner.
- We select a patch so that the pattern matches, apply it to the damaged area, and cut out a piece of the desired shape.
- Apply the patch adhesive composition below and along the edges. We insert it into the hole, press it down, and leave it under pressure for 48 hours.
Using the above principle, large torn holes can be repaired. If the edges of the tear are even, you can glue them together using the joint-joining method; if they are torn, then you will have to look for a patch made of material with the same structure and pattern.
After completing the repair, there is no need to throw away the remaining materials used; they may be needed to restore damaged areas of the coating.
If the joining seams come apart
You can seal the joints of the coating strips using the “hot” or “cold” method.
 The joints are “welded” hot and cold
 Step-by-step instruction cold joining seams:
- we stretch the two strips to create an overlap of 2 mm, put a metal strip under it for ease of cutting. In the middle of the overlap we cut both strips;
- we throw away the cut strips, stick masking tape along the entire length to the joint, and cut it at the joint;
- Fill the seam with PVC glue using glue gun or a thin tip, peel off the tape after half an hour, wait until the glue has completely hardened.
 Using the hot method, we glue the linoleum joints together using a hair dryer with a special nozzle. To do this, you need to purchase a special cord in advance and expand the joining area to 5 mm.
At the same time, we warm up the cord and quickly (before it cools down) place it inside the seam. The gluing of the ends occurs by vulcanization of the joints, thanks to which the strips form one whole. This method is more reliable, but requires special skills in working with a hair dryer.
Joints sealed using hot method will be properly fastened for a long time. There is no need to neglect repairs, as dirt will get under the coating and moisture will get in, which will lead to the formation of mold and unpleasant odor in room.
Eliminating waves
If the linoleum swells, it means that the technology for laying it was violated. If waves form along the edges of the decking, the size of the covering should be reduced, leaving a compensation gap between the decking and the wall. To learn how to get rid of bloating, watch this video:
Stages of eliminating bloating:
- We remove the baseboards along the walls of the room, trim the covering to the required size.
- We leave the material in a straightened form for 2-3 days so that it can rest.
- After the covering has straightened, we glue it or fix it with skirting boards.
 Having pierced the bulge and released the air, pump glue under the coating.
 Sometimes swelling occurs due to the fact that the coating is excessively stretched due to its insignificant thickness.
When waves form in the center of the room, there are several options for restoring the surface:
- We pierce the small swelling with a needle, release the air from it, smooth it with our hands, fill the hole with glue through a syringe, and press down on the flooring with pressure.
- We cut large waves in the middle with a blade; sometimes you will need to cut off the excess stretched material, release the air, and glue it with masking tape so as not to stain the surface with glue. We apply glue to the joints and fill the seam, then press it down and leave it under the load until it dries completely. For more information about repairing your coating, watch this video:
In order for the floor covering to serve for a long time, it is necessary to select the material during the repair work. of proper quality. The characteristics depending on the coating class can be studied based on the attached table:

By showing skill and accuracy, you can easily restore linoleum so that it will be completely unnoticeable and will save a lot of money cash due to the absence of the need to purchase new flooring materials.


