Artistic painting of ceramics - stencils and sketches. Painting on ceramics: DIY master class with acrylic paints and glaze
To paint on ceramics you will need:
- paints for ceramics (depending on the company and type, they either require baking during high temperature, or they can simply be left to dry, or they need to be varnished);
- contour on ceramics (colorless or colors of your choice. An interesting effect can be achieved by a contour contrasting with the colors of the painting itself; and a strictly black contour will help to create a drawing in the style of pop art or even a scene from a cartoon or comic book, where a thin black stroke line is often necessary) ;
- the item that you will be painting (make sure that it is ceramic and not plastic masquerading as it - this is especially important if you bake the painted item in the oven. The plastic may melt);
- acetone (for degreasing);
- varnish for fixing;
- cotton pads or cotton wool;
- brushes of different thicknesses;
- paper and pencils (plain, soft - preferably 2-3B) for the sketch.
How to paint ceramics:
Whatever design you choose for painting, in order to apply it and end up with a beautiful ceramic product, you first need to prepare its surface. Apply a little acetone to a cotton pad or cotton wool and wipe the ceramic thoroughly. It must be low fat.
After degreasing, try not to touch the surface you will paint with your fingers without gloves - human skin is covered on the outside with an insignificant, imperceptible layer of fat necessary for interaction with environment, but this will be enough for the paints: they will apply worse or not at all.

For some paints, the surface is also primed after degreasing. special mixtures, but this is not always necessary. Paints will stick better on porous ceramics; on glossy ones, you will need to finally seal them with ceramic varnish.
Make a sketch on paper, transfer it to the product, and then dry it as stated in the instructions for your paints - use a hair dryer, just leave it on the duck, bake in the oven; this varies depending on the paints. Then coat, if necessary, with varnish.

If the product needed to be baked, then be sure to ventilate the room after opening the oven, especially if you are going to cook in the same oven. The smell may not be noticeable, but it will remain until aired.
Sketches for ceramics
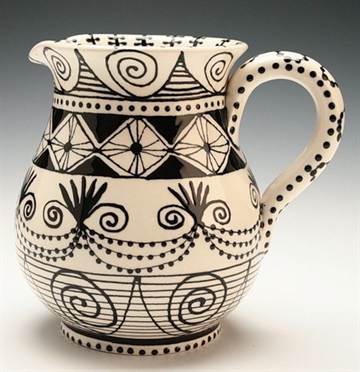
You can draw anything on a plate, cup or dish, but the most popular motifs are, of course, ornaments. One way or another, elements on round surfaces are usually repeated, forming a chain - it consists of colors or Batman profiles, it doesn’t matter. Trace your item on paper, and then distribute the pattern on this blank. For example, these could be grape brushes or monochrome fairy-tale flowers.


Grapes on a plate
For the grape brushes with leaves, use green, yellow and purple paints, as well as a silver outline. Arrange three brushes, consisting of 10-15 grape circles, in a triangle, and fill the space between them along the edge with two leaves in each gap. Add green curly tendrils and outline everything.

Black and white flowers
They can be used to paint any ceramic products. Achieve similarities with real flowers not required, just use your own taste. Such flowers usually do not have leaves, they stand on tall thin legs and look like either peonies or dandelions. Use thin, strict lines, “fill” the petals not with color, but with patterns, and place the flowers not close to each other, as if they were growing in natural conditions. Be sure to add black dots around the flowers - they will look like either dandelion seeds or small fairy lights.
 How to make a Kupavka doll

Ceramics and utensils are an important part kitchen interior and their appearance actually has great value in shaping your mood. Agree, breakfast will be much nicer if it is served in beautiful painted plates or cups.
Let's look at a few master classes for beginners that will help you use acrylic paints to transform your ordinary plain plates into small works of art with your own hands.
We will look at 3 main techniques for painting ceramics with acrylic: plates, cups and mugs using a stencil, as well as beautiful combination marker and paint.
We talked about it in this article!
How to hang 6 ways
- Once you have finished using the ceramic marker, I say cover it with a lid, even if it’s a short break from work. The tip may become clogged, but this can be avoided.
- Markers should be stored horizontally.
- It is important to put place the dishes in an unheated oven and heat them up, when she's already there. Otherwise, it may crack due to a sudden temperature change.
- Acrylic translucent paints, so they are best used on white or light-colored porcelain.
- If you want the paint to become less transparent, mix it with white.
Acrylic paint is resistant to washing (both manual and dishwasher) and microwave oven.
Please note that this paint is non-toxic. However, we do not recommend using it on surfaces that come into direct contact with food.
Master class No. 1: painting with black acrylic on a white plate
For this master class you will not need a lot of acrylic paints, just one color is enough. But ceramics painted in this way will not look any less impressive.

Materials:
- cups, ceramic plates, saucers (it is best to use porcelain or earthenware),
- tassel,
- black acrylic paint Pebeo Porcelaine 150 (or similar),
- damp cloth or towel.

Painting technology: 
- At first practice drawing on paper so that you don’t have to make unnecessary adjustments to the dishes later. But if there is a mistake on the dishes, it can be corrected with a damp cloth.
- Apply the design to the dishes. These could be flowers, stars, polka dots, small lines, or anything else that comes to your mind.
- Translucent paint, so for a clearer pattern, apply more than one coat.
- Leave dry for 24 hours.
- After this time has passed, set place the dishes in a cool oven, set the temperature to 150° C. When the oven has warmed up to the set temperature, leave to bake.
- When the time is up, turn off the oven and let the dishes cool before removing.
- The result is beautiful dishes that only you have!


Master class No. 2: painting mugs and cups with acrylic paint
A fairly simple drawing will be used here, which does not require special artistic skills, so all you need is desire, materials and a little time.

Materials:
- white cup (mug) and saucer (ceramic or porcelain),
- marker Pebeo Porcelaine 150,
- several colors of acrylic paints (blue, sapphire, white, rainbow colors),
- one or two brushes,
- palette for mixing paints (you can use a plate),
- several cotton swabs (to correct mistakes),
- alcohol or glass cleaner, a regular kitchen stove.

Painting technology:
- First you need alcohol or window cleaner Clean ceramics and dishes from fingerprints or grease.
- We draw raindrops on the cup and saucer (except for the center of the saucer where the cup is placed), that is, their outlines. Draw a rainbow in the center of the saucer.
- Thus, it turns out that when the cup is on the saucer, the rainbow will not be visible, but when the cup is lifted from the saucer for tea, there will be a pleasant little surprise, rainbow in the literal and figurative sense of the word. Remember that the paint dries in 5-10 seconds.

TIP: If you have never used a marker before, you need to make the paint start to flow out of it. To do this, you need to shake it for about 30 seconds, and then press the tip onto a sheet of paper until the paint begins to flow. Once the paint has gone, you can start painting.
- Use a medium sized brush to paint the raindrops. Use blue paint. You can paint right away with the paint in the bottle, or you can add a little water so that the color is not so saturated. Do not shake the paint, this may create bubbles which will reduce the quality of the painting.


If you have gone a little beyond the contours and the paint has not yet dried, this can be corrected with a cotton swab or napkin. If the paint has already dried, first moisten a cotton swab with alcohol, and only then correct the mistake. If you made a big mistake when drawing and you want to start over, then wash the dishes under warm water or wipe with alcohol and let it dry thoroughly before starting to paint again.

- These paints mix well with each other, so you can paint some of the droplets with blue, then mix with sapphire and paint the rest. You can paint some of them with just paint, or often with paint mixed with water.
- It is important to wash and dry your brush well when switching to each new paint color.


- After you finish drawing the raindrops, move on to the rainbow. To do this, use a very thin brush so that the design is neat and does not go beyond the contours.
- Remember that green can be obtained by mixing yellow and blue, and orange by mixing red and yellow.
- The drawing is already finished, but this dish is not ready for use yet. Leave to dry for 24 hours.
- After this time, place the dishes in a cool oven, set the temperature to 150° C. When the oven warms up to the set temperature, set the timer for 30 minutes and leave to bake. When the time is up, turn off the oven and let the dishes cool before removing.
- That's it now. You can enjoy your tea!

In general, with the help of these same tools you can draw any other picture that appears in your imagination.

Master class No. 3: Painting a plate using a stencil
If you are worried that you won’t be able to immediately draw something on a plate, then a stencil can help you. It is also useful if you want to make a set of dishes from several identical plates or cups, then a stencil will help save time and achieve identity.

There is one trick worth knowing about this method: the stencil must be removed before the paint begins to dry, since it can then be removed with part of the paint.
Materials:
- porcelain, ceramic plates or even paper,
- acrylic paint,
- stationery knife,
- contact paper for stencil,
- brushes,
- oven.

Manufacturing stages:
- You can draw the stencils yourself or you can take one already ready-made drawings and print them out on contact paper.
- Place patterned contact paper on a plate.
- Carefully cut out the design with a utility knife.
- Using a brush, apply paint to the plate inside the stencil. If you mixed paints and different colors, make sure you get enough paint for all the plates so that they all look the same.


- Leave to dry for 24 hours.
- After this time, place the dishes in a cool oven, set the temperature to 150° C.
- When the oven reaches the set temperature, set the timer for 30 minutes and leave to bake. When the time is up, turn off the oven and let the dishes cool before removing.


The set of dishes is ready!
All dishes painted with these paints can be used for food. But it can also be used in room decoration. Either way, she's beautiful and unique!
Ideas for painting ceramics
Below are some ideas and designs for ceramic tableware decor and inspiration. Such plates self made- this is a birthday or Valentine's Day.


Stencils for painting
The easiest way to paint is, of course, a stencil. If you really don’t know how to draw or don’t like to draw, take a ready-made drawing, print it out, cut it out and attach it to a plate with tape. Paint it in the desired color.
Here are the simplest and most popular stencils for plates.
Do-it-yourself plate painting is a creative activity that is accessible to both experienced and novice decorators. After all, the technique is very easy to master, does not require the purchase of expensive materials, waste of time and effort, so you do not have to be afraid of losing interest in the process. And hand-painting on glass and ceramics can become your permanent hobby, a method of relaxation, or even a hand-made business on Internet sites like the Crafts Fair or Etsy.
In this material we will look at the following methods and techniques for painting plates with your own hands, which are suitable for beginners:
- Painting using stencils and templates;
- Artistic hand painted plate;
- Stained glass painting.
Master class No. 1: chiseled plate painting
Dot painting of plates (pique or point to point) is a technique of drawing and creating contours with dots, thanks to which you can achieve the effect of chasing, inlay with stones, colored rhinestones or beadwork. In the photo below you can take note of successful combinations of colors and patterns (scroll the photo to the right).


Here are ideas for decorating bowls using the pique technique.

To work you will need:
- Cotton pads for degreasing and cotton swabs for correcting unsuccessful patterns;
- Ethyl alcohol, nail polish remover or special degreaser;
- Contour acrylic paints in the desired colors;
- Aerosol varnish to fix and protect the design;
- A needle and paper for cleaning tubes.
Adviсe:
- If you want to use plates for their intended purpose, then choose baked acrylic paints labeled dishwasher ability or dishwasher resistant. Durable contour paints can be found in the Hobby Line brands Kreul, Decola, Marabu and Pebeo Vitrail.
- The paints should not be too thick or too thin. You can check this in the following way: press on the tube - if the paint comes out easily, but in a puddle, then the consistency is too liquid; if it is difficult to squeeze out, then it is too thick. Before starting work, you need to test each tube, since different colors paints of the same type can have different consistencies.
- You can make dots with a small thin brush, needle or toothpick, using acrylic ceramic paints in regular jars if you find painting from tubes difficult.

Drawing technique
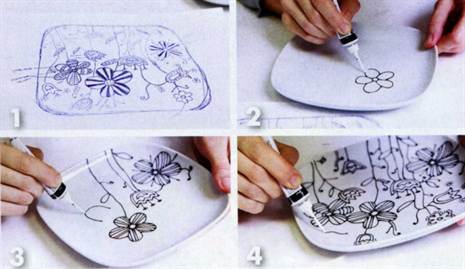
The first thing you need to do is degrease the surface well with alcohol or a degreaser using a cotton pad and only then start getting creative. Experienced craftsmen can draw directly on a plate, without using any sketches or markings, inventing patterns right as they work. You too can trust the free flight of thoughts and improvise. But if you want to realize a certain artistic idea, then it is better to first draw a sketch, template, stencil or marking, having thought through color scheme and ornaments.

For painting on glass, it is convenient to use templates that can be glued to the back of the plate.

Tip for beginners: before you paint the plate, practice putting small, medium and small dots on paper. large size at the same distance from each other with the same pressure and pressure on the tube.

- The main rules: in one line there must be points of the same size, and the same distance must be maintained between the points, and it is very important that it (the distance) be minimal, that is, such that the points are “readable”, but do not merge into a continuous outline ;
- Remember that the larger the dots, the greater the distance between them can be. And vice versa, the smaller the points, the smaller the indentation from each other should be;
- You need to draw according to the principle from general to specific, that is, starting with large contours and ending with drawing small details.
After work, the paint should harden. There are three ways to dry them:
- Naturally for 1 day - if you want to use the plate rarely or even use it only as a decorative item.
- Dry with a hairdryer, and then leave the paint to harden for 10-12 hours. naturally.
- Bake at a temperature of 150-170 degrees for half an hour, and then, without removing from the oven, let the dishes cool - in case you want to eat from painted plates. It is advisable not to wash painted dishes for 20 days after firing - this way the paint will last longer.
After the paint on the decorative plate has dried, you can seal it with varnish.
Master class No. 2: painting plates using stencils and templates
Another method that anyone can master is painting dishes using stencils and templates.

To work you will need:
- Acrylic paints for glass and ceramics or felt-tip pens for painting dishes, which come in different colors and rod thicknesses. In Russia you can most often find markers from Marabu;
- Artistic synthetic brushes suitable sizes(if necessary) or a sponge for tamping;
- Nail polish remover, alcohol or degreaser and cotton pads for degreasing;
- Everything you need to draw and cut out a stencil or template: paper, cutter, pencil.
Drawing technique
First, you need to draw or print a ready-made stencil/template yourself, and then use a utility knife to cut out the required holes. Perhaps, in this technique, only this stage can be called labor-intensive. Then everything is much simpler: degrease the surface and glue the template to the bottom with tape.

Then we paint over/stamp the design using the stencil. Then you can place accents on your picture, draw details or contours.


If you were drawing acrylic paints, then you can dry them naturally, with a hairdryer or in the oven according to the recommendations of the first master class on dot painting of plates.
Master class No. 3: Artistic painting by hand with brushes
Painting plates traditional way, that is, with brushes and paints - this best way write a real masterpiece.
To work you will need:
- Artistic synthetic brushes different forms and sizes;
- Acrylic paints for glass and ceramics or baked stained glass paints on water based;
- Tip: stained glass paints are more transparent and, at the same time, brighter, but they are a little more difficult to work with due to their liquid consistency and ability to spread over the surface, so they are often used in combination with contour paints that contain them. Also, keep in mind that solvent-based stained glass paints are not suitable for painting plates that will be used for their intended purpose.
- Any degreaser.
Drawing technique
First you need to write the underpainting, that is, draw large parts of the composition, which will be its basis. Next, add volume and depth to the design using dark and light colors. And then start drawing the details. At the end of the work, use the recommendations for fixing paint from the first master class.

Adviсe:
- Mix paints and play with undertones to create unusual colors and effects.
- Painting a ceramic plate with a matte glaze will be easier than painting on glossy ceramics or glass, since the paint will apply more densely and evenly.
These are simple, but interesting ideas for painting plates with brushes and acrylic paints with your own hands for beginner artists (scroll the photo to the right).


For those who have the skill and experience of drawing, we invite you to be inspired by the following selection of photos of painted plates.


Here's a great idea for painting saucers and plates from old tea sets.

Master class No. 4: painting on ceramics and glass with markers
Drawing with markers and felt-tip pens is familiar to all of us from childhood. With the help of special markers for painting dishes with your own hands, you can quickly and easily decorate ceramic plate inscriptions, as well as depict a graphic and very detailed picture. We look at examples of such decor in the following selection of photos.


To work you will need:
- Any degreaser and cotton pads;
- Felt pens of different colors and thickness of the rod.
Painting technique
- Before you start painting on dishes, do not forget to degrease the surface.
- The main rule is to try to draw the lines and contours of the drawing with small, frequent strokes - this way you are less likely to make a mistake.
- Also try to draw from the general to the specific.

- Preliminarily outline the contours of the drawing; if necessary, use a template or stencil.
- Most markers dry in 24 hours, do not require burning, and are dishwasher safe.

Video tutorial: stained glass painting on glass

And finally, it was the turn of stained glass plate painting. This is a slightly more complex technique for painting on dishes due to the paint itself - as already noted, stained glass paints are liquid, and therefore they are often used to fill contours. They are also more transparent, glossy and less durable than acrylic. If you want to use “stained glass” plates, then choose only water-based paints, and upon completion of work, bake the dishes in the oven at a temperature of 170 degrees. If you want to hang a painted dish on the wall, then you can choose non-solvent-based paints and, in this case, do not forget to purchase varnish to fix the design.
Ordinary boring dishes sold in chain stores can easily be turned into designer sets. All you need is some acrylic paints, brushes and, of course, inspiration. Let’s try to master painting on ceramics, and our master class will help you quickly master this activity.
Ceramics is one of the most simple materials for painting with paints. Special acrylic paints are usually used to apply patterns, but contours, various three-dimensional adhesives to create three-dimensional images, or special markers can also be used. If the dishes will not be used for their intended purpose, but will simply stand on the shelf, then the design can be applied even with ordinary gouache or even nail polish.
Learn beautiful painting on ceramics in a master class
For “Painting with stains” you will need:- white or light ceramic mug
- nail polish remover or acetone
- cotton pads and swabs (for degreasing the surface and correcting the pattern)
- 2-3 bottles of nail polish (you can even use old and thickened ones)
- any container with warm water (for example, an ordinary plastic container)
- toothpicks
- napkins
1) The surface of the mug must be thoroughly washed and wiped with nail polish remover or acetone.
2) Add nail polish to a container with warm water. The color of our product will depend on its quantity: the more varnish, the richer the pattern will be. If you are using several colors of varnish, add the second one after the first one, then the third one.
3) Use a toothpick to gently stir the resulting mixture.
4) We lower the cup into the container with the mixture - the surface of the product will instantly begin to be covered with drawings with watercolor stains. Please note that the top edge of the mug should remain unpainted.

5)The drawing can be corrected using nail polish remover and cotton swabs. Leave the workpiece to dry for three hours.
6) If desired, the dried drawing can be supplemented with patterns made with contour paints, sparkles, etc. A stylish cup is ready to take its place of honor on dining table! To prevent damage to the design, such products should only be washed by hand, and also do not put such dishes in a microwave oven.

You can decorate not only mugs yourself, but also other utensils, such as plates. The art of dot technique requires more time and effort than “painting with stains,” but the result is worth it.
To dot painting a plate you will need:- plain ceramic plate
- squared notebook paper or graph paper
- scotch
- scissors
- acrylic paints - it is best to use a special contour, because it has a denser texture and is convenient to squeeze out of the tube drop by drop
- brushes
After varnishing we will have decorative plate, it will no longer be possible to eat from it. If you want to use it in the kitchen, then you need to choose special acrylic paints for baking; they do not need varnish.
Master class “Dot painting of plates”:1) The plate must be washed thoroughly, then thoroughly dry the surface and degrease it - wipe with acetone or nail polish remover.
2) Now we need to choose the pattern that we will apply to the glass. Beginners can take inspiration from examples on the World Wide Web or use the pictures from this master class.
3) We make stencils out of paper and glue them onto a plate with tape. Experienced craftsmen may not use any templates, but draw straight from their heads, but in order for the pattern to be neat and symmetrical, it is better to play it safe.
4) First you need to practice a little technique for applying dots on a draft, and you can start painting.
5) We continue to paint the plate with acrylic paints, adding new colors and making additional types stencils if necessary.
6) If you see that some point looks “crooked”, you can immediately correct it with a dry cotton swab. If the paint has already hardened, you will have to use a stick soaked in solvent. For particularly fine points, you can use toothpicks.
7) Our hand-painted plate is ready!
And, of course, one cannot ignore dishes decorated in the traditional style: Khokhloma, Gzhel, Zhostovo... Such images look more like real paintings than ordinary patterns, so it’s better to start with them already having experience in painting on ceramics.
To paint a plate using the Gzhel technique you will need:- white ceramic plate
- simple pencil
- acetone (can be replaced with nail polish remover)
- acrylic blue and white paints
- brushes
1) Thoroughly wash and degrease the surface of the ceramic plate.
2) Using a simple pencil, sketch a drawing - flowers, leaves, fairy-tale birds.

3) After practicing on paper, we begin painting in the Gzhel style, combining dark blue and light blue strokes.
4) Let the paint dry. Ready! The painted plate can be coated with a special glaze to secure the design.
Video on the topic of the article
For greater clarity, we suggest watching the following videos, which demonstrate the process of artistic painting on ceramics in stages.
Those who like to draw should master painting on ceramics. The master class will tell novice craftsmen what materials and tools they will need for work, and will also tell about general stages performing painting. There are various types and methods of painting on ceramics, many of which were known back in the Middle Ages. Dishes decorated with bright and interesting painting, always looks alive and new, and a drawing made in the author’s style can tell a lot about the master and his artistic vision.

Even children and those adults who don’t know how to draw or think they don’t can do painting can practice painting. Today's hobby and craft stores offer a variety of materials, tools, templates and gadgets that will make creative process not only pleasant, but also convenient.
What is needed
Before you start painting, you need to prepare everything necessary materials and tools.

First of all, this paints and brushes. Most often, painting on ceramics is done with water-based acrylic paints. If desired, the finished craft can be coated acrylic varnish For better protection and greater paint fixation. In addition, you can use contour paints, which are well suited for spot painting and finishing the finished work.

For products intended for food products, it is recommended to use special baked paints. Paintings made with such paints must be fired in special ovens at 800 degrees. After this, you can eat from the painted dishes calmly and safely, without worrying about the safety of the painting and your health.
Natural brushes, such as squirrel brushes or synthetic brushes with soft bristles, are suitable for painting.
Better stock up on brushes different sizes, so that you can paint both large details and the background, and draw small elements of the picture.
You will also need drawing or template. If the author draws well and is not deprived of imagination, then you can do without a finished image. Beginners can buy or make stencils.


You should start with simple drawings and patterns, using only paint and brushes. In the future, you can choose more “branchy” patterns of ornaments or complex plot pictures. A combination of several painting techniques using different additional materials and experimenting with colors and paints can turn a hobby into an art.

In addition to paints and brushes, you will also need:
- liquid for degreasing the surface - alcohol, nail polish remover, vinegar;
- cotton pads;
- carbon copy for transferring drawings;
- soft pencil;
- scotch;
- acrylic varnish.
Work progress
There are various techniques painting on ceramics. This can be simple dot painting using templates or complex artistic designs done by hand. It all depends on the wishes and imagination of the author. You can paint ceramic or clay dishes coated with a glossy or matte glaze - dishes, mugs, teapots, pots, etc. Let's look at how to make a painting using the example of a cup and plate.
Painting begins with the selection of a suitable drawing as a template. To decide on a stencil, you need to choose the style of the future craft. It can be strict geometric pattern, abstraction, ethnic ornament, plot. For inspiration, you should look at a few photos of painted dishes.


The mug is usually small in size and has a rounded shape, which must be taken into account when choosing a design. On the cup you can depict fruits, animals, scenes, as well as rounded patterns and ornaments in the form of a border.


Stencils and design templates for a mug can be like this:


The plate gives more freedom for creativity, as it is quite large in size and flat in shape. On a plate, just like on a piece of paper, you can depict anything you want. These can be either ornaments or entire scenes made by hand by the master. The peculiarity of the painting is that the image and patterns must be inscribed in a circle.
Here are some examples of plate templates:


Don’t forget about folk art - Gzhel, which looks very good on ceramic plates. To make such a painting, it is enough to transfer the pattern you like through carbon paper (outline the lines) or redraw it by hand.
Before you start painting a ceramic surface, it is recommended to practice making Gzhel patterns on paper with gouache. Use a brush to make broad strokes of blue and white paint to create flower petals.

Gzhel patterns on a plate can be like this:


So, art painting for ceramics is performed as follows:
- Degrease the surface using a cotton pad soaked in alcohol or nail polish remover;
- Attach the stencil to the ceramic piece with tape or transfer the outline drawing to the surface using carbon paper (you can also draw it by hand);

- Start painting the background and large details of the transferred drawing with a brush and paints, adhering to the outlined contours;


- Draw small details using a thin brush, outline or marker;


- Leave the craft to dry (about 24 hours);
- Coat with protective acrylic varnish if desired.
Depending on the painting method and the master’s ideas, the stages may be adjusted. For example, if you plan to do dot painting, then you can start immediately along the contours after transferring the drawing to the surface and not paint the image with acrylic. You can also outline all the elements before painting.

It’s always a pleasure to make a beautiful and at the same time useful, functional thing with your own hands. Having mastered painting on ceramics, you can create unique and original table sets, tea sets, surprise and delight your loved ones.


