Finishing a wooden arch. Decorating the arch with decorative stone
Decorative stone is an excellent material for finishing both building facades and interiors. This material is easy to process, cut and drill.
He is easy to work with. However, to obtain an aesthetically good result, it is necessary to strictly follow the cladding technology.
Tools
First, let's prepare the tool.
You will need:
- Construction mixer
- Construction level
- Cutting machine or cutting machine
- Spatula
- Bucket
- Metal brush
- Paint brushes
- Rubber mallet
- Trowel
- Construction tape
- Grout syringe
- Household spray bottle
- Wooden or plastic wedges of the same thickness
Consumables – making the right choice

You will also need consumables:
- Adhesive for decorative stone
Our advice is that when purchasing glue, carefully read what is written on its packaging. The instructions must accurately indicate its properties.
For gluing decorative stones of different weights, there are different types of glue. Therefore, first choose a decorative stone that suits you, then buy glue, and not vice versa.
Price in this case plays a secondary role, the main thing is quality.

Finishing arches with decorative stone suggests that in addition to laying the stone on a vertical surface, you will also need to cover the vault. In this case, a pull-out force will constantly act on the glued stone.
Therefore, following all recommendations for choosing the right glue are especially important.
Important - when carrying out work on installing decorative stone at an ambient temperature below +5 degrees, it is necessary to use a certain brand of glue. Consider all this when choosing.
You will also need:
- Grout of a suitable color
- Primer

Our reference is a water repellent, a water-repellent composition for concrete.
Small addition. Many may have a question: what is the difference between hydrophobization and waterproofing?

The fact is that when waterproofing the walls are protected from moisture, but in turn they do not breathe. Hydrophobization not only protects walls from moisture, but also allows them to breathe.
Decorative stone finishing
Step one - surface preparation
The first and very important stage is competent and correct surface preparation.

Before laying decorative stone on the wall, it is necessary to carry out preliminary preparations:
- Remove remnants of old whitewash, paint or wallpaper
- The walls must be leveled using putty
- Prime the wall and arch. The primer holds together small particles of the wall and on such a surface any finish holds stronger
Our information is that primers for all surfaces are currently on sale. Choose what you need based on the material of your walls.
Concrete walls, especially monolithic ones, must be treated with a special adhesive primer “Betonokontakt”. At elevated temperatures or high humidity of the surrounding air, it is recommended to moisten the back side of the decorative stone with water.
Drywall arch - rules for stone finishing
Someone will be interested in how to finish decorative stone plasterboard arch:
- When laying decorative stone on drywall, it is recommended to use light grades of stone.
- In addition, decorative stone can only be laid on gypsum boards indoors.
- If your plasterboard arch is located under a canopy and outdoors, you cannot cover it with decorative stone.
The surface of moisture-resistant gypsum board must be treated with a primer, after which it is necessary to allow the sheet to dry. Only after this can you begin installation.
It is convenient to apply the primer using a roller. At the same time, do not forget to prime both the outer and inner surfaces of the arch.
Proper preparation of stone tiles for laying

Do not rush to lay decorative tiles right away:
- Mix stone from different packages.
- Next, lay the stone on the floor.
- Select the position of individual stones so that its texture looks as advantageous as possible.
For example, distribute it according to the shades of the color difference or place short and long elements in the masonry so that masonry looked more natural.
Checking the stone - what is important to know
Before laying, make sure that there is no thin foamy layer, the so-called cement laitance, on the back of the tile.
If you find it, you need to clean the back with a wire brush. Do it.
Our information is that the presence of cement laitance significantly impairs adhesion. Your tile will simply fall off.
In a bucket, strictly following the instructions on the package, dilute the glue. Using a mixer, mix it thoroughly.
The mixture should be homogeneous:
- Using a spatula, apply a layer of adhesive to the wall where the tiles are installed.
- Also apply a layer of adhesive mass on the back side of the stone with a spatula.
- Each layer, whether on a wall or on a tile, should be 5 – 10 mm.
Our advice - don't apply too much thick layer glue, this may cause the decorative stone to slide off the wall.

Important - the glue must completely cover the back side of the tile without voids. This recommendation also applies to the wall, on which glue is also applied. Everything should be covered in an even layer.
Internal voids can lead to the formation of condensation inside the masonry.
We lay the stone ourselves - competently and efficiently
So:
- Place the tile in the desired location and press lightly.
- Further using building level Use a rubber mallet to level the stone.
- Move it from side to side until it fits well against the wall.
Our advice is that finishing arches with decorative stone requires high-quality masonry. Therefore, during installation, tap the surface of the stone with the handle of a screwdriver.
This way you can determine if there are voids inside. If they are found, the stone must be dismantled, the glue cleaned off and re-laid.
- Additionally, tap the surface of the stone with a mallet. If any glue comes out around the edges, remove it with a spatula.
At the same time, if there is glue left on the ends of the stone, you should not remove it, this way you will achieve better adhesion of the stone not only to the wall, but also to each other. Decorating arches with decorative stone in an apartment (see Arch in an apartment: transformation into a decorative structure) presupposes high-quality adhesion of the tiles to each other.
Masonry with jointing
There are two types of laying artificial stone:
- With jointing
- No seams
Decorating the arch with decorative stone with jointing is one of interesting options design. If you need just such a laying, you need to use wooden or plastic wedges during the laying process.
Select wedges of the thickness you require. After the glue has dried, the wedges can be removed and the seams can be started.
Joining the seams of decorative stone is no less important stage work when finishing an arch or just a wall with decorative stone. The entire final result of such painstaking work depends on its competent and careful execution.
Grouting joints
The gaps between decorative stones should be filled with a special grout using a syringe.

So:
- Fill the syringe with grout solution
- Squeeze it out slowly and carefully fill all the seams.
- It is recommended to fill the joints with grout so that it goes 3 - 4 mm inside the outer edge of the stone. This way you will achieve a pronounced relief of the masonry.
- If you need to get a smoothed texture of the masonry, you can fill the joint with grout at the same level as the face of the stone.

- After the solution begins to set, this is about 30 minutes, it must be smoothed out with a spatula or a special shaped spatula for jointing.
Our reference is that the time range we indicated is 30 minutes.
It all depends on the specific grout you purchased. Read the instructions carefully and carry out all work according to the manufacturer's instructions.
There is a large selection of grouts on sale that imitate the color and texture of real mortar. You can choose the grout different colors and shade, according to your taste and the requirements of the intended design.
We cover the arch - “correct” chips
Finishing arches in an apartment with decorative stone suggests that the stone will need to be cut to the required size. Many may have a question: how to decorate an arch with decorative stone without finishing the walls with stone?
It is necessary to understand that a trimmed smooth edge of a stone at the junction of masonry and a smooth, unlined wall will not look entirely natural and beautiful.

A more acceptable result would be when the stone laid along the edges has various chips. This will create the impression of naturalness and the effect will be more natural.

Decorative chips are quite easy to make using sawing and cutting tools.
To perform the correct chipping you must proceed as follows:
- Using a knife, outline the main outlines of the future chip
- All excess is bit off using pliers

Our advice is that you shouldn’t try to bite off the mark right away. You need to start from the edge, biting off a small piece.
Thus, everything unnecessary is removed according to the mark made. Otherwise, the stone may break in a completely inappropriate place.

- Chip areas are corrected using a knife or file
- Subsequently, to give the chips a smoother shape, they are processed using sandpaper
- If desired or required by the design, chips may not be smoothed out. Everything is at your discretion
Decor – the finish line

Upon completion of the masonry, small defects may remain, chips in unnecessary places, abrasions, end cuts and not entirely correct color matches.
All this can be easily fixed with an airbrush. In this case, it will take you less than an hour for your masonry to take on its finished form.
The airbrush mixture is:
- Tinting paste
- Water
- Acrylic varnish
To give the stone the greatest relief and expressiveness, a finishing spray is applied to its surface with an airbrush. In this case, it is necessary to apply spraying in such a way that the airbrush is at an oblique angle relative to the surface to be finished.

The color of the coating should be slightly darker than the color of the stone itself. If you want to get an unusual effect, you can add special metallic pigments, gold or bronze, to the mixture.
But you need to understand that this coating must be used in limited quantities, preferably at the ends of the stone.
Under normal conditions, this shine will be practically invisible. But when direct rays of the sun or directed light hit it, your decorative stone will “come to life” and begin to sparkle. different colors just as it happens in nature.
Our advice is that after completing the decorative finishing and applying the finishing spray, we recommend that you coat the masonry acrylic varnish.
This recommendation is relevant in active zones. Arches are just one of these zones. This will protect the coating from scuffs.
Use clear, matte or semi-matte varnish on water based. It can be applied using an airbrush or spray gun.
Finishing the arches with decorative stone will add a unique and truly memorable look to your interior.
Our resource has enough various videos and photos of material on design and ways to implement it. With us you can learn a lot of new things and get acquainted with the advice of specialists that will be useful to you when performing certain types of finishing works.
Good luck to you!
Among the most popular elements for finishing openings, the arched corner should be noted. Security element, which at the same time performs the function of decoration, is manufactured in two types: metal and plastic.
Installation is not difficult, but has features that a person doing the work with his own hands should know. So, let's look at how to finish an arch with a plastic corner.
Important function of arched corners
The finishing corner has been used for many years to simplify repair work. It allows you to form corners and also protect the doorway. The main advantage of arched corners is the possibility of extending the service life of the finish, since with them the wallpaper will not break off at the corners and the paint will not be erased.
And if during the installation of an interior arch you need to plaster a corner made of chipboard or plasterboard, then an aluminum corner will allow you to display 90 degrees. Any home corner is subject to external influence, especially for arched openings - rearranging furniture or regular Saturday cleaning can damage it. There is a solution - glue a decorative corner.
Important! A perforated corner provides a smooth edge for a curved design. At the same time, the consumption of putties is reduced.
Thanks to perforation, the corner can be framed not only with clear lines, it can be folded in and out various shapes. The soft curved element provides the opportunity to design not only square or rounded arches into classic style, but also to create semi-arches, as well as openings with non-standard bends. Arch corners have the following advantages:
- Affordable price.
- Practical - can be used in most interior solutions.
- Finish – produced in a wide range of colors.
- Install decorative elements won't be difficult.
Necessary tool

The plastic corner for the interior arch must be properly secured. For this purpose, a list of such tools is prepared in advance:
- Plastic element to match the style of the room.
- Assembly adhesive.
- Liquid nails will help attach the element.
- Rubber mallet.
Important! Gluing decor using liquid nails is simple, but risky. Firstly, the plastic can be damaged, and secondly, a large amount of material used leaves greasy marks on the finish.
Attach bent corner it is best to use mounting adhesive or liquid nails, since installation using metal nails or screws looks ridiculous, and also increases the chances of cracks and chips.
Drywall is one of the most common materials for creating interior portals. It is lightweight, attached to the frame and makes it possible to draw internal and external radius corners. Since the material requires subsequent cladding, corners are used for ease of design. Glue for installation - putty.
Finishing an arch with a plastic corner (video)
Installation of decorative corners
Any apartment will look much more impressive if it has edging existing arches will be framed using plastic corners. Therefore, let's look at how to glue a plastic corner to an interior arch and make the frame durable and reliable.
There are two needs to use a PVC part: to glue and remove a right angle, or to paste over an arc. Condition for creating right angles:
- Surface treatment with a penetrating primer solution.
- Use a square to mark, mark and cut to the required size with a grinder.
- Apply the adhesive mixture to two inner planes of the element.
- Apply the strip, gently pressing it along its entire length.

The flexible corner for the arcuate arch is fixed in a slightly different way. Photos and videos will help beginners understand the differences and features of installation. Installing such an element yourself will be no more difficult than the previous option, but pay attention to the following nuances:
- The width of the sides of the corner when finishing the arc varies. The wide side is laid on the end corner of the arch, and the narrow side is pressed against the wall.
- Silicone sealant or adhesive solution is applied to the element, as in the first case.
- You need to fasten it with several nails - a necessary measure, since the hot solution must completely set.
- Instead of nails, it is allowed to use masking tape - it secures the edge of the plastic corner.

Important! It is prohibited to use a home or construction hair dryer to speed up drying, especially if photo wallpaper or paint is used for the walls.
Corners for interior arches are easy to glue onto wallpaper. The finishing material quickly sets with glue and allows you to test your strength the very next day. But if you want to cover an arch with an MDF corner, then use these tips:
- This type does not require additional fixation, but after applying glue to the corner and pressing it to the surface, wait a couple of seconds and then peel off the element again.
- After waiting for the glue to thicken, you can safely return it to its place. Usually 1-2 minutes is enough.
It is better to use a wooden corner for arched openings made of the same material. It is difficult to bend, so you can glue it on straight planes. Ideal use is rectangular portals where there is no round element.

Interesting! Among the abundance of finishing elements, you can choose cork, rubberized, rubber corners. A rolled and flexible rubber corner is simply necessary in places where water hitting the surface makes it slippery. These can be glued to tiles and concrete if necessary.
It is also possible to cover the arch using ordinary plastic corners, but in this case the elastic threshold will be much smaller. In order to bend the product without damaging it to the right size, you should heat the material with a hair dryer.
For decorative design arches and walls, polyurethane and polyurethane foam are used - in this case, all surfaces must be smooth. If there are small differences, then you need to glue the elements together by gently pressing and increasing the amount of glue in these places.
Photo gallery of finished works


How to frame and trim the edges of an arch, photo
Whatever the arch is made of, it becomes a real decoration of the room only after decorative cladding. Therefore, let's talk about how to decorate an arch with your own hands and what materials can be used for this.
If you ordered project development in construction company, then its specialists had to do everything in accordance with the overall design concept of the apartment. If you made the structure yourself, then you will also have to decide what to cover it with.
Arches are used not only in doorways, but also to decorate niches in the wall or to give unique design windows (see). And in each case, different requirements are imposed on decorative finishing.
Here we will talk about interior arches, which, compared to others, experience the maximum load. And that means them too decorative cladding should have higher strength.

Painted arches of original design, photo
IN lately designers are increasingly offering instead of doorways in country houses and install arches in apartments (see). They allow you not to divide your home into rooms, but to create a single space, divided into zones only conditionally.
Increasingly, new building projects feature studio apartments that combine functional areas such as an entrance hall, kitchen, dining room and living room. And increasingly, such redevelopment is being done in old houses.
And an arched opening is the most attractive option for simultaneously combining and separating these zones.

Manufacturers of building materials have long responded to this trend. A variety of materials for cladding arches have appeared on sale. Among them are ready-made wooden products, and MDF arches, and polyurethane baguettes, and various components made of artificial and natural stone - locks, blocks, arch extensions, etc.
For self-made In arched structures, plasterboard is most often used, so those who do the repairs with their own hands.
The easiest way is to carefully level the surface and paint it or. Modern paint compositions, like wallpaper, have any desired texture and can withstand cleaning and washing.
But if you don’t want to limit yourself to such classic types of finishes, you can use:
- decorative stone/brick
- tile or ceramic tiles
- mirrors
- mosaic
- textile
- traffic jam
- decorative plaster
I would especially like to note that the most vulnerable point of an arched opening is its corners. Especially if they are not protected by a hard finish, but are covered with wallpaper or painted. Over time, the wallpaper at the joint may begin to peel off, giving the opening an untidy appearance.
Fortunately, the manufacturers also took care of how to finish the corners of the arch in order to protect them from mechanical damage and give the opening an aesthetic appearance. These are special plastic arched corners with different shelf widths.
The most convenient and common size is 10x20 mm. The wider side of the corner is glued to the inner surface, and the narrow side to the facade.
Liquid nails are used as glue. Complex shape requires pressing the corner against the surface for a long time so that it sticks well along its entire length. Therefore, it is secured with masking tape for 12–18 hours until the glue completely sets.
Arch finishing
Finished trim for arches
If you want the decorative trim of the arches to look professional and solid, order ready-made interior arches made of solid wood or MDF. Opening in plasterboard wall in this case, you need to accurately correlate with the dimensions of the finish.

Such arches are especially popular among finishers, as they resemble the lining of an opening with platbands and perfectly protect all structural elements from chips, scratches and dirt. But making such an arch yourself is difficult.
Another option is polyurethane arches. What is good about this material is its flexibility, which allows you to smooth small irregularities, and the ability to paint it in any color. You can purchase separately racks, arches, locks, decorative panels and decorate the arch with them yourself.

Self-finishing of arches with cork
Today, great importance is given to the use of environmentally friendly materials in finishing natural materials. One of them is cork. In many houses, floors and walls are finished with it, and the decorative finishing of an arch with cork is also no exception.
This material is available in panels and rolls; there is also cork wallpaper. It is these, as well as the rolled cork, that should be used for.
The easiest way to work is with cork wallpaper on a self-adhesive basis. If you haven’t found any, buy a roll cork and contact or acrylic glue.

So:
- Before you start finishing, the walls need to be puttied, dry and level well, as the surface must be perfect.
- Decorating the door arches with cork resembles a regular wallpaper sticker. The glue is applied to the wall, the underside of the cork covering, after which you need to wait a little for the composition to set, and then begin gluing.
- The coating is glued end-to-end, without cracks or gaps. In this case, you need to make sure that there are no air bubbles left underneath.
- The cork covering can be moved along the wall until the glue hardens, but it’s better to immediately try to apply it correctly and press it.
Important! If the arch is located in a room with high humidity, for example, in the kitchen, you need to choose for finishing cork materials, coated with wax, which will repel moisture from the surface. For better durability, the cork can be varnished after installation.
How to decorate an arch with tiles or stone
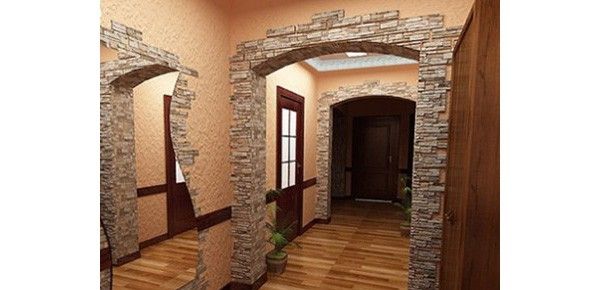
Decorating the arch with artificial stone will look harmonious in country or eco-style interiors. This type of finishing looks best when not only the opening, but also part of the wall around it is lined with stone.
This cladding can be symmetrical or asymmetrical, smoothly transitioning from one arch to another, as in the picture below. In any case, arches trimmed with stone look very impressive and original.
Let us describe the technology of lining arched openings with decorative artificial or natural stone. For this, it is best to use narrow tiles, the front surface of which can have any texture and color of your choice. For example, it could be an imitation of sandstone, marble or brick.
Attention! Keep in mind that materials for finishing plasterboard arches should be light.
So:
- For good adhesion of the tiles to the surface, it must be plastered, primed, and then notched.
- Prepare according to instructions cement mortar. In addition to cement, it should include lime, glue and sand.
Although some types of cladding can also be attached to liquid nails. - If you want the stone trim of the arches to not require sealing external corners, the tiles should be glued overlapping. To do this, the first tile must be glued close to the opening, and in the second row - with an inward shift by the thickness of the product. This is how you need to continue: in each odd row align the edge of the tile with the border of the opening, and in each even one - glue it with an overlap.
- Having reached the rounding of the arch, first try on the tiles dry to the opening and mark the cut line on the back side, drawing a pencil along the arc.
- You need to run a construction knife along the drawn line several times, then break off the unnecessary part of the tile with pliers, and smooth out the unevenness with a file.
- When you're done with the wall cladding, you can start gluing the opening. Don't forget to overlap the decorative stone here too. If necessary, cut the tiles to length. Use a regular hacksaw if the base of the tile is gypsum, or circular saw(cement).
- The seams are sealed within 24 hours. This is done with a special solution, very carefully so as not to stain or break the stone.
The finishing of the arch with tiles - ceramic or tiled - occurs somewhat differently. Here it is necessary to cut the edges of the tiles at 45 degrees to form a beautiful and even angle. Not every master can do this efficiently, so it is better to entrust such work to a professional.
Of course, you can use a special plastic element to finish the corners. however, such DIY arch finishing will look rustic and cheap.
Application of decorative plaster
Finishing features
- Its advantages: easy and simple application, durability.
- Disadvantages of decorative plaster: restoration is difficult, the relief is difficult to wash or clean.

We attach the corners (made of aluminum or PVC with mesh) under the plaster.
To decorate with decorative plaster, we will need relief rollers or stamps.

Plaster finishing tool
Note that using ready-made slow-drying mixtures will make the work easier: we will have time to make a relief on the wet plaster.
Work order
- Distribute the mixture over the surface - the instructions will indicate the thickness of the layer (but more than 1.5 cm).
- Now we create a relief using relief rollers or stamps. By the way, rollers save us material and time, unlike stamps.
- Then we prime the dried relief.
After 20 hours we paint according to a special scheme:
- to emphasize the relief, first apply dark paint with a roller with a longer pile;
- second layer: apply light paint with a roller with a shorter pile or a rubber one - now only the tops of the relief are painted.
Other finishing options

The greatest difficulty in decorating arches is their vaulted part. For it, you need to use elastic, bendable materials or have remarkable patience and accuracy in order to line the arch with small or very narrow parts that will ideally follow all the curves.
This could be, for example, finishing an arch with mosaics. It looks luxurious, but requires great skill. If you do not feel the talent of a professional finisher, make the arch not the classic semicircular shape, but in the form of a trapezoid or other broken figure.
Even fractures of this design will not make you rack your brains for a long time about what can be used to decorate the arch - choose any materials. It can be wooden or plastic lining, parquet or laminated board, cork panels and all the materials already listed above.
When renovating a new apartment, its final appearance occupies a special place, so everything needs to be calculated down to the smallest detail. To give your apartment an attractive appearance, you should beautifully decorate its walls. A lot is used for this different materials However, the most popular of them is drywall. With its help you can make both smooth and boring walls and ceilings, and various shapes on the ceiling and walls. Inside the apartment, a plasterboard arch is popular, which is often installed above the doorway. A plasterboard arch will perfectly decorate a boring, acute-angled apartment into a cozy and cheerful, round box, where you can take a great break from everything and everyone. After finishing the walls with plasterboard, you will have to brighten it up with something to add brightness and aesthetic appearance to the material. So, we will tell you below how to decorate a plasterboard arch in order to achieve exactly this effect.
What is this article about?
Finish options
As you know, there are two types of arches: round and square. The former are well suited for apartments, and the latter for dachas or country houses. But it can be the other way around, it just all depends on the style of the interior. For some strict designs, a square arch is perfect, and for relaxed and cheerful styles, a round arch is the best option.
Finishing the arch with your own hands will take a lot of effort and time, but in the end you will get a home where you want to live forever. Doing this with drywall is not so difficult, because, as you know, drywall is a universal material that can be finished by any methods used for finishing walls. Moreover, the popularity statistics finishing materials for drywall is the same as for the walls themselves, but we will only touch on the most popular of them. According to our observations, the consumer is inclined to choose: wallpaper, paint, decorative stone and decorative plaster as a finishing material for a plasterboard arch.
Wallpaper
Learn how to wallpaper an arch below. This option for finishing the arch is the most affordable for the consumer. Another benefit is the wide range of prints and designs available, making wallpaper perhaps the most creative finishing option for your arch. In this case, you can choose one wallpaper for the arch and another for the rest of the room to highlight it, but the main thing here is not to overdo it with highlighting the structure, that is, you cannot choose minimalist wallpaper for the room and, for example, photo wallpaper with a picture of the sea. This means that one should smoothly flow into the other, i.e. the wallpaper can be different, but with the same design style.
Advice for installing wallpaper on an arch. When decorating the outer part of the arch with wallpaper, you should slightly bend the wallpaper inward and, stepping back from the corner literally a millimeter, cut off the unnecessary piece. Having done this on both outer sides, you should stick the wallpaper on the inside of the arch. If you do everything following this advice, then the joints on the wallpaper will look a little more natural, because there won’t be that random white stripe between the sheets of wallpaper.
It is very important to level the surface on which the wallpaper will be pasted to achieve an aesthetic appearance of the wallpaper pattern. This is done with ordinary putty. To save mortar, you can only putty the joints of plasterboard plates, since the rest of this material is often perfectly smooth.
Let's talk about the disadvantages. Yes, we have washable wallpaper, thick wallpaper with a supposedly long lifespan, but this does not change the fact that the period of operation of any wallpaper, no matter how much it is praised by the manufacturer or seller, is still short. Often, it lasts about 2-4 years with careful use and proper care.
Dye

So, the second most popular option is painting the arch. Here you can show your individuality and paint your own unique ornament, design or inscription, the main thing is to have good imagination and paint brushes, and do not forget that the skills of an artist are not the last thing in this matter, and if you do not have this gift, then it is better to call a specialist.
But if, unfortunately, you don’t have any of the above, then you can simply buy paint and tools, and then paint each room with monotonous and boring paint. To highlight the arch, and this is important, otherwise why did you make it at all, you can do beautiful painting on the inner and outer parts of the arch using a stencil and spray paint. By choosing a suitable color background for this painting, you can easily stun any guest in your home.
Naturally, painting has its drawbacks. Firstly, this is the price, because a can of good paint can cost a lot of money and it won’t be enough money to cover the whole house with such paint or it will cost a pretty penny. Secondly, at such a price, these paints can be easily damaged by children or you if liquids, colored pencils, pens, paints, etc. accidentally come into contact with it.
Decorative plaster

This material can be used to design a plasterboard arch, and it is important to take into account the design of the entire room so that the arch stands out, but not too much, otherwise it will feel like the arch was taken from another apartment and simply moved to yours. When using decorative plaster, many householders make columns from it. Yes, it’s beautiful, but not always, because these columns in the classical style will not fit into the Art Nouveau style, so you need to carefully weigh the pros and cons before making a decision on columns. After all, their list of applications does not end with them, for example, an excellent replacement The same columns can be decorated with small or large ornaments that do not go out of fashion, because classics cannot become outdated.
One of the disadvantages of this solution may be fragility and tendency to crack. But this can happen when purchasing low-quality material or improper installation. Otherwise, this material is very good: it is durable, not too expensive, and suits almost all interior styles. Although intended for use in the yard or for exterior finishing Houses.
Decorative stone

To decorate the arch beautifully, you can also use decorative stone, which is perfectly attached to any surface using construction adhesive. It is not recommended to use heavy material as a working material. natural stone, because a plasterboard structure cannot boast such a high load-carrying capacity to hold all the power and beauty of natural decorative stone. So use substitutes that imitate it well. They can be made from a variety of materials.
One of the disadvantages of this finishing material is its complexity of installation, because laying it out takes a lot of time and effort, like all others it requires a lot of attention and accurate calculation. Another drawback is the price. Decorative stone is truly almost the most expensive of finishing materials. But the greatest advantage of such a stone is its appearance, it’s not for nothing that it costs so much money.
Mosaic

Another good option for decorating an arch in an apartment. Practical and unpretentious, also suitable for wet rooms.
What should not be used to cover a plasterboard arch?
There are materials that are not recommended for finishing an arch. One of them is decorative plastic panels. They have many disadvantages in relation to the decoration of arches. For example, it is difficult to install due to the fact that there are a lot of corners in the arch, so you will have to install a huge number of skirting board corners and do not forget about the frame for the plastic panels. And besides, plastic always creates a feeling of cheapness, by the way, it is so, because plastic panels are very cheap. But this is not a reason to use them for a plasterboard arch.
Another material that should not be used for decoration is wood paneling. The main reason for failure is the low flexibility of the wood, which makes it impossible to finish the inside of the plasterboard arch.
Let's talk a little about square arches. From the name it is clear that this type of arch does not have roundness; instead, there are slats installed at an angle of 45˚. So for this type of arches you can use both wood and plastic. In addition, all previously used finishing elements (wallpaper, paint, decorative plaster and decorative stone) can be used to decorate a square arch. The only thing we do not recommend is finishing the arch with decorative plastic panels.
Arch angles
This question is quite natural, since most people, when installing finishing materials, are not accustomed to counting on a specialist and do everything themselves; they always have to think: “What to do with the corners of the arch?” But this is not a problem, because you can simply paint the corners the same color as its surroundings. For example, gray or black is suitable for decorative stone. For wallpapers, we have already given you advice above in the section about them. When painting an arch, the corners do not need to be additional processing. And when decorating with plaster, you don’t need to think about corners at all.

Also, there is an option to stick it on the corners of the arch plastic corners, after which they can be painted or left white. The corners will protect the arch from damage if you accidentally hit it with something, and such precedents will certainly occur.
Good luck with your renovation!
Unlike the usual interior doors, plasterboard arches look solemn, visually raise the ceilings and expand the space of the apartment. The plasticity of this building material allows you to cut out oval reliefs and all sorts of smooth curves from it, which complement the interior so beautifully. About various plasterboard arches, their features and design functions will be discussed later in the article.
Features of plasterboard arches in the interior
Drywall arches are three-dimensional structures that decorate openings between rooms in private houses, apartments, cafes, galleries, theaters, educational institutions and churches. They can be of different diameters, narrow or occupying almost the entire wall, simple or unusual shapes.
The basis of the arch is a metal frame to which curved drywall is attached. To give the material its shape, factory processing is used (production of arched blanks of the GKLA brand), as well as dry and wet bending of initially flat sheets. In the first case, cuts are made, in the second, the drywall is soaked in water, bent and dried in this form under a press.
The positive aspects of plasterboard arches are their aesthetics, ease of installation and low cost (compared to concrete, brick, and wood). Among the disadvantages, low resistance to humidity can be noted. In some cases, the disadvantage may be that the arched opening in the wall remains open, which means drafts, extraneous sounds, odors, and light will penetrate through it.

What forms exist
Reminiscent of ancient temples and Renaissance palaces, vaulted passages add sublimity to the interior. They are great for visual zoning of hallways, corridors, landings, living rooms, and reception rooms. Large quantity geometric shapes, which can be given to drywall, provides the opportunity to choose ideal option for any type of interior.
Round arches made of plasterboard
Round and semicircular arches will harmoniously complement the classical, Greek, Byzantine, and Victorian styles. They should be decorated with plaster stucco, gold or silver ornaments, and the side parts should be made in the form of columns. The finish should be plain, white or a color very close to it.


Rectangular arches made of plasterboard
Such portals are very similar to doorways. This good choice for minimalistic and modern interior. They can be part of partitions with shelves located on the sides, and, if necessary, even closed with sliding screens.

Elliptical arches made of plasterboard
Arches made of plasterboard, the upper part of which is made in the shape of half a horizontal ellipse, are suitable for rooms with low ceilings (from 2.5 m). They fit well into styles such as modern, Provence, loft, country - you just need to find the appropriate frame.


Arabic / Oriental plasterboard arches
The eastern openings look like pointed domes. This type of arches is typical for India, Turkey and all Muslim countries. As an addition, jagged and wavy reliefs and complex miniature patterns in rich colors are possible.


Trapezoidal plasterboard arches
Arches with geometric angles look good surrounded by wood and stone, because these materials do not allow smooth bends. They are especially good for country houses, offices, pubs and libraries.

Curly arches made of plasterboard
Fantasy soft reliefs can become the highlight of an interior made in a futuristic, romantic or playful style. By the way, a plasterboard arch can not only decorate an opening in the wall, but also serve as a decorative frame around a niche.


Finishing plasterboard arches
After giving the plasterboard arch the desired shape, applying basic putty and primer, its appearance can be significantly improved with the help of decor. There are a great variety of finishing options, and among them you can choose any that suits the price and aesthetic qualities.
Painting
Alkyd enamel will help achieve a glossy effect, and water-emulsion and water-dispersion compositions will provide a matte surface.


painting
To apply drawings to the arch, you can use stencils, and if you have artistic talent, you can do them by hand. Techniques and materials in this case are limited only by the imagination of the master.

Stucco molding and PVC decor
Stucco molding, as well as inexpensive polystyrene foam products in the form of various figures and lace, will help instantly decorate any arch. Due to their low weight, they are easily glued to the plasterboard base.


Wallpaper
Wallpapering is one of the most available ways finishing of arched structures. It will only require greater skill and accuracy than smooth walls- so that the seams are not visible.

Decorative stone
Natural or artificial stone will perfectly frame the opening, giving the interior a luxurious and complete look.


Wood veneer
The unique cut pattern of expensive tree species on a plasterboard arch will make a simple interior look elite with minimal financial costs.

Stained glass, glass, mirrors
Decorative slots can be filled with translucent or reflective inserts. This design looks elegant and creates beautiful game rays.


How to make a plasterboard arch with your own hands
To carry out the installation of the arch you will need the following materials:
— drywall (beginners should choose an already curved arched one (GKLA);
- metal or wooden profiles, plywood;
- screws, dowels;
- putty, primer.
Tools should be prepared measuring instruments(carpenter's square, tape measure), large compass, pencil, drywall knife, metal cutting scissors, screwdriver, fine sandpaper for polishing edges, spatula, personal protective equipment.

Stages of work
1) Design. Based on the parameters of the room and the design idea, it is necessary to accurately determine the dimensions and relief of the future structure.
2) Calculation of materials. It is better to take more drywall and consumables than required. This way, in case of accidental damage, you can safely continue installation.
3) Cutting and fastening of profiles. The result should be a kind of frame suitable in width. TO concrete wall They must first be attached to dowels, and then fixed with self-tapping screws. Optimal distance between screws - 10-15 cm.
4) Cutting out plasterboard blanks, giving them a curved shape. You can clearly see this process in the video.
5) Sheathing of the frame. The diameter and length of the screws should be selected depending on the thickness of the sheets. After screwing in, their caps should be flush with the drywall so as not to create unnecessary unevenness.
6) Strengthening the structure. To do this, a curved metal profile is attached to the outer edges of the arch.
7) Alignment. At this stage, you need to smooth out the roughness, putty the surface and prepare it for finishing.

Design of plasterboard arches - photo
Our gallery presents the most interesting and vivid examples of what plasterboard arches might look like in the interior. For convenience, they are grouped by different types premises. After looking at the pictures, you will certainly find inspiring design options for yourself!
Drywall arches in the living room


Drywall arches in the hallway/corridor


