Decoupage of old flat thin radiators. Decoupage of heating radiators with napkins: do-it-yourself video, photo radiators, how to make cast iron ones, paper master class
You have renovated your apartment, but decided to keep the old heating system. But in general modern interior The radiators don't fit. What to do?
You can purchase decorative frames for radiators. A you can decorate your old battery and finish it yourself, that is, an old thing.
Conditions for starting work
For finishing you need:
- Wish.
- Old battery.
- Upgrade option.
Decoupage options
There are many options for decorating yours, but the most common, reliable and proven are:
- Taping old batteries.
- Drawing on radiators.
- Applying stucco.
Pasting
Paste You can use napkins, stickers, favorite images from magazines, stickers on rice paper. When the necessary pictures suitable for the area of pasting have been found, you need to prepare:
- Sandpaper.
- PVA glue.
- White enamel paint.
- Brushes for gluing and painting.
- The pictures themselves.
- Heat-resistant colorless varnish.
First you need to rinse the heating device. IN cast iron radiators even need to be washed hard to reach places. Then thoroughly sand the battery to achieve a smooth surface without roughness or gouges.
Then apply heat-resistant white paint (or a different color to suit your taste) with a brush. Let it dry for a day. Then we begin to decorate the battery with our own hands. If you chose colored napkins, then:

Read also: How to cover radiators with plasterboard
Your new-old batteries are decorated.
Drawing
 For finishing in the form of applying drawings you need:
- Acrylic paints
- Brushes.
Technology:
- Cleaning the battery.
- We paint the background.
- We apply the drawing.
- Cover with varnish.
You can decorate radiators in the form of drawings with your own hands or use special stencils for applying flowers, butterflies, and patterns. Choose paint colors to match the color of your room.
In today's article, we will talk about decorating metal surfaces with our own hands. Many craftswomen who are interested in decoupage, having tried different ways decorating objects, are in search of new ideas for creativity. Decoupage on metal can be one of them.
Having decided to do decoupage on metal, the selected surfaces must first of all be degreased and sanded. These processes are required for better adhesion of the primer to the plane. If rust is detected on the surface, it is treated with a special cleaning agent, which can be purchased at specialized hardware stores.
 In the next step, you will need to prime the metal surface. Here you can use special remedy with a gypsum base, which can subsequently prevent peeling of the decor. Acrylic-based paints are not suitable for priming metal products. Many needlewomen use water-based emulsion as a primer.
The primer should be applied in several layers with intermediate sanding with light pressure. To apply the primer, use a sponge, since using a brush for this purpose can cause the paint to coagulate, causing it to simply peel off the surface.
Metal surfaces are usually coated with two or more layers of primer, depending on what item you have chosen for decoupage. When your choice falls on a tea box or a pastry box, it is noticeable that they have already been coated with colorful layers, which may later appear. In this case, you need to remove all the motifs using acetone and sandpaper.
The situation is more complicated with old teapots and cans. It is quite difficult to remove paint from such metal surfaces. Here you can try to make decoupage on an uncleaned item. It is worth working with a small area on the selected product. This way you can understand whether decoupage on metal will work without first removing the paint layer and simply degreasing the surface. If there is rust, do not forget to use a special cleaner. But still, the main condition under which decoupage is carried out on metal is sanding and priming of one or another metal plane. After which the product is already coated with paint and decorated using selected images from a napkin, card or printout.
Video: Decoupage on a metal jug
Master class on decoupage on a heating radiator
 In the practical part of our article, we will walk you through a master class that will help you make decoupage of a heating radiator with your own hands. For beginners, this lesson is equipped step by step photos, illustrating the technological process.
So, for work you need to prepare:
- decorative item - heating radiators;
- sandpaper;
- enamel white with a matte effect;
- rice paper with a suitable theme;
- tassels;
- acrylic based paints;
- PVA glue;
- varnish resistant to temperature changes.
Before decoupaging the battery, its surface is thoroughly washed and lightly sanded. After performing these steps, wipe the battery again to remove any dust residue. Do not use nitro enamel for work. In cases where the previous paint layer was oil-based, nitro painting may form bubbles on the surface.
Drying of the paint occurs within twelve or eighteen hours.


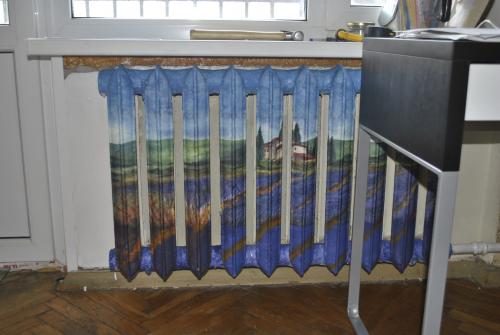
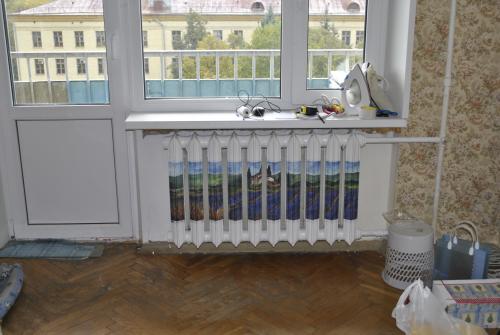
This master class for decoupage of a heating radiator chose a plot in the Provence style, applied to rice paper, the size of which is thirty-four by one hundred centimeters. Since the battery being decorated has irregularities, it is necessary to first measure the width of the fragments. As a result, the paper is drawn into nine-centimeter sections on the reverse side and cut.
 Having decided on the area where the pattern will be fixed, the plot is glued to the center of the radiator.
For work, you can use either a special glue for decoupage or PVA, previously diluted with water in a one-to-one ratio. Start gluing from the center of the picture, gradually moving towards its borders.
After the plot is fixed, you need to draw. At this stage, you will need to select suitable shades of paint for the chosen motif and draw some areas in order to more clearly highlight the image and the battery decoupage itself.
 Decoupage of the heating radiator is coming to an end. Upon completion of all work on the dried surface, you need to apply heat-resistant varnish. This will help protect your work and extend its lifespan. In the photo you can view the finished result. So, using a simple master class for beginners as a basis, you can try to decorate a heating radiator with your own hands.

Video: Decorating the battery with decoupage
In continuing to study the technology of decorating interior items, we invite you to study decoupage on metal, using different surfaces. So in a simple way You can easily transform home radiators or other metal objects. Just select the appropriate image and get to work. To help you, we have put together several training lessons with photographs for beginners, where you can step by step follow the entire process of decorating these products.


This master class for beginners offers you a simple and easy way, which helps you quickly decoupage the battery.
To transform a heating radiator in any of your rooms, prepare:
- in three layers (select images and color combinations, matching the style to your interior);
- scissors;
- PVA glue.
Before using napkins in decoupage, take an iron and carefully iron them. Next, try them on the battery and cut them into strips, as in the photo. Now, take PVA glue and dilute it with water in a one to one ratio.
Then, take the prepared strips of napkins and with your own hands separate their first layer, on which the design you want is directly applied. This image is glued to the surface of the battery. Then give free rein to your imagination, you can stop at the intermediate stage and decoupage the battery up to half, or continue and apply the motif along the entire length of the sections, as in the photo.


As a result, to decorate such a radiator containing ten sections, you will need twelve napkins.
At the final stage, cover the decoupage of the battery with several layers acrylic varnish.


The following small master class demonstrates the decoupage of a battery that has more modern look and shape. In addition, such a flat surface is much easier to work with.
Necessary items for decoupage on the metal surface of the battery:
- the battery itself;
- primer for metal surfaces;
- white paint suitable for painting batteries;
- sandpaper of different sizes;
- PVA glue;
- napkins.
Decoupage on metal and the master class begins with surface preparation. To do this, you need to sand off the previous layer of paint. After this, prime the surface and leave the battery to dry.


The easiest way to decorate such a heating radiator with decoupage is using a file. Experienced decoupage artists have already appreciated the benefits of such an item in this type of needlework. So, the top image of the napkin is transferred to the entire plane of the product using a file. Following this, the slats are also decorated. After applying the image, the top of the drawings are covered with glue. Next, the product is dried. The remaining parts of the napkin along the edges are sanded. And on last stage, such decoupage for metal is coated with varnish to securely fix the image.


Master class on decoupage coffee jars
Another lesson will help you turn the ordinary metal surface of a coffee jar into a wonderful decorative item that will fit seamlessly into the interior of any kitchen.
 To make such decoupage on metal, you should prepare the following materials and tools:
- coffee tin;
- acrylic-based paints in two contrasting shades;
- special decoupage glue;
- craquelure varnish (one-step);
- varnish with a glossy structure for coating;
- napkins for decoupage with a specific motif;
- brush;
- scissors;
- sandpaper.
At the first stage, the master class begins to grout the surface of the can using sandpaper. This is necessary for better adhesion of the surface and paint. Don't forget to wipe the jar so that there are no dust particles on it.
Next, the surface is covered with acrylic-based paint. Here you independently select the desired shade, the color of which will determine future cracks obtained using craquelure. This master class uses paint brown tone. After applying it, leave the metal surface to dry. Drying time will be approximately twenty minutes.
Take a wide brush and use it to apply varnish intended for one-step craquelure over the entire surface of the jar. Alternatively, you can varnish only those areas where you plan to get cracks. Please note that the size of the cracks depends on the thickness of the craquelure layer. Denser layers will help you get larger cracks. Allow the surface to dry for twenty minutes. After this, apply paint in the specific direction in which you want the cracks to appear. Try to work with the brush carefully and carefully applying an even layer. Repeatedly applying paint in the same place may result in the craquelure failing. Now leave the item to dry as usual or speed up the process by using a hairdryer.


It's time for decoupage. Take a prepared napkin and separate the top layer with a color picture from it. You must tear out the motifs you need with your own hands or cut them out using scissors. Attach the resulting fragments to the jar and, using careful movements of the brush, apply glue on top of them, moving from the middle of the picture to its borders. There should be enough glue so that the motif can move freely along the plane of the jar. The folds that formed while fixing the pattern can be eliminated by expelling the air from them and carefully smoothing them out with your own hands.
 At the last stage, a glossy acrylic-based varnish is applied to the resulting decoupage on metal. This completes the master class. The photo shows what an interesting vintage-style coffee jar we end up with.
Video: Decoration of batteries and metal surfaces
Do-it-yourself decoupage of a heating battery (photo and video)
If translated literally from French decoupage technique, then this will mean an action such as cutting. Drawing conclusions, we can say with confidence that decoupage is almost the same as appliqué from different materials. Such an interesting technique as decoupage is aimed at decorating various objects with your own hands.
On at the moment, decoupage paste all kinds of pictures or napkins, various kinds surfaces and planes, and then cover them with varnish. It is also used to paint walls and ceilings in rooms.
In this article, we will consider a method of applying decoupage to metal objects, or rather decoupage on metal, with interesting tips and step-by-step photos for beginners. 


Metal surface coating technique

Before you start decorating using the decoupage technique on a metal surface, you should know how to properly process the surface. First of all, when creating decoupage for metal, you should sand the object and wipe it with a rust remover, and then apply a primer or water-based paint. Only after such manipulations do you paint the product with acrylic paint. If you want to get a cracked effect, add a little PVA glue to the acrylic. After this, as your craft dries, cracks will form on it. At the very end of the work, the entire surface of your product is covered with more than one layer of varnish.
There is another way to decoupage metal. The craft is covered with primer, and then it is sanded and decoration continues as described above in the text. If you use a primer that is made with gypsum base, paint can be saved a little. Also used for iron objects car paint in small cans. It is easy to apply and lays down in an even layer, and dries quickly.
Heating battery decor
Basically, in our apartments, heating radiators have a slightly unesthetic appearance. Of course, you can make repairs and replace all metal surfaces with your own hands with more modern radiators that have a beautiful shell. Since such work is costly and time-consuming, you can get out of this situation using battery decoupage. 
Work such as decoupage on metal is not too difficult, but it will take your patience and work. In this article, a master class will be offered, which is intended for beginners. Here is a list of materials that will be useful during work:
- decoupage cards;
- glue;
- acrylic paints;
- decoupage varnish;
- light-colored enamel;
- sandpaper;
- brush.
The first stage of battery decoupage, which the master class recommends, is to thoroughly wash the batteries and then sand them. Don't try to remove the entire paint layer, just try to make the surface smooth. 
Wash the battery again with your own hands and wait for it to dry. Now, we begin to paint the battery with white enamel, as shown in the photo. At this time, you need to open the balcony and windows, as this paint has a strong smell. 
While your batteries are drying, you need to prepare decoupage cards. Measure the size of the battery and draw a pattern to cut out. 
We glue the drawing so that it is located in the center of the battery, as in the photo. 
PVA glue is diluted with the required amount of water. This is done so that it fits more correctly on the decoupage paper. 
Look at the photo of the battery decoupage; your picture should be glued in exactly the same way. 
We paint the top and bottom of the battery with selected shades of acrylic paint. If your artistic abilities are very developed, you can continue the image on the map. After the metal has completely dried, coat the battery with varnish, preferably more than once, leaving intervals between dryings. This master class is completely finished, look at the photo, how beautiful it turned out.
As you may have noticed, decoupage on metal, like decoupage of a battery, is a very entertaining activity. Especially when we're talking about about the transformation of interior items. Using a master class that shows the decoupage method, you can decorate not only radiators, but also furniture and doors. Watch videos showing decoupage lessons for beginners. It is not necessary to immediately take the labor-intensive option. It is enough to try this style on some small object to understand how this technique works.
Craftswomen who have used the decoupage method more than once will no longer be able to switch to other types of needlework and exchange them too. Since such a hobby can turn into a stable monthly income, which also brings pleasure. You should carefully learn the entire technique of applying a decoupage pattern and love what you do.
Video: Decoupage batteries
Comments
Related posts:
 Decoupage of a key holder: decorating objects with your own hands (photo)
 Beaded necklace: DIY weaving lessons (photos and videos)
Modern fashion rejects everything standard and familiar and gives unconditional preference to the original, new, and unusual. Therefore, now all types of needlework, things made by the hands of masters and craftswomen have become incredibly popular. This applies not only to clothing, jewelry, but also to decorative elements in the home. Such items make the interior original, unique, give it individual character, mood. How to “fit” radiators or radiators into the design? There is a simple way to decorate them beautifully - the decoupage technique.
Beauty and comfort in the interior
Not everyone can make furniture, weave a carpet, or paint a picture with their own hands. But there is a simpler and affordable way make existing products unusual and unique. This option is called decoupage. This transformation allows you to give a second life to objects that do not fit into the interior, but are still able to properly perform their functions.
Creative people find unexpected decoupage options even for familiar elements of the house, which are usually not taken into account when decorating a room; on the contrary, they try to make them invisible. This category includes heating batteries, without which it is impossible to provide heat in the house, but it is quite difficult to call them decorations.
Old cast iron batteries are especially frustrating for beauty lovers. They are quite massive and look unattractive. It is not advisable to cover them with furniture; it will block the path to warm air. Thick curtains are also not suitable for camouflage. Not only will they not allow heat to pass through, but they will also quickly become unusable.
Craftsmen have found a way to cope with this problem. Make the battery not just more attractive, but turn it into bright accent design, decoupage will help to add its zest. There are several options from which you can choose the one that suits your personal preferences and abilities.
Give the battery new look not as difficult as it might seem at first glance. Before choosing the appropriate decoupage method, you should decide:
- Will the radiator fit harmoniously into the design and successfully complement it?
- Or the battery will become one of the main elements that immediately attracts attention.
- You also need to take into account your own creative abilities so that the result is perfect.
Photo gallery: ideas for decorating radiators using decoupage technique
An unusual solution for decorating a radiator A bright pattern will enliven the interior This design will be appropriate in the kitchen When decorating, you can use individual elements A cozy fireplace Or a wine cellar in your apartment Decorating a radiator in the color of the wall Imitation of Gzhel on a radiator Piano keys for musical people The radiator can be completely covered with a pattern A can be limit ourselves to a few fragments of Khokhloma motifs
Master class on decoupage of a battery or radiator with your own hands
The simplest and most accessible type of decoupage for everyone is pasting. It doesn't require any special talent. All you need is accuracy and the ability to choose the right materials. Such work will not require much time. But the result will certainly please you and become a source of pride.
We use napkins
 For decoupage you will need napkins
- First you need to prepare the battery: wash it thoroughly using detergents. A brush will come in handy for this work, since the radiator has many hard-to-reach places.
- Then, using sandpaper, you need to clean all the places where the paint has peeled off so that the surface of the ribs becomes smooth. After this, the battery will have to be washed again.
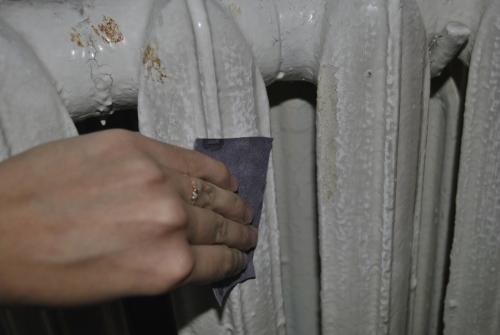 The battery must first be cleaned with sandpaper.
 - In decoupage, ready-made images printed on rice paper are most often used. You can choose the type for your battery at your discretion. But it should be taken into account that standard sizes this paper: 34*100. If such an image is used, it will not be enough to completely cover the edges. We'll have to complete the picture. Therefore, you should choose options where the top and bottom are not difficult: earth, grass, sky.
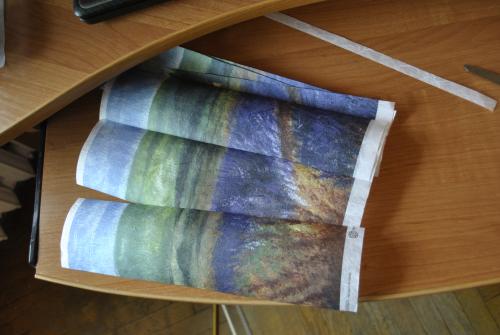 Think in advance about the design you want to apply.
 - First, the base is created using oil-based white paint. The painted battery should be left for a day to dry completely.
 After cleaning, the battery must be painted oil paint and wait until it dries completely
 - Then you need to measure the width of the section, draw and cut the design into appropriate strips. They are glued using regular PVA glue. The stripes must be carefully smoothed, removing air bubbles. When the glue has dried, you need to start completing the drawing, painting the remaining parts of the ribs, mixing paints to obtain the desired shade.
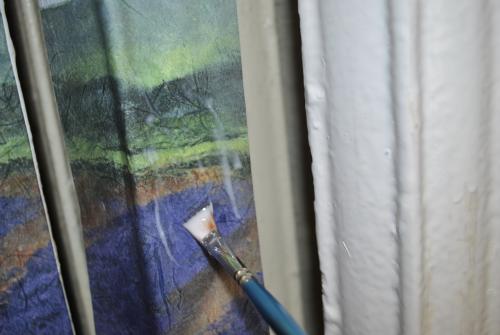 You need to glue the fragments with PVA glue
 - In order to give the decoration strength and a more attractive look, after the paint has dried, the battery is coated with heat-resistant varnish in two layers.
 After all work is completed, the battery is varnished
You can cover the radiator with ordinary multi-layer table napkins. They are offered in a large assortment, allowing you to choose any pattern. Before gluing, you need to separate the top layer from the napkins and cut them into strips of the required width. The work also uses PVA glue. You can cover the surface with decoupage varnish.
Coloring
Drawing abilities open up great opportunities in decoupage. You can bring any creative idea to life, create images of any subject on the battery. Luxurious roses or modest daisies can bloom on the sections of the radiator and “settle” ladybugs, butterflies, birds or reptiles, ethnic ornaments, ornate patterns or futuristic symbols will appear. It all depends on personal preferences and imagination.
Acrylic paints are used in this work. They are durable, resistant to external influences, dry quickly. These paints differ in density and purpose, so when purchasing them you should make sure that they are suitable for indoor work. The beauty of the applied design will last for many years. Additional coverage no varnish required.
You can also create voluminous decorations on the radiator. Craftsmen who have skills in modeling and have creative abilities should use them to decoupage the battery. On the sections you can create elements of stucco from the Renaissance or ancient times, use floral, plant, and animal motifs. In a children's room, fairy tale and cartoon characters can become excellent decorations.
This type of decoupage uses a self-hardening mass. It easily takes any shape, attaches well to metal, and has high heat resistance. The completed decorations will dry quickly. They can be decorated acrylic paints to give the necessary brightness, and then cover with a double layer of heat-resistant varnish.
Video: how to decorate and design heating radiators


